


About the Apple Ethernet CS II Card
The Apple Ethernet CS II Card expands the communication capabilities of models of Macintosh computers that have a communication slot II (CS II). The card is designed for networks that conform to the IEEE 802.3 standard for Ethernet.
There are three configurations of the Apple Ethernet CS II Card, each with a connector for a different type of Ethernet cable. These are
mtwisted pair
mthin coaxial (“coax”)
mAAUI (universal connector)
This manual provides instructions for all three configurations of the card.
You begin by installing the card and then connecting it to your network. You should also install the latest version of the Ethernet software if a disk is included with the card.
The Apple Ethernet CS II Card requires System 7.5.3 or a later version. For best performance your system should have 8 megabytes (MB) minimum of random-access memory (RAM).
What’s in the box
mOne Apple Ethernet CS II Card with either a twisted-pair connector, a thin coaxial connector (with T-connector attached), or an AAUI connector Note: Keep the card inside its antistatic bag in the protective cardboard box until you’re ready to install it.
mOne floppy disk containing Ethernet CS II software
mWarranty card
mUser’s guide
IMPORTANT If you purchased a new Macintosh and this booklet came in the box, your Apple Ethernet CS II Card and software may already be installed, and no disk containing the Ethernet CS II software is included. Skip ahead to “Installing Your Ethernet Software” for information about setting up your software.
1

Installing Your Apple Ethernet CS II Card
Note: You’ll need to obtain the specific cable for your network separately. If you are not sure which transceiver you need, see your network administrator or support person.
WARNING To avoid damage to the card and to your other computer equipment, be sure that you’ve turned off power to the computer before beginning installation procedures.
Your Apple Ethernet CS II card has one of three types of network connectors: twisted pair, coaxial, or AAUI connector. No matter which type of connector your card has, the procedure for installing your card in a Macintosh is the same. Perform the steps in the following procedure. Note that the Ethernet card illustrations may look slightly different from your Apple Ethernet CS II card.
2
1.Follow the specific setup information that came with your Macintosh to open the back panel or lid and locate the communication slot II inside the computer.
The material that comes with your Macintosh includes instructions to help you avoid damage to your computer’s components when installing the card. Be sure you’ve shut down and turned off the power to your computer before starting the installation.
2.Remove the cover from the opening for the communication slot II on the computer’s back panel.
Check the manual that came with your computer for specific instructions.
3.Remove the card from its antistatic bag.
Handle the card by its edges and avoid touching the components and connector as much as possible.

IMPORTANT If you’re installing the Apple Ethernet CS II Thin Coax Card, a T-connector is connected to your card. Before you install the card, twist the T-connector to unlock it from your card and set it aside.
4.Tilt the card to fit the connector through the back panel’s opening and hook the small metal bracket at the top of the card to the edge of the opening.
5.Align the card over the communications slot and press down firmly and evenly on both ends until the card fits snugly into place.
You can test to see if the card is properly connected by lifting the card slightly. If it resists and stays in place, it’s connected.
6.Follow the directions that came with your computer to replace the back panel or lid and reattach any cables you removed earlier.
This procedure depends on the model you have.
T-connector removed from the Thin Coax card
Metal bracket |
Handle the card by its edge. |
|
Push down evenly and firmly. |
To locate the communication slot for your computer, see the setup instructions that came with your Macintosh.
Port on the Thin Coax card
3

Connecting Your Card to the Network
To connect your card to the network, follow the instructions for your specific card. Check the illustration below to determine your card type.
|
|
|
|
|
|
|
|
|
|
|
|
|
|
|
|
|
|
|
|
|
|
|
|
|
|
|
|
|
|
|
|
|
|
|
|
|
|
|
|
|
|
|
|
|
|
|
|
|
|
|
|
|
|
|
|
|
|
|
|
|
|
|
|
|
|
|
|
|
|
|
|
|
|
|
|
|
|
|
|
|
|
|
|
|
|
|
|
|
|
|
|
CS II Thin |
CS II Twisted- |
CS II AAUI |
|||||||||
|
Coax Card |
Pair Card |
Card |
|||||||||
Refer to the following pages for instructions on how to connect your card:
mApple Ethernet CS II Twisted Pair Card: page 4
mApple Ethernet CS II Coax Card: page 5
mApple Ethernet CS II AAUI Card: page 7
4
Connecting an Apple Ethernet CS II
Twisted Pair Card
1.Plug the twisted-pair cable from your network into the RJ-45 port on your card.
Just as with a telephone wire connector, you’ll hear a “click” when you plug in the cable.
Card’s green LED lights up when there’s a good network connection.
Other end of cable connects to network controller (hub).
RJ-45 connector clicks when you attach it to the port.
2.Turn on the computer’s power switch and start up the computer.
You’ve made the hardware connections. Turn to “Installing Your Ethernet Software” later in this booklet for software installation instructions.
Connecting an Apple Ethernet CS II
Coax Card
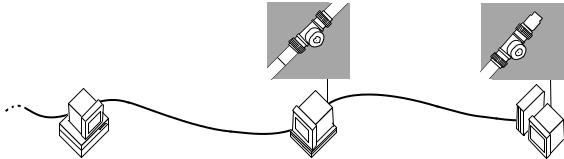
IMPORTANT Connecting your computer to the network will temporarily disrupt services to other users, so work quickly. To minimize the disruption, alert your network administrator before continuing these instructions.
1.Attach one end of the new cable for your computer to the T-connector you removed from your card.
Be sure to twist and lock the cable’s connector to your T-connector.
When you add your Thin Coax Card, you must use a T-connector in one of these two ways:
Twist to lock both cables to a T-connector in the middle of the network.
Network continues
2.On the computer closest to your computer, detach the network cable (or terminator) from the T-connector.
This disrupts network services for other users. Note: You can add a computer in the middle or at either end of the network.
3.Lock the free end of the new cable to the T-connector on the other computer.
4.If you are adding your computer somewhere in the middle of the network, lock the unattached network cable to your T-connector. Otherwise, lock a terminator to your T-connector.
This restores network services for other users.
Lock a terminator to a T-connector at 
the end of the network.
5

5.Attach your T-connector to the port on your card.
It may help to use two hands. With one hand, push the T-connector on the port. While still holding the T-connector, use the fingers on your other hand to lock the connector into place.
Pull the T-connector to test that it is locked securely to the port.
Port on card
|
The T-connector locks |
|
the network cable |
|
(and terminator, if |
|
needed) to your card. |
Cable from one |
Cable from other |
side of network |
side of network |
6.Turn on your computer’s power switch and start up the computer.
You’ve made all the necessary hardware connections. Next you’ll install and set up your network communication software. For instructions, turn to “Installing Your Ethernet Software” later in this booklet.
6
Connecting an Apple Ethernet CS II
AAUI Card
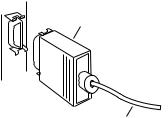
1.Plug the AAUI connector from your network transceiver cable into the AAUI port on your card.
You need a specific AAUI-compatible transceiver for the kind of media used for your network: thick coax, twisted-pair, thin coax, fiber-optic, or twisted-pair hub. The transceiver connects your computer to the main network cable.
The AAUI connector attaches to the card’s port.
The cable also connects to the appropriate AAUI-compatible transceiver for your network.
2.Turn on the computer’s power switch and start up the computer.
You’ve made all the necessary hardware connections. Next you’ll install and set up your network communication software. For instructions, turn to “Installing Your Ethernet Software” later in this booklet.
7

Installing Your Software
If you purchased a new Macintosh with an Apple Ethernet CS II card, you may already have the required software installed.
If a PCI Network Installer disk is included with your card, perform the steps in “Installing the Software,” next.
If no PCI Network Installer disk is included with your card, the latest software is already installed. Skip ahead to “Setting the Network Software Selector.”
Installing the Ethernet software
To install the latest version of Ethernet software you need to use the Installer program on the PCI Network Installer disk, included with your card.
For safety, make sure that the Installer disk is locked before you use it. To lock a disk, slide the tab on the back side so that the square hole is open.
Keep the Installer disk after installation in case you need to reinstall Ethernet software some time in the future.
Close all open applications before installing.
8
 Loading...