


R
Je Il Moon Hwa Co.
23-5, 1Ga, Pil-dong, Jung-gu,
Seoul, Korea
ALPINE ELECTRONICS, INC.
Tokyo office: 1-1-8 Nishi Gotanda,
Shinagawa-ku, Tokyo 141-8501, Japan
Tel.: (03) 3494-1101
ALPINE ELECTRONICS OF AMERICA, INC.
19145 Gramercy Place, Torrance,
California 90501, U.S.A.
Tel.: 1-800-ALPINE-1 (1-800-257-4631)
ALPINE ELECTRONICS OF CANADA, INC.
Suite 203, 7300 Warden Ave. Markham,
Ontario L3R 9Z6, Canada
Tel.: 1-800-ALPINE-1 (1-800-257-4631)
ALPINE ELECTRONICS OF AUSTRALIA PTY. LTD.
6-8 Fiveways Boulevarde Keysborough,
Victoria 3173, Australia
Tel.: (03) 9769-0000
ALPINE ELECTRONICS GmbH
Brandenburger Strasse 2-6 D-40880 Ratingen,
Germany
Tel.: 02102-45 50
ALPINE ITALIA S.p.A.
Via C. Colombo 8, 20090 Trezzano Sul
Naviglio MI, Italy
Tel.: 02-48 40 16 24
ALPINE ELECTRONICS FRANCE S.A.R.L.
(RCS PONTOISE B 338 101 280)
98, Rue De La Belle Etoile, Z.I. Paris Nord Il
B.P. 50016 F-95945, Roissy,
Charles De Gaulle Cedex, France
Tel.: 01-48 63 89 89
ALPINE ELECTRONICS OF U.K., LTD.
13 Tanners Drive, Blakelands,
Milton Keynes MK14 5BU, U.K.
Tel.: 01908-61 15 56
ALPINE ELECTRONICS DE ESPAÑA, S.A.
Portal De Gamarra 36, Pabellón 32
01013 Vitoria (Alava)-Apdo. 133, Spain
Tel.: 34-45-283588
Designed by ALPINE Japan Printed in Korea (Y)
68P11199Y28-O
R
TDA-7553E/TDA-7551E
FM/AM Cassette Receiver
∙ OWNER'S MANUAL
Please read this manual to maximize your enjoyment of the outstanding performance and feature capabilities of the equipment, then retain the manual for future reference.
PWR
IN |
D |
|

 DN
DN
A
U
D
I
O
C
O
N
T
ROL
35W × 4
MOTE S ENSOR |
EYE |
|
|
RE |
|
|
|
SOURCE |
|
|
|
A.S.U. |
|
|
|
|
L |
|
|
|
O |
|
|
|
U |
||
|
|
D |
|
|
UP |
|
|
|
|
D |
E |
|
M |
O |
|
TUNE·A. ME
|
DETACHABLE FRONT PANEL |
|
D.A.P. 1 |
MONO 2 |
3 |
F |
|
|
U |
B NR |
|
|
DEMO |
||
|
|
HEAD |
M.I.X. 4 |
RPT 5 |
SCAN 6 |
||
|
|
|
|
|
|||
|
|
|
|
B. SKIP |
|
|
|
BAND |
UP |
|
|
|
|
|
|
PROG |
LOUD |
REPEAT ALL |
M.I.X. MTL DX SEEK B.SKIP |
|
|||
T.S.M |
DISC |
|
|||||
|
TITLE |
D.A.P. R.MONI |
|
|
|
ST |
|
TITLE |
MEMORY |
|
|
|
|||
|
|
|
|
|
|
|
|
CLK |
DN |
|
|
|
|
|
MO |
|
|
|
|
|
|
||
R. MONI |
DISC·PRESET·P.S. |
CASSETTE RECEIVER 35Wx4 |
TDA-7553E |
|
|
||
(TDA-7553E)
2
Precaution English
Warning
DO NOT DISASSEMBLE OR ALTER
Attempts to disassemble or alter may lead to an accident, fire and/or electric shock.
KEEP SMALL ARTICLES OUT OF THE REACH OF CHILDREN
Store small articles (batteries, screws, etc.) in places not accessible to children. If swallowed, consult a physician immediately.
USE THE CORRECT AMPERE RATING WHEN REPLACING FUSES
Replace fuses only with fuses of the same ampere rating. Failure to do so may result in a fire and/or damage to the vehicle.
HALT USE IMMEDIATELY IF A PROBLEM APPEARS
When problems appear, stop using the system immediately and contact the dealer from whom you purchased the equipment. Some problems which may warrant immediate attention include a lack of sound, noxious odors or smoke being emitted from the unit, or foreign objects dropped inside the unit.
DO NOT OPERATE THE REMOTE CONTROL WHILE DRIVING
Do not change settings while driving. If operation requiring a prolonged view of the display is required, stop the vehicle in a safe location before attempting operation.
3
Precaution English
Caution
DO NOT BLOCK VENTS OR RADIATOR PANELS
Do not block air vents or heat discharge plates. Blocking them will cause heat to build up inside and may result in fire.
DO NOT RAISE THE VOLUME EXCESSIVELY
Keep the volume at a level where you can still hear outside noises while driving. Driving while unable to hear outside sounds could cause an accident.
DO NOT USE THIS EQUIPMENT OUTSIDE THE VEHICLE
Do not use this equipment for purposes other than those listed for a vehicle. Failure to do so may result in an electric shock or an injury.
KEEP FOREIGN OBJECTS OUT OF THE CASSETTE COMPARTMENT SLOT
Keep any foreign objects, including fingers, out of the cassette compartment slot.
STOP THE VEHICLE BEFORE CARRYING OUT ANY OPERATION THAT COULD INTERFERE WITH YOUR DRIVING
If loading or unloading a cassette interferes with your driving, stop the vehicle in a safe location before attempting operation.
DO NOT MIX NEW BATTERIES WITH OLD BATTERIES. INSERT WITH THE CORRECT BATTERY POLARITY.
When inserting the batteries, be sure to observe proper polarity (+ and –) as instructed. Rupture or chemical leakage from the battery may cause fire or personal injury.
4
Contents
English
|
|
|
|
|
|
Page |
|
|
|
|
|
|
|
|
|
|
|
|
|
3 ........................................................................... |
|
|
|
|
Precautions |
|
|
|
|||||||||||
8 ........................................................ |
|
|
|
Detachable Front Panel |
|
|
|
||||||||||||
|
|
|
|
|
|
|
|
|
|
|
|
|
|
|
|
|
|
|
|
|
|
|
|
|
|
|
|
|
|
Basic Operation |
|
|
|
|
|
|
|
|
|
10 |
|
|
|
Initial System Start-Up |
|
|
|
||||||||||||
|
|
|
|
|
|
|
|||||||||||||
|
|
|
|
|
|
|
|||||||||||||
10 ....................................................... |
|
|
|
Automatic Setup (A.S.U.) |
|
|
|
||||||||||||
|
|
|
|
|
11 ..................................................... |
|
|
|
Turning Power On and Off |
|
|
|
|
||||||
|
|
|
|
|
11 |
|
|
|
Non Fading Pre-Out (N.F.P) On and Off |
|
|
|
|
||||||
|
|
|
|
|
|
|
|
|
|
|
|
||||||||
|
|
|
|
|
|
|
|
|
|
||||||||||
12 ...................................................... |
|
|
|
Turning Loudness On/Off |
|
|
|
||||||||||||
13 .............................................. |
|
|
|
Adjusting Volume/Bass/Treble/ |
|
|
|
||||||||||||
|
|
|
|
|
|
|
|
|
|
|
Balance/Fader |
|
|
|
|||||
14 ....................................................................... |
|
|
|
|
Demonstration |
|
|
|
|||||||||||
|
|
|
|
|
|
|
|
|
|
|
|
|
|
|
|
|
|
|
|
|
|
|
|
|
|
|
|
|
|
Radio Operation |
|
|
|
|
|
|
|
|
|
15 |
|
|
|
Manual Tuning |
|
|
|
||||||||||||
|
|
|
|
|
|
|
|||||||||||||
16 .......................................................... |
|
|
|
|
Automatic Seek Tuning |
|
|
|
|||||||||||
17 .......................................................... |
|
|
|
|
Mono/Stereo Switching |
|
|
|
|||||||||||
18 ......................................... |
|
|
|
Manual Storing of Station Presets |
|
|
|
||||||||||||
19 ................................... |
|
|
|
Automatic Memory of Station Presets |
|
|
|
||||||||||||
20 ................... |
Storing into Direct Access Preset (D.A.P.) Band |
|
|
|
|||||||||||||||
21 ...................................................... |
|
|
|
Tuning to Preset Stations |
|
|
|
||||||||||||
22 ........................................................ |
|
|
|
Displaying Station Titles |
|
|
|
||||||||||||
23 ....................................................................... |
|
|
|
|
Titling Stations |
|
|
|
|||||||||||
25 ...................... |
Searching Titled Stations (Title Search Menu) |
|
|
|
|||||||||||||||
|
|
|
|
|
|
|
|
|
|
|
|
|
|
|
|
|
|
|
|
|
|
|
|
|
|
|
|
|
|
Cassette Player Operation |
|
|
|
|
|
|
|
|
|
26 |
|
|
|
Cassette |
|
|
|
|
|
||||||||||
|
|
|
Inserting/Ejecting |
|
|
|
|
|
|||||||||||
|
|
|
|
|
|
|
|
||||||||||||
27 |
|
|
|
|
|
Normal Play |
|
|
|
|
|
||||||||
|
|
|
|
|
|
|
|
|
|
||||||||||
|
|
|
|
|
|
|
|
|
|
||||||||||
28 ................ |
Dolby B NR (Noise Reduction) (TDA-7553E only) |
|
|
|
|||||||||||||||
28 ........................................................................... |
|
|
|
|
Repeat Play |
|
|
|
|||||||||||
|
|
|
|
29 |
|
|
|
Fast Forward and Rewind |
|
|
|
||||||||
|
|
|
|
|
|
|
|
|
|
|
|||||||||
|
|
|
|
29 ............................................................... |
|
|
|
|
Blank Skip (B.SKIP) |
|
|
|
|||||||
|
|
|
|
|
|
|
|
|
|
|
|
|
|||||||
|
|
|
|
...............................................................30 |
|
|
|
|
Scanning Programs |
|
|
|
|||||||
30 ..................................................................... |
|
|
|
|
Manual Reverse |
|
|
|
|||||||||||
31 ......................... |
|
|
|
Monitoring Radio During Fast Forwarding or |
|
|
|
||||||||||||
|
|
|
|
|
|
|
|
|
|
|
|
Rewinding |
|
|
|
||||
32 .......................................................... |
|
|
|
|
Program Sensor (P.S.) |
|
|
|
|||||||||||
33 .......................................................... |
|
|
|
|
CD Shuttle Operation |
|
|
|
|||||||||||
44 ................................................ |
|
|
|
Audio Processor Operation |
|
|
|
||||||||||||
45 ................................................................... |
|
|
|
|
Clock Operation |
|
|
|
|||||||||||
47 ..................................... |
|
|
|
Remote Control (TDA-7553E only) |
|
|
|
||||||||||||
50 ............................................................. |
|
|
|
|
In Case of Difficulty |
|
|
|
|||||||||||
54 ...................................................................... |
|
|
|
|
Specifications |
|
|
|
|||||||||||
5
English
Precautions
– |
1 |
2 |
3 |
F |
|
4 |
5 |
6 |
|
TDA-7553E 


Temperature
Be sure the temperature inside the vehicle is between +60°C (+140°F) and –10°C (+14°F) before turing your unit on.
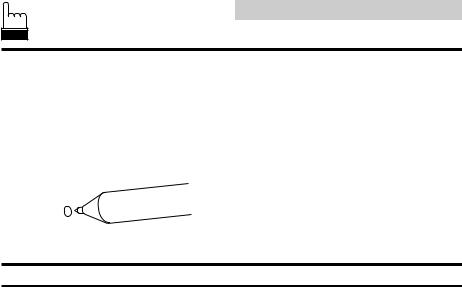
Tape Slack
Check and make sure any slack in the tape is taken up before inserting the tape into the unit. A loose tape can get caught in the mechanism and cause damage to the unit and the tape itself. Tighten the tape by inserting a pencil or a similar instrument into the spindle hole and turn until all the slack has been taken up.
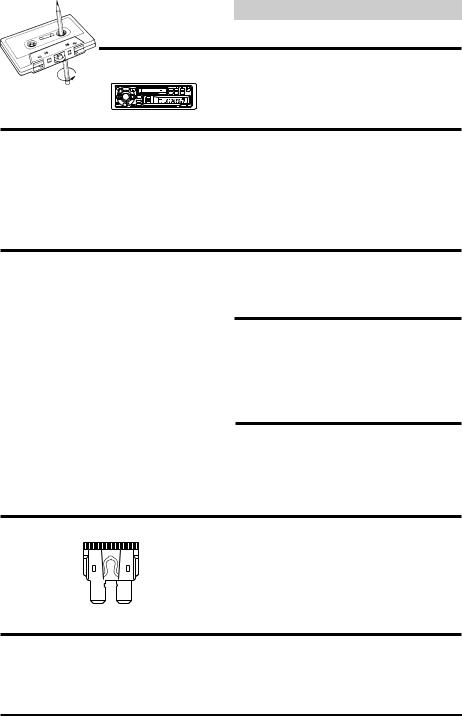
Excessively Thin Tape
C-120 type cassette tapes are not recommended for use in automobile tape players.
Precision Tape Mechanism
Prevent any foreign objects from entering the cassette opening as the precision mechanism and tape head may be damaged.
Never play dirty or dusty tapes – they can damage the tape head.
Tape Head Cleaning
Periodic cleaning (approximately every 20 hours of use) of the tape head with a wet type head-cleaning cassette tape (available at audio stores) is necessary for best performance.
Fuse Replacement
When replacing the fuse(s), the replacement must be of the same amperage as shown on the fuse holder. If the fuse blows more than once, carefully check all electrical connections for shorted circuitry. Also have your vehicle's voltage regulator checked
Maintenance
If you have problems, do not attempt to repair the unit yourself. Return it to your Alpine dealer or the nearest Alpine Service Station for
servicing.
6
English
Precautions
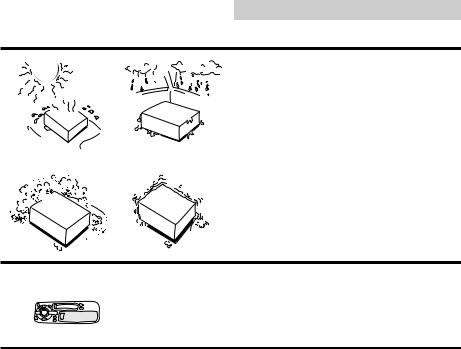
Installation Location
Make sure the TDA-7553E/TDA-7551E will not be installed in a location subjected to:
∙Direct sun and heat
∙High humidity and water
∙Excessive dust
∙Excessive vibrations
Handling the Detachable
Front Panel
∙Do not expose to rain or water.
∙Do not drop or apply shock.
7
|
|
Detachable Front English |
|
|
Panel |
|
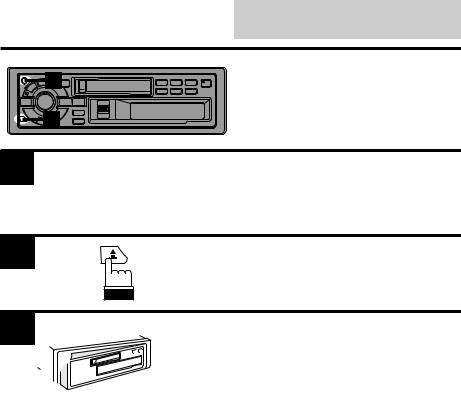
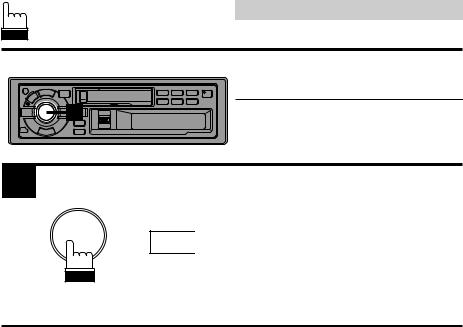
1 |
Detaching the Front |
|
|
|
|
2 |
Panel |
|
|
|
1 |
|
Press the PWR button to turn off the power. |
|
|
2
3
Press the release button until the front panel pops out.
Grasp the left side of the front panel and pull it out.
Notes: ∙ The front panel may become hot in normal usage (especially the connector terminals). This is not malfunction.
∙To protect the front panel, place it in the supplied carrying case.
8
|
|
Detachable Front English |
|
|
Panel |
|
|
|
|
|
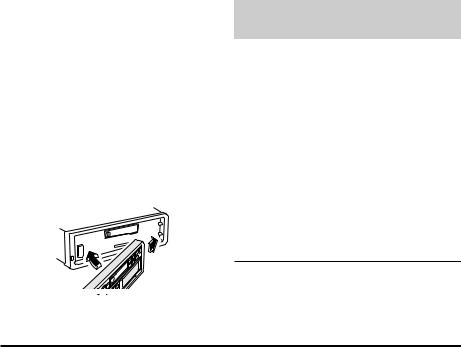
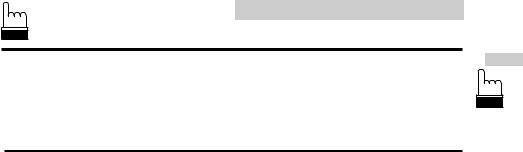
Attaching the Front |
|
|
Panel |
|
|
|
1 |
|
1. First, insert the right side of the front panel |
|
into the main unit. Align the 2 small holes on |
the front panel with the 2 projections on the main unit.
2. Push the left side of the front panel until it locks firmly into the main unit.
1
Note: Before attaching the front panel, make sure that there is no dirt or dust on the connector terminals and no foreign object between the front panel and the main unit.
9
English
Basic Operation
Initial System Start-Up
Automatic Setup (A.S.U.)
Press the PWR (POWER) button to turn on the unit.
Note: When Power is turned on for the very first time, the A.S.U. (Automatic Set-Up) function will be initiated automatically. See A.S.U. description below.
10
|
English |
|
Basic Operation |
|
Turning Power |
1 |
On and Off |
1 |
Press the PWR button to turn on the unit. |
Note: The unit can be turned on by pressing |
|
|
any other button except the eject c and |
|
CLK buttons. |
|
PWR |
|
The volume level gradually increases to the |
|
previous level you were listening to before the |
|
unit was turned off. Press the PWR button |
|
again to turn off the unit. |
|
Non Fading Pre-Out |
1 |
(N.F.P.) On and Off |
|
1
NFP OFF
NFP ON
Press and hold the Eject button for at least 3 seconds.
With each press, N.F.P. is toggled On or Off.
N.F.P. ON: In this position, the Front PreOutput on the TDA-7553E or Rear Output on the TDA-7551E will not be affected by the fader. This is ideal for driving a subwoofer amplifier.
N.F.P. OFF: Returns to normal fader mode.
Notes:
∙Initial mode is "NFP OFF."
∙Set the N.F.P. to OFF unless the subwoofer is used.
∙If an optional Processor with subwoofer output is connected via the Ai-NET bus, this button will turn that output ON or OFF.
11
|
|
English |
|
|
Basic Operation |
|
|
Turning Loudness On/Off |
1 |
|
Loudness introduces a special lowand high- |
|
|
frequency emphasis at low listening levels to |
|
|
compensate for the ear's decreased sensitivity |
|
|
to bass and treble sound. |
1 |
|
Press and hold the AUDIO CONTROL button |
|
for at least 2 seconds to activate or deactivate |
|
|
|
the loudness mode. The display shows "LOUD" |
|
|
when the loudness mode is activated. |
|
LOUD |
Note: When an optional Alpine Audio Proces- |
|
|
|
|
|
sor (Equalizer or Divider) is connected |
|
|
to the unit the Loudness mode is not |
|
|
functional. |
12
English
Basic Operation
Adjusting
Volume/Bass/Treble/
13
English
Basic Operation
|
|
|
|
|
|
|
|
|
|
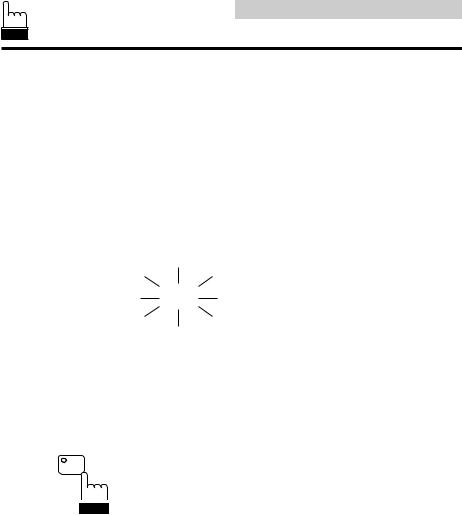
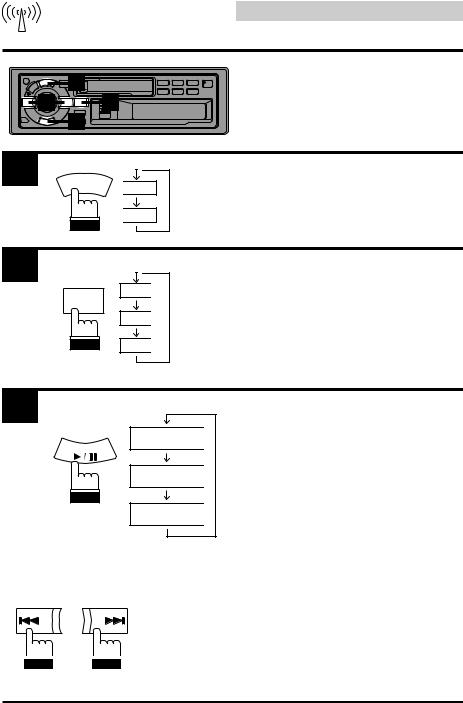
Demonstration |
|
|
|
|
|
|
|
|
|
|
In the Demonstration (DEMO) mode, the unit |
|
|
|
|
|
|
|
|
|
|
scans each source; tuner, cassette tape and |
|
|
|
|
|
|
|
|
|
|
CD. |
|
|
|
|
|
|
|
|
|
|
|
1 |
|
|
|
|
|
|
|
|
|
Press and hold the DEMO button for at least 3 |
|
|
|
|
|
|
|
|
|
seconds to activate the DEMO mode. |
|
|
|
|
|
|
|
|
|
|
|
"DEMO" blinks in the display. |
|
|
|
|
|
|
|
|
|
|
The unit automatically performs the following |
|
|
|
|
|
|
|
|
|
|
scanning operation. |
|
|
|
|
|
|
|
|
|
|
1. The unit automatically selects the Tuner |
|
|
|
|
|
|
|
|
|
|
mode and begins scanning the presets. It will |
|
|
|
|
|
|
|
|
|
|
play 10 seconds of each preset station on |
|
|
|
|
|
|
|
|
|
|
bands FM1 and AM. |
|
|
|
|
|
|
|
|
|
|
2. The unit then switches to Tape mode. It will |
|
|
|
|
|
|
|
|
|
|
|
|
|
|
|
|
|
|
|
|
|
scan the first 10 seconds of each selection |
|
|
|
|
|
|
|
|
DEMO |
|
|
|
|
|
|
|
|
|
|
|
on the currently loaded cassette, starting |
|
|
|
|
|
|
|
|
|
|
|
|
|
|
|
|
|
|
|
|
|
|
from the first. |
|
|
|
|
|
|
|
|
|
|
|
|
|
|
|
|
|
|
|
|
|
|
|
|
|
|
|
|
|
|
|
|
3. If a CD Shuttle is connected, the unit will go |
|
|
|
|
|
|
|
|
|
|
into the CD mode. It will play the first 10 |
|
|
|
|
|
|
|
|
|
|
seconds of each track starting with track one |
|
|
|
|
|
|
|
|
|
|
of the first disc. |
|
|
|
|
|
|
|
|
|
|
4. The unit continues scanning of the sources |
|
|
|
|
|
|
|
|
|
|
as described in 1 to 3 above. |
|
|
|
|
|
|
|
|
|
|
|
2 |
|
|
|
|
|
|
|
|
|
To end the DEMO mode, press the DEMO |
F |
|
|
|
|
|
button. |
||||
|
|
|
|
|
||||||
|
|
|
|
|
|
"DEMO" disappears from the display. |
||||
|
DEMO |
|
|
|
|
|
||||
|
|
|
|
|
|
|
||||
|
|
|
|
|
|
|
|
|
|
|
|
|
|
|
|
|
|
|
|
|
|
|
|
|
|
|
|
|
|
|
|
|
|
|
|
|
|
|
|
|
|
|
|
|
|
|
|
|
|
|
|
|
|
|
14
English
|
|
Radio Operation |
|
1 |
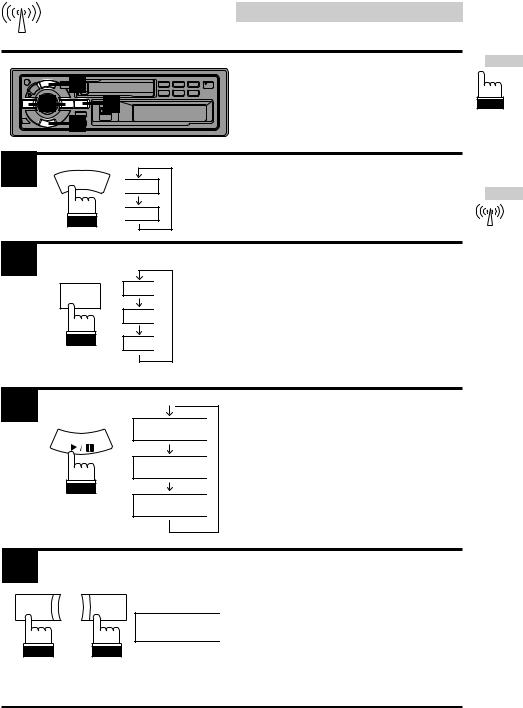
Manual Tuning |
4 |
2 |
|
|
3 |
|
1 |
SOURCE |
90.10 |
|
A.S.U. |
|
|
|
TAPE |
Press the SOURCE button until radio frequency appears in the display.
2
BAND |
F 1 |
PROG |
|
F 2 |
AM |
Press the BAND button repeatedly until the desired radio band is displayed.
3
DX SEEK
TUNE·A. ME
SEEK
Press the TUNE button repeatedly until "DX SEEK" and "SEEK" disappears from the display.
Note: The initial mode is DX SEEK.
(OFF)
4

 DN UP
DN UP 

F1 90.10
Press the DN or UP button to move downward or upward one step respectively until the desired station frequency is displayed.
15
|
|
English |
|
|
Radio Operation |
|
1 |
Automatic Seek Tuning |
4 |
2 |
|
|
3 |
|
1 |
SOURCE |
90.10 |
|
A.S.U. |
TAPE |
Press the SOURCE button until radio frequency appears in the display.
2
F 1
BAND
PROG
F 2 |
AM |
Press the BAND button repeatedly until the desired radio band is displayed.
3
DX-SEEK
TUNE·A. ME
SEEK
Press the TUNE button to illuminate the DX and
SEEK indicators in the display.
With the DX mode activated, both strong and weak stations will be tuned in the Auto-Seek operation.
Press again to return to the local mode. The DX indicator will turn off and the SEEK indicator will remain illuminated. Now, only strong stations will be tuned.
4 |
|
|
|
|
|
|
Press the DN or UP button to automatically |
|
|
|
|
|
|
|
seek a station downward or upward |
||
|
|
|
|
|
|
|
|
respectively. |
|
|
DN |
|
UP |
|
The unit will stop on the next station it finds. |
||
|
|
|
|
Press the same button again to seek next |
||||
|
|
|
||||||
|
|
|
|
|
|
|
|
|
|
|
|
|
|
|
F1 90.10 |
|
station. |
|
|
|
|
|
|
|
|
|
|
|
|
|
|
|
|
|
|
|
|
|
|
|
|
|
|
|
16
English
Radio Operation


 2
2 


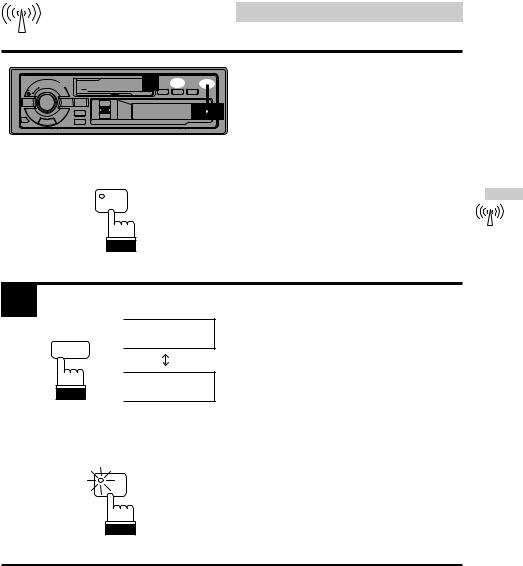
1  3 Mono/Stereo Switching
1 |
Press the "F" button. The function indicator on |
the button will turn off. |
F
2
F1 90.10 ST
MONO 2
F1 90.10 MO
"ST" indicator appears when a stereo station is tuned in.
Press the MONO button to switch from stereo to monaural FM reception. This will help in reducing the noise of weak FM Stereo broadcasts. In the monaural mode, the MO indicator appears. Press the MONO button again to return to the stereo mode.
3 |
Press the "F" button to activate the normal |
mode. The function indicator will illuminate. |
F
17
 Loading...