


Drying Tumblers
Refer to Page 3 for Model Numbers
NOTA: El manual en |
|
español aparece después |
T433I |
del manual en inglés. |
T477C |
|
T478C
Keep These Instructions for Future Reference.
(If this machine changes ownership, this manual must accompany machine.)
|
|
|
www.comlaundry.com |
Part No. M414462R1 |
|
|
|
||
|
|
|
March 2001 |
Operation/Maintenance/Programming

In the U.S.A., installation must conform to the latest edition of the American National Standard Z223.1 “National Fuel Gas Code” and Standard ANSI/NFPA 70 “National Electric Code”.
In Canada, installation must comply with Standards CAN1-B149.1 or CAN1-B149.2 codes for gas burning appliances and equipment and CSA C22.1, latest edition, Canadian Electric Code, Part I.
In Australia, installation must comply with the Australian Gas Association Installation Code for Gas Burning Appliances and Equipment.
WARNING
FOR YOUR SAFETY, the information in this manual must be followed to minimize the risk of fire or explosion or to prevent property damage, personal injury or death.
W033
•Do not store or use gasoline or other flammable vapors and liquids in the vicinity of this or any other appliance.
•WHAT TO DO IF YOU SMELL GAS:
–Do not try to light any appliance.
–Do not touch any electrical switch; do not use any phone in your building.
–Clear the room, building or area of all occupants.
–Immediately call your gas supplier from a neighbor’s phone. Follow the gas supplier’s instructions.
–If you cannot reach your gas supplier, call the fire department.
•Installation and service must be performed by a qualified installer, service agency or the gas supplier.
W052
FOR YOUR SAFETY
Do not store or use gasoline or other flammable vapors and liquids in the vicinity of this or any other appliance.
W053
MISE EN GARDE
POUR VOTRE SÉCURITÉ il est impératif de suivre les instructions de ce manuel pour minimiser les risques d’incendie ou d’explosion et pour éviter les dommages matériels, les blessures corporelles ou la mort.
W033Q
•Ne pas entreposer ni utiliser d’essence ni d’autres vapeurs ou liquides inflammables dans le voisinage de cet appareil ou de tout autre appareil.
•QUE FAIRE SI VOUS SENTEZ UNE ODEUR DE GAZ :
–Ne pas tenter d’allumer d’apareil.
–Ne touchez à aucun interrupteur. Ne pas vous servir des téléphones se trouvant dans le bâtiment où vous vous trouvez.
–Évacuez la pièce, le bâtiment ou la zone.
–Appelez immédiatement votre fournisseur de gaz depuis un voisin. Suivez les instructions du fournisseur.
–Si vous ne pouvez rejoindre le fournisseur de gaz, appelez le service des incendies.
•L’installation et l’entretien doivent être assurés par un installateur ou un service d’entretien qualifié ou par le fournisseur de gaz.
W052Q
POUR VOTRE SÉCURITÉ
Ne pas entreposer ni utiliser d’essence ni d’autres vapeurs ou liquides inflammables dans le voisinage de cet appareil ou de tout autre appareil.
W053Q
IMPORTANT: Information must be obtained from a local gas supplier on instructions to be followed if the user smells gas. These instructions must be posted in a prominent location.
Step-by-step instructions of the above safety information must be posted in a prominent location near the tumbler for customer use.
M414462 |
© Copyright, Alliance Laundry Systems LLC – DO NOT COPY or TRANSMIT |
1 |
|
Table of
Contents
Introduction......................................................................................... |
3 |
Model Identification ............................................................................. |
3 |
Customer Service.................................................................................. |
4 |
Wiring Diagram .................................................................................... |
4 |
Nameplate Location.............................................................................. |
5 |
Safety Information.............................................................................. |
7 |
Important Safety Instructions ............................................................... |
8 |
Operating Instructions ....................................................................... |
11 |
Step 1: Clean Lint Screen/Compartment .............................................. |
11 |
Step 2: Load Laundry ........................................................................... |
11 |
Step 3: Determine Required Temperature ............................................ |
11 |
Step 4: Determine Control Type........................................................... |
11 |
Manual Timer Tumblers .................................................................. |
12 |
Electro-Mechanical Coin Control Tumbler ..................................... |
13 |
NetMaster Coin Control................................................................... |
14 |
NetMaster Card Control................................................................... |
15 |
Electronic OPL Control ................................................................... |
16 |
Electronic Coin Control ................................................................... |
17 |
Reversing Operation ........................................................................ |
18 |
Reverse Control Switch ................................................................... |
18 |
Programming the Electronic OPL Control...................................... |
19 |
Signal .................................................................................................... |
20 |
Reversing .............................................................................................. |
20 |
Status Lights ......................................................................................... |
20 |
Automatic Dry and Condition Mode .................................................... |
21 |
Time Dry and No Heat Modes.............................................................. |
22 |
Custom.................................................................................................. |
23 |
Custom Cycle Record ..................................................................... |
23 |
Special Cycle Mode.............................................................................. |
24 |
Special Time Mode............................................................................... |
24 |
Security Lock-Out ................................................................................ |
24 |
Show Mode........................................................................................... |
24 |
Temperature Sensor .............................................................................. |
25 |
Temperature Adjustment ...................................................................... |
25 |
Temperature Display (°F/°C)................................................................ |
25 |
Cylinder Temperature Display ............................................................. |
25 |
Maintenance ........................................................................................ |
27 |
Daily ..................................................................................................... |
27 |
Monthly................................................................................................. |
28 |
Every Three Months ............................................................................. |
29 |
Every Six Months ................................................................................. |
29 |
Before You Call for Service ............................................................... |
31 |
© Copyright 2001, Alliance Laundry Systems LLC
All rights reserved. No part of the contents of this book may be reproduced or transmitted in any form or by any means without the expressed written consent of the publisher.
2 |
© Copyright, Alliance Laundry Systems LLC – DO NOT COPY or TRANSMIT |
M414462 |
|
Introduction
Model Identification
Information in this manual is applicable to these models: †
|
|
Gas |
|
Steam |
Electric/Other |
||
|
|
|
|
|
|
|
|
|
DT0220SFG |
DT0220SRG |
DT0220SSH |
DT0220SSL |
DT0220SEL |
DC0220SEL |
|
|
JT0220SFG |
JT0220SRG |
JT0220SSH |
JT0220SSL |
JT0220SEL |
JC0220SEL |
|
25 Pound |
ST0220SFG |
ST0220SRG |
ST0220SSH |
ST0220SSL |
ST0220SEL |
SC0220SEL |
|
(220 Liter) |
DC0220SFG |
DC0220SRG |
DC0220SSL |
JC0220SSL |
|
|
|
|
JC0220SFG |
JC0220SRG |
SC0220SSL |
|
|
|
|
|
SC0220SFG |
SC0220SRG |
|
|
|
|
|
|
|
|
|
|
|
|
|
|
DT0300DFG |
DT0300DRG |
DT0300DSH |
DT0300DSL |
DT0300DEL |
DC0300DEL |
|
Stacked |
JT0300DFG |
JT0300DRG |
JT0300DSH |
JT0300DSL |
JT0300DEL |
JC0300DEL |
|
ST0300DFG |
ST0300DRG |
ST0300DSH |
ST0300DSL |
ST0300DEL |
SC0300DEL |
||
30 Pound |
|||||||
DC0300DFG |
DC0300DRG |
DC0300DSL |
JC0300DSL |
|
|
||
(300 Liter) |
|
|
|||||
|
JC0300DFG |
JC0300DRG |
SC0300DSL |
|
|
|
|
|
SC0300DFG |
SC0300DRG |
|
|
|
|
|
|
NT0300DRG |
|
|
|
|
|
|
|
|
|
|
|
|
|
|
|
DT0270SFG |
DT0270SRG |
DT0270SSH |
DT0270SSL |
DT0270SEL |
DC0270SEL |
|
|
JT0270SFG |
JT0270SRG |
JT0270SSH |
ST0270SSL |
JT0270SEL |
JC0270SEL |
|
30 Pound |
ST0270SFG |
ST0270SRG |
ST0270SSH |
DC0270SSL |
ST0270SEL |
SC0270SEL |
|
(270 Liter) |
DC0270SFG |
DC0270SRG |
JC0270SSL |
SC0270SSL |
|
|
|
|
JC0270SFG |
JC0270SRG |
JT0270SSL |
|
|
|
|
|
SC0270SFG |
SC0270SRG |
|
|
|
|
|
|
|
|
|
|
|
|
|
|
DT0350SFG |
JT0350SRG |
DT0350SSH |
JT0350SSL |
DT0350SEL |
DC0350SEL |
|
|
JT0350SFG |
ST0350SRG |
JT0350SSH |
ST0350SSL |
JT0350SEL |
JC0350SEL |
|
35 Pound |
ST0350SFG |
DC0350SRG |
ST0350SSH |
DC0350SSL |
ST0350SEL |
SC0350SEL |
|
DC0350SFG |
JC0350SRG |
DT0350SSL |
JC0350SSL |
|
|
||
(350 Liter) |
|
|
|||||
JC0350SFG |
SC0350SRG |
SC0350SSL |
AT0350SSL |
|
|
||
|
|
|
|||||
|
SC0350SFG |
AT0350SRG |
|
|
|
|
|
|
|
|
|
|
|||
|
DT0350SRG |
|
|
|
|
|
|
|
|
|
|
|
|
|
|
† Includes models with MT, EC, OM, CD, RM, EP, CX, CY, EX, EY, NX, NY, ZC, ZR, ZX, ZY, NC and NR control suffixes.
M414462 |
© Copyright, Alliance Laundry Systems LLC – DO NOT COPY or TRANSMIT |
3 |
Introduction
Information in this manual is applicable to these models: †
|
|
Gas |
|
Steam |
Electric/Other |
||
|
|
|
|
|
|
|
|
|
ATB50CG |
DTB50EG |
STB50CSH |
STB50CSL |
STB50CE |
JCB50CE |
|
|
STB50CG |
JTB50EG |
JTB50CSH |
JTB50CSL |
JTB50CE |
SCB50CE |
|
|
|||||||
|
DTB50CG |
JT50EG |
DTB50CSH |
DTB50CSL |
DTB50CE |
JC50CE |
|
|
JTB50CG |
JC50EG |
JT50CSH |
JT50CSL |
JT50CE |
DCB50CE |
|
50 Pound |
JT50CG |
JCB50EG |
JCB50CSH |
SCB50CSH |
SC50CE |
SCB50AT |
|
JC50CG |
SC50EG |
JC50CSH |
DCB50CSH |
|
|
||
|
|
|
|||||
|
JCB50CG |
SCB50EG |
ATB50CSH |
|
|
|
|
|
SC50CG |
DCB50CG |
|
|
|
|
|
|
SCB50CG |
DCB50EG |
|
|
|
|
|
|
STB50EG |
|
|
|
|
|
|
|
|
|
|
|
|
|
|
|
STB75CG |
DTB75EG |
STB75CSH |
JTB75CSL |
STB75CE |
JCB75CE |
|
|
DTB75CG |
JTB75EG |
JTB75CSH |
DTB75CSL |
JTB75CE |
SCB75CE |
|
75 Pound |
JTB75CG |
JT75EG |
DTB75CSH |
JT75CSL |
DTB75CE |
ST75CE |
|
ATB75CG |
STB634 |
JT75CSH |
DCB75CSH |
JT75CE |
JC75CE |
||
|
JT75CG |
DCB75CG |
ATB75CSH |
JCB75CSH |
DCB75CE |
SC75CE |
|
|
|||||||
|
DTB634 |
JCB75CG |
STB75CSL |
SCB75CSH |
|
|
|
|
|
|
|||||
|
STB75EG |
SCB75CG |
SCB75CSL |
JCB75CSL |
|
|
|
|
|
|
DCB75CSL |
|
|
|
|
|
|
|
|
|
|
|
|
|
ST120FG |
JC120FG |
ST120CSH |
JC120CSH |
ST120AT |
SC120AT |
|
120 Pound |
JT120FG |
DC120FG |
JT120CSH |
DC120CSH |
|
|
|
DT120FG |
AT120FG |
DT120CSH |
AT120CSH |
|
|
||
|
|
|
|||||
|
SC120FG |
|
SC120CSH |
|
|
|
|
|
|
|
|
|
|||
|
|
|
|
|
|
|
|
|
ST170FG |
SC170FG |
ST170CSH |
SC170CSH |
|
|
|
170 Pound |
JT170FG |
AT170FG |
JT170CSH |
AT170CSH |
Not Applicable |
||
JC170FG |
DT170FG |
JC170CSH |
DT170CSH |
||||
|
|
|
|||||
|
DC170FG |
|
DC170CSH |
|
|
|
|
|
|
|
|
|
|
|
|
† Includes models with MT, EC, OM, CD, RM, EP, CX, CY, EX, EY, NX, NY, ZC, ZR, ZX, ZY, NC and NR control suffixes.
Customer Service
If literature or replacement parts are required, contact the source from whom the machine was purchased or contact Alliance Laundry Systems at (920) 748-3950 for the name and address of the nearest authorized parts distributor.
For technical assistance, call (920) 748-3121.
Wiring Diagram
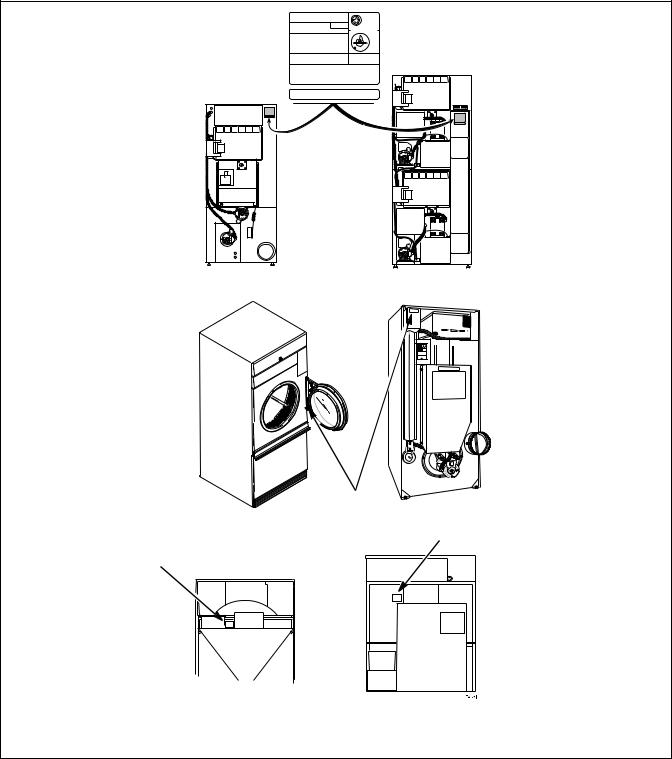
The wiring diagram is located in the literature packet supplied with all the non-European models. On European models, it is located in the junction box.
The wiring diagram is inside the electrical junction boxes located on the back of 0300D models, or under the front control panel on 0220S, 0270S, and 0350S models.
4 |
© Copyright, Alliance Laundry Systems LLC – DO NOT COPY or TRANSMIT |
M414462 |
Introduction
Nameplate Location
When calling or writing for information about your product, be sure to mention model and serial numbers. Model and serial numbers are located on the nameplate as shown. The model number may also be found inside the door.
|
|
|
|
|
ANS 72152 |
|
|
|
|
|
CLOTHES DRYER. |
MODEL NO: |
|
|
|
VOL II |
|
|
|
|
|
||
SERIAL NO: |
|
|
TESTED FOR NATURAL & |
||
|
|
LIQUID PETROLEUM GASSES |
|||
|
V-/ |
HERTZ/ |
PHASE |
|
CGA 72 |
|
AMPS, |
WIRES + GROUND |
|
|
|
TOTAL kW, |
MOTOR kW |
|
|
||
REQ'D CIRCUIT BREAKER: |
AMPS |
|
|
||
FAN OUTPUT: |
|
|
|
|
|
@MAX |
"WC STATIC PRESSURE |
|
|
||
EQUIPPED FOR: |
GAS@ |
"WC MANIFOLD PRESS. |
|||
MIN SUPPLY |
"WC. |
MAX SUPPLY |
"WC. |
|
|
PRESSURE: |
PRESSURE: |
|
|
||
INPUT: |
BTU/hr @ |
BTU/cu.ft. |
|
|
|
MADE IN U.S.A./FABRIQUE AU ETATS UNIS/FABRICADO EN LOS ESTADOS UNIDOS |
70051001 |
||||
MODEL NO: |
|
|
|
|
|
SERIAL NO: |
|
|
|
|
|
|
|
|
|
|
T448I |
0220S, 0270S, 0350S |
|
|
|
|
0300D |
1 T453I
50 AND 75 POUND TUMBLERS
1
1
120 POUND TUMBLER |
170 POUND TUMBLER |
1 Nameplate
Figure 1
M414462 |
© Copyright, Alliance Laundry Systems LLC – DO NOT COPY or TRANSMIT |
5 |

Notes
6 |
© Copyright, Alliance Laundry Systems LLC – DO NOT COPY or TRANSMIT |
M414462 |

Safety Information
Precautionary statements (“CAUTION,” “WARNING,” and “DANGER”), followed by specific instructions, are found in this manual and on machine decals. These precautions are intended for the personal safety of the operator, user, servicer, and those maintaining the machine.
DANGER
DANGER indicates the presence of a hazard that will cause severe personal injury, death, or substantial property damage if the danger is ignored.
WARNING
WARNING indicates the presence of a hazard that can cause severe personal injury, death, or substantial property damage if the warning is ignored.
CAUTION
CAUTION indicates the presence of a hazard that will or can cause minor personal injury or property damage if the caution is ignored.
Additional precautionary statements (“IMPORTANT” and “NOTE”) are followed by specific instructions.
IMPORTANT: The word “IMPORTANT” is used to inform the reader of specific procedures where minor machine damage will occur if the procedure is not followed.
NOTE: The word “NOTE” is used to communicate installation, operation, maintenance or servicing information that is important but not hazard related.
IMPORTANT: Warranty is void unless drying tumbler is installed according to instructions in this manual. Compliance with minimum specifications and requirements detailed herein, and with applicable local gas fitting regulations, municipal building codes, water supply regulations, electrical wiring regulations, and any other relevant statutory regulations. Because of varied requirements, applicable local codes should be thoroughly understood and all pre-installation work arranged for accordingly.
WARNING
Failure to install, maintain, and/or operate this machine according to manufacturer’s instructions may result in conditions which can produce serious injury, death and/or property damage.
W051
NOTE: The WARNING and IMPORTANT instructions appearing in this manual are not meant to cover all possible conditions and situations that may occur. It must be understood that common sense, caution and carefulness are factors which CANNOT be built into this tumbler. These factors MUST BE supplied by the person(s) installing, maintaining or operating the tumbler.
Always contact your dealer, distributor, service agent or the manufacturer on any problems or conditions you do not understand.
M414462 |
© Copyright, Alliance Laundry Systems LLC – DO NOT COPY or TRANSMIT |
7 |

Safety Information
Important Safety Instructions
WARNING
To reduce the risk of fire, electric shock, serious injury or death to persons when using your tumbler, follow these basic precautions:
W054
1.Read all instructions before using the tumbler.
2.Refer to the GROUNDING INSTRUCTIONS for the proper grounding of the tumbler.
3.Do not dry articles that have been previously cleaned in, washed in, soaked in, or spotted with gasoline, dry cleaning solvents, or other flammable or explosive substances as they give off vapors that could ignite or explode.
4.Do not allow children to play on or in the tumbler. Close supervision of children is necessary when the tumbler is used near children. This is a safety rule for all appliances.
5.Before the tumbler is removed from service or discarded, remove the door to the drying compartment and the door to the lint compartment.
6.Do not reach into the tumbler if the cylinder is revolving.
7.Do not install or store the tumbler where it will be exposed to water and/or weather.
8.Do not tamper with the controls.
9.Do not repair or replace any part of the tumbler, or attempt any servicing unless specifically recommended in the User-Maintenance instructions or in published user-repair instructions that you understand and have the skills to carry out.
10.Do not use fabric softeners or products to eliminate static unless recommended by the manufacturer of the fabric softener or product.
11.To reduce the risk of fire, DO NOT DRY plastics or articles containing foam rubber or similarly textured rubberlike materials.
12.Always clean the lint filter daily.
13.Keep area around the exhaust opening and adjacent surrounding area free from the accumulation of lint, dust, and dirt.
14.The interior of the tumbler and the exhaust duct should be cleaned periodically by qualified service personnel.
15.If not installed, operated and maintained in accordance with the manufacturer’s instructions or if there is damage to or mishandling of this product’s components, use of this product could expose you to substances in the fuel or from fuel combustion which can cause death or serious illness and which are known to the State of California to cause cancer, birth defects or other reproductive harm.
16.Tumbler will not operate with the loading door open. DO NOT bypass the door safety switch to permit the tumbler to operate with the door open. The tumbler will stop tumbling when the door is opened. Do not use the dryer if it does not stop tumbling when the door is opened or starts tumbling without pressing or turning the START mechanism. Remove the tumbler from use and call the service person.
17.Tumbler will not operate with lint panel open. DO NOT bypass lint panel safety switch to permit the tumbler to operate with the lint panel open.
18.Do not put articles soiled with vegetable or cooking oil in the tumbler, as these oils may not be removed during washing. Due to the remaining oil, the fabric may catch on fire by itself.
19.To reduce the risk of fire, DO NOT put clothes which have traces of any flammable substances such as machine oil, flammable chemicals, thinner, etc. or anything containing wax or chemicals such as in mops and cleaning cloths, or anything dry-cleaned at home with dry-cleaning solvent in the tumbler.
20.Use the tumbler only for its intended purpose, drying water-washed fabrics.
21.ALWAYS disconnect the electrical power to the tumbler before servicing. Disconnect power by shutting off appropriate breaker or fuse.
22.Install this tumbler according to these INSTALLATION INSTRUCTIONS. All connections for electrical power, grounding, and gas supply must comply with local codes and be made by licensed personnel when required. Do not do it yourself unless you know how!
8 |
© Copyright, Alliance Laundry Systems LLC – DO NOT COPY or TRANSMIT |
M414462 |
23.Remove laundry immediately after tumbler stops.
24.Always read and follow manufacturer’s instructions on packages of laundry and cleaning aids. Heed all warnings or precautions. To reduce the risk of poisoning or chemical burns, keep them out of reach of children at all times (preferably in a locked cabinet).
25.Do not tumble fiberglass curtains and draperies unless the label says it can be done. If they are dried, wipe out the cylinder with a damp cloth to remove particles of fiberglass.
26.Always follow the fabric care instructions supplied by the garment manufacturer.
27.Never operate the tumbler with any guards and/or panels removed.
Safety Information
28.DO NOT operate the tumbler with missing or broken parts.
29.DO NOT by-pass any safety devices.
WARNING
To reduce the risk of serious injury, install lockable door(s) to prevent public access to rear of tumblers.
W055
This machine is intended for commercial use.
IMPORTANT: Solvent vapors from dry-cleaning machines create acids when drawn through the heater of the drying unit. These acids are corrosive to the tumbler as well as to the laundry load being dried. Be sure make-up air is free of solvent vapors.
M414462 |
© Copyright, Alliance Laundry Systems LLC – DO NOT COPY or TRANSMIT |
9 |

Notes
10 |
© Copyright, Alliance Laundry Systems LLC – DO NOT COPY or TRANSMIT |
M414462 |

Operating Instructions
WARNING
To reduce the risk of fire:
•DO NOT DRY articles containing foam rubber or similarly textured rubberlike materials.
•DO NOT DRY plastics, anything containing wax or chemicals such as mops and cleaning cloths, or anything dry-cleaned at home with a dry-cleaning solvent.
•DO NOT TUMBLE fiberglass curtains and draperies unless the label says it can be done. If they are dried, wipe out the cylinder with a damp cloth to remove particles of fiberglass.
W076
To reduce the risk of serious injury, open tumbler door and allow cylinder to stop before cleaning lint screen. Do not operate without lint panel in place.
W077
Step 1: Clean Lint Screen/
Compartment
Remove any accumulated lint from the lint screen and compartment. Close panel tightly against tumbler frame and lock panel securely.
CAUTION
Clean lint screen and lint compartment daily. Failure to clean the lint screen daily will result in higher than normal temperatures that may damage laundry.
W331
WARNING
To reduce the risk of serious injury, open tumbler door and allow cylinder to stop before cleaning lint screen. Do not operate without lint panel in place.
W077
Step 2: Load Laundry
Open tumbler door and load cylinder with laundry. DO NOT OVERLOAD.
NOTE: Overloading causes slow drying and wrinkling.
Close cylinder door. Tumbler will not operate with the door open.
Step 3: Determine Required
Temperature
The type of fabric being dried will determine the setting. Consult the fabric-care label or fabric manufacturer to determine proper temperature setting.
IMPORTANT: ALWAYS FOLLOW THE FABRIC CARE INSTRUCTIONS SUPPLIED BY THE GARMENT MANUFACTURER.
Step 4: Determine Control Type
Refer to the following pages and use the appropriate instructions for the control type.
Stacked Tumblers Only: Use the correct coin slot and control panel for the top or bottom cylinder.
M414462 |
© Copyright, Alliance Laundry Systems LLC – DO NOT COPY or TRANSMIT |
11 |
Operating Instructions
1 |
0 |
|
2 |
0 |
|
|
|
|
|
|
|
60 |
10 |
|
15 |
|
|
|
|
|
|
|
|
|
|
|
|
|
|
|
||
50 |
|
|
|
5 |
|
HIGH |
LOW |
COOLING |
DRYING |
|
|
|
20 |
|
COOL |
COTTON |
PERM |
|
|
|
|
|
|
HEAT |
|
|
PRESS |
|
50 |
|
||
|
|
|
|
|
|
|
|
|||
|
40 |
30 |
|
10 |
DOWN |
|
MEDIUM |
10 |
|
|
|
|
|
|
|
|
40 |
60 |
|||
|
|
|
|
|
|
|
15 |
|||
|
|
|
|
|
|
|
MIXED |
|||
|
|
|
|
|
|
|
|
|
|
|
|
|
|
|
|
|
TEMPERATURE |
0 |
|
0 |
|
|
|
|
|
|
|
|
|
|
||
|
|
|
|
HIGH |
LOW |
|
|
|
30 |
10 |
|
|
|
|
|
|
|
|
|
|
|
|
|
|
|
|
|
|
|
5 |
20 |
|
|
|
|
PUSH |
|
|
PUSH TO START |
|
|
|
|
|
|
|
TO |
|
|
|
|
|
|
|
|
4 |
|
START |
3 |
|
|
|
|
|
|
|
|
|
|
|
|
TMB47N |
50/75 POUND TUMBLERS |
TMB48N |
||
|
|
25, 30 AND 35 POUND TUMBLERS |
|
|
||||||
|
|
|
|
|
|
|
||||
|
|
|
LOAD |
LOW AIR |
PUSH |
COOLING |
DRYING |
|
|
|
|
|
|
READY |
FLOW |
TO |
|
50 |
|
|
|
|
|
|
|
|
|
START |
|
|
|
|
|
|
|
|
|
|
|
|
|
|
|
|
|
|
|
|
|
|
10 |
40 |
60 |
|
|
|
|
|
|
|
|
15 |
|
||
|
|
|
HIGH |
LOW |
|
|
0 |
|
0 |
|
|
|
|
190 |
130 |
|
|
|
|
||
|
|
|
|
|
|
|
|
|
||
|
|
|
|
|
|
|
|
30 |
|
|
|
|
|
MEDIUM |
NON |
REV |
|
|
|
10 |
|
|
|
|
160 |
REV |
|
|
5 |
20 |
|
|
|
|
|
|
|
|
|
|
|||
|
|
|
TEMPERATURE |
|
|
|
|
|
|
|
|
|
|
|
|
120 AND 170 POUND TUMBLERS |
|
TMB49N |
|
||
|
|
|
|
|
|
|
|
|||
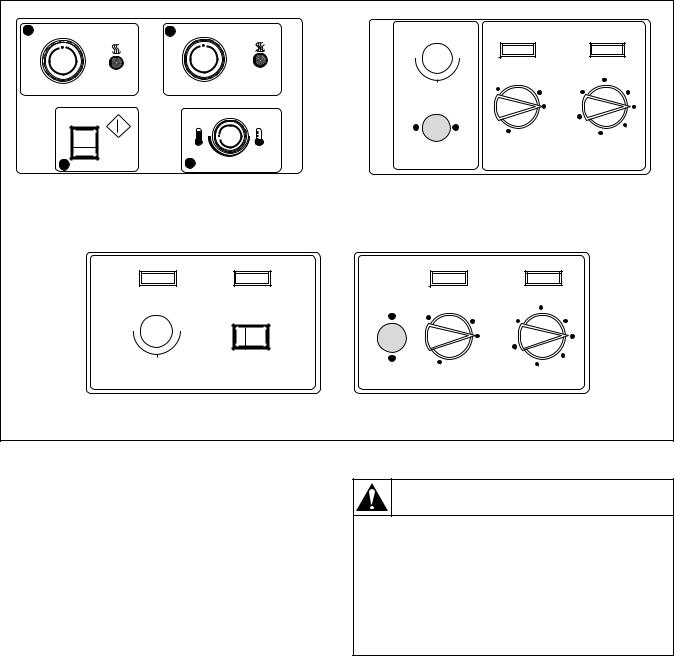
Figure 2
Manual Timer Tumblers
1.Set the TEMPERATURE selector at HIGH, MEDIUM, LOW or anywhere between these settings.
2.Set the HEAT/DRYING timer for the number of minutes (from 0-60) desired.
3.Set the COOL DOWN/COOLING timer for the number of minutes (from 0-15) desired.
4.Press the PUSH TO START button in and hold it in for approximately three seconds. This starts the tumbler cycle.
IMPORTANT: If the cylinder is opened during the cycle, the heating system will shut off and the motor will stop. To restart the cycle, door must be closed and the PUSH TO START button must be pressed in.
WARNING
To reduce the risk of bodily injury, the tumbler stops tumbling when the door is opened. Do not use the tumbler if it does not stop tumbling when the door is opened or starts tumbling without pressing the START pad. Remove the tumbler from use and call for service.
W078
5.When the cycle is complete, open door and remove the laundry
12 |
© Copyright, Alliance Laundry Systems LLC – DO NOT COPY or TRANSMIT |
M414462 |
|
Operating Instructions |
|
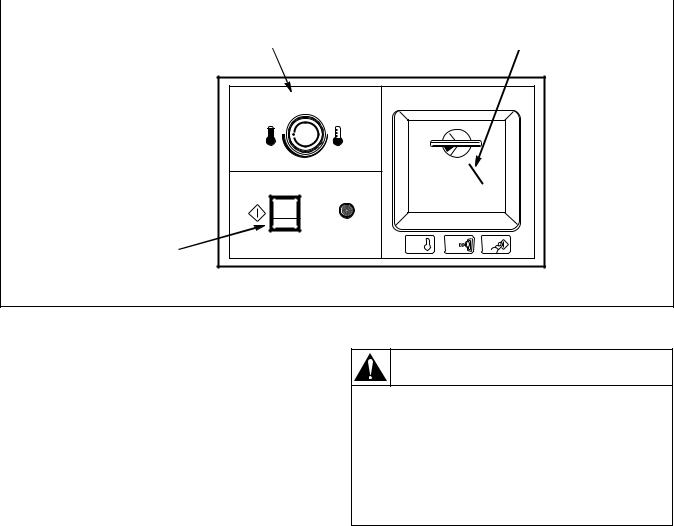
|
TEMPERATURE SELECTOR |
SINGLE AND DUAL COIN |
METER COIN SLOT AND KNOB |
PUSH TO START
BUTTON
TEMPERATURE |
|
|
|
|
|
|
|
HIGH |
LOW |
|
|
|
|
|
|
|
INSERT QUARTER |
|
|
|
|
||
|
TURN KNOB |
|
|
|
|
||
|
Q |
|
25 |
|
|
|
R |
|
U |
A |
|
|
|
E |
|
|
|
|
|
T |
|
||
|
|
|
S |
|
|
||
|
PUSH |
|
RTERMA |
|
|
|
|
|
TO |
|
|
|
|
|
|
|
START |
|
|
|
|
|
|
|
1 |
|
2 |
|
|
|
3 |
|
SELECT |
|
INSERT |
|
|
|
PUSH |
|
TEMP |
|
COIN |
|
|
|
START |
T366I
Figure 3
Electro-Mechanical Coin Control Tumbler
1.Set the TEMPERATURE selector at HIGH or LOW, or anywhere between these settings.
2.Coin Drop Models: Insert the coin(s) in the coin slot, turn the knob to the right and release it. Coin Slide Models: Insert the required number of coins in the coin slide. Push coin slide in completely and then release it.
3.Press the PUSH TO START button and hold it for approximately three (3) seconds.
IMPORTANT: If the cylinder door is opened during the cycle, the heating system will shut off and the motor will stop. However, the timer will continue to run. To restart the cycle, the door must be closed and the PUSH TO START button must be pressed in.
WARNING
To reduce the risk of bodily injury, the tumbler stops tumbling when the door is opened. Do not use the tumbler if it does not stop tumbling when the door is opened or starts tumbling without pressing the START pad. Remove the tumbler from use and call for service.
W078
4.When the cycle is complete, open door and remove the laundry.
M414462 |
© Copyright, Alliance Laundry Systems LLC – DO NOT COPY or TRANSMIT |
13 |

Operating Instructions
C851I
C851I
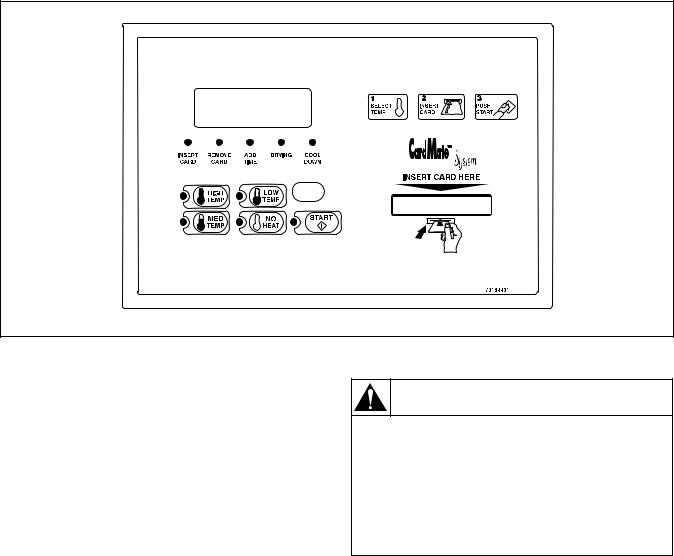
Figure 4
NetMaster Coin Control
1.Select HIGH TEMP, MED TEMP, LOW TEMP, or NO HEAT by pressing the appropriate temperature pad.
2.Insert the coin(s) in the coin slot.
3.Press START pad to start tumbler.
To stop the tumbler at any time during the cycle, OPEN DOOR. To restart the tumbler, CLOSE door and press START pad.
WARNING
To reduce the risk of bodily injury, the tumbler stops tumbling when the door is opened. Do not use the tumbler if it does not stop tumbling when the door is opened or starts tumbling without pressing the START pad. Remove the tumbler from use and call for service.
W078
4.When the cycle is complete, open door and remove the laundry.
14 |
© Copyright, Alliance Laundry Systems LLC – DO NOT COPY or TRANSMIT |
M414462 |
Operating Instructions
C852I
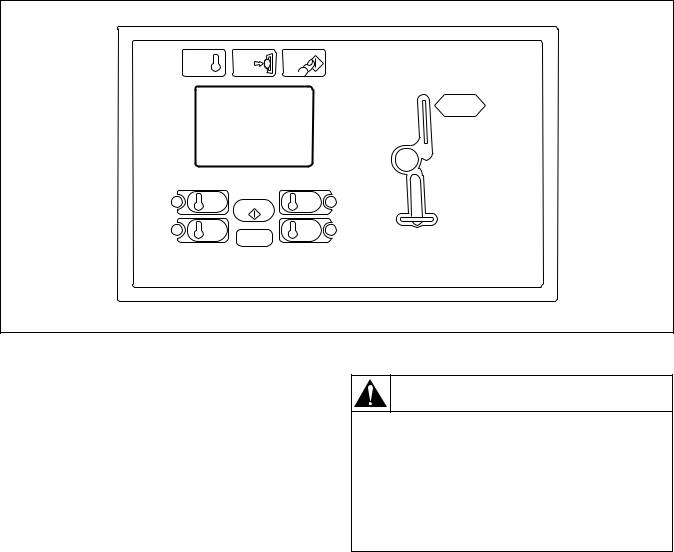
Figure 5
NetMaster Card Control
1.Select HIGH TEMP, MED TEMP, LOW TEMP, or NO HEAT by pressing the appropriate temperature pad.
2.Insert card into opening. DO NOT remove the card until “REMOVE CARD” LED is lit.
3.Press START pad to start tumbler.
To stop the tumbler at any time during the cycle, OPEN DOOR. To restart the tumbler, CLOSE door and press START pad.
WARNING
To reduce the risk of bodily injury, the tumbler stops tumbling when the door is opened. Do not use the tumbler if it does not stop tumbling when the door is opened or starts tumbling without pressing the START pad. Remove the tumbler from use and call for service.
W078
4.When the cycle is complete, open door and remove the laundry.
M414462 |
© Copyright, Alliance Laundry Systems LLC – DO NOT COPY or TRANSMIT |
15 |
Operating Instructions
ON / SELECT |
|
STATUS |
PROGRAM |
|
HIGH |
START |
DRYING |
AUTO |
TIME |
|
|
|
||
|
|
|
AUTO |
|
MEDIUM |
STOP/RESET |
COOL DOWN |
SPECIAL |
SPECIAL |
CYCLE |
TIME |
|||
MED LOW |
TEMP |
DOOR OPEN |
*TEMPAUTO |
COOL |
|
DISPLAY |
|
|
*DOWN |
|
F/ C |
|
|
|
LOW |
SIGNAL |
CUSTOM |
MORE |
LESS |
|
|
|
+ |
-- |
NO HEAT |
REVERSING |
|
CONDITION |
SAVE |
|
|
|
CUSTOM |
|
|
|
|
|
PROG |
T359I
T359I
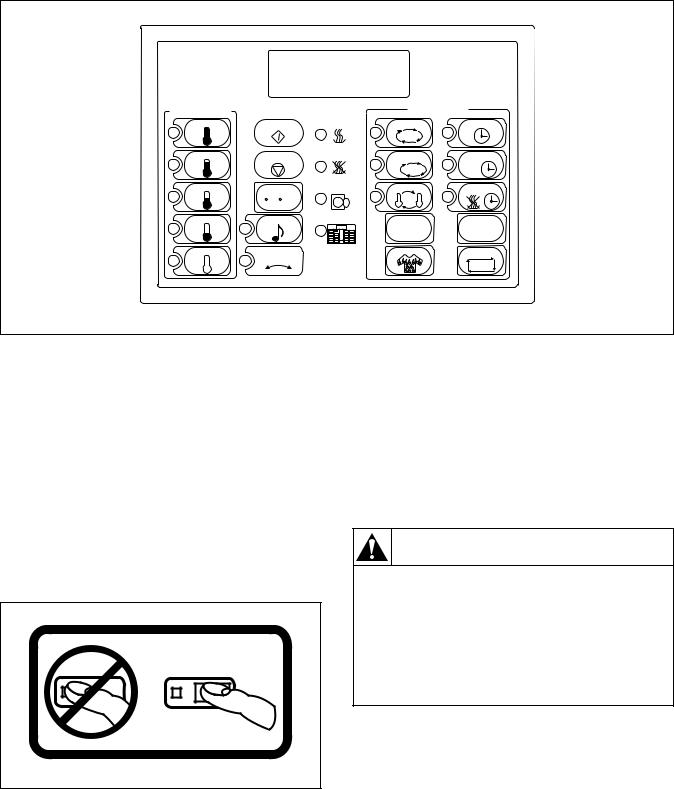
Figure 6
Electronic OPL Control
1.To use an Automatic Cycle, press an ON/ SELECT pad. Select HIGH, MEDIUM, MED LOW, LOW or NO HEAT for items that
should not be dried with heat. A light to the left of the selected pad lights up.
To use a Time Dry or Custom Cycle, refer to section Programming the Electronic OPL Control.
NOTE: Do not press directly on lights or the center of pad. For proper selection, press on pad slightly to the right of center. Refer to Figure 7.
2. Press START pad to start tumbler.
NOTE: All pads can be pressed in any sequence without damaging control or tumbler. To stop the tumbler at any time, open the door or press STOP/ RESET. The window display will flash. Press STOP/RESET twice (within 3 seconds) to end the cycle and reset the control to idle status. To restart the tumbler, CLOSE door and press START pad.
WARNING
To reduce the risk of bodily injury, the tumbler stops tumbling when the door is opened. Do not use the tumbler if it does not stop tumbling when the door is opened or starts tumbling without pressing the START pad. Remove the tumbler from use and call for service.
W078
3.When the cycle is complete, open door and remove the laundry.
T306I
Figure 7
16 |
© Copyright, Alliance Laundry Systems LLC – DO NOT COPY or TRANSMIT |
M414462 |
Operating Instructions
1 |
2 |
3 |
SELECT |
INSERT |
PUSH |
TEMP |
COIN |
START |
25C
HIGH |
START |
LOW |
TEMP |
TEMP |
|
MED |
|
NO |
TEMP |
|
HEAT |
T361I
T361I
Figure 8
Electronic Coin Control
1.Select HIGH TEMP, MED TEMP, LOW TEMP, or NO HEAT by pressing the appropriate temperature pad.
2.Insert the coin(s) in the coin slot.
3.Press START pad to start tumbler.
To stop the tumbler at any time during the cycle, OPEN DOOR. To restart the tumbler, CLOSE door and press START pad.
WARNING
To reduce the risk of bodily injury, the tumbler stops tumbling when the door is opened. Do not use the tumbler if it does not stop tumbling when the door is opened or starts tumbling without pressing the START pad. Remove the tumbler from use and call for service.
W078
4.When the cycle is complete, open door and remove the laundry.
M414462 |
© Copyright, Alliance Laundry Systems LLC – DO NOT COPY or TRANSMIT |
17 |
Operating Instructions
Reversing Operation
Tumblers with the reversing options are equipped with a second motor and additional controls to reverse the direction of the cylinder rotation. This prevents the tangling of large pieces and minimizes wrinkling.
Reverse Control Switch
A simple “on-off” switch is placed in the control panel area so the operator can select the reversing or nonreversing operation. The switch is wired into the reverse control time circuit so the cylinder will always turn clockwise (as viewed from the front of the dryer) when the reverse control switch is actuated for “nonreversing” operation. If the cylinder is turning in the wrong direction when the switch is actuated, it will continue for a few seconds and then start up in the proper direction.
IMPORTANT: After any electrical maintenance is done, make sure that the blower motor is turning clockwise as viewed from the front of the 0350S, 50, and 75 pound tumblers and counterclockwise on the 634, 120 and 170 pound tumblers. Then set the reverse control switch to “non-reversing” and note that the cylinder turns constantly clockwise as viewed from the front of the tumbler. If not, interchange L1 and L2 power leads to the reverse drive motor.
18 |
© Copyright, Alliance Laundry Systems LLC – DO NOT COPY or TRANSMIT |
M414462 |
Programming the Electronic OPL Control
One pre-programmed  NO HEAT cycle
Four pre-programmed Automatic Dry heat cycles
All of these cycles |
|
They may be |
|
They may be |
may be used as |
OR |
modified for one |
OR |
modified and |
pre-programmed |
cycle without |
saved in the |
||
from the factory . . . |
|
being saved in |
|
memory as one of |
|
|
the memory . . . |
|
five CUSTOM |
|
|
|
|
CYCLES. |
ON / SELECT |
|
STATUS |
PROGRAM |
|
HIGH |
START |
DRYING |
AUTO |
TIME |
|
|
|
||
|
|
|
AUTO |
|
MEDIUM |
STOP/RESET |
COOL DOWN |
SPECIAL |
SPECIAL |
CYCLE |
TIME |
|||
MED LOW |
TEMP |
DOOR OPEN |
*TEMPAUTO |
COOL |
|
DISPLAY |
|
|
*DOWN |
|
F/ C |
|
|
|
LOW |
SIGNAL |
CUSTOM |
MORE |
LESS |
|
|
|
+ |
-- |
NO HEAT |
REVERSING |
|
CONDITION |
SAVE |
|
|
|
CUSTOM |
|
|
|
|
|
PROG |
T359I
NOTE: Not all tumblers will have reversing option.
Figure 9
Drying can be done automatically or by time dry. When drying automatically, the tumbler stops drying when laundry reaches the factory set or programmed dryness level and starts cool down. When time drying, the tumbler stops drying when programmed time ends and starts cool down.
Both automatic and time dry have factory-set cycles, but other cycles can also be created. Frequently used cycles can be saved in the control’s memory as Custom cycles.
In all cycles, except No Heat, Wrinkle-Free begins when Cool Down ends. During Wrinkle-Free, the tumbler alternately stops for 2-1/2 minutes and then runs without heat for 2-1/2 minutes until door is opened or 60 minutes has elapsed.
The HIGH, MEDIUM, MED LOW, and LOW ON/ SELECT pads may be saved in one of four ways as a custom heat cycle, refer to Table 1.
|
Custom Cycles |
|
|
|
|
Automatic Dry |
|
Dries the load to one of eleven user- |
|
|
selectable dryness levels for a given |
|
|
fabric type, and then enters automatic |
|
|
or user-variable cool down. |
|
|
|
Time Dry |
|
Duplicates the functions of |
|
|
electromechanical dual timer |
|
|
controls, allowing the user to vary |
|
|
temperature, drying time and cool |
|
|
down time. |
|
|
|
Special Cycle |
|
Allows the user to specify the |
|
|
number of heating cycles and to |
|
|
select from the full range of |
|
|
temperatures for all heat cycles. |
|
|
|
Special Time |
|
Similar to Time Dry, except that the |
|
|
user may specify from 80°F (27°C) |
|
|
to 180°F (82°C) for any heat cycle. |
|
|
|
|
|
Table 1 |
M414462 |
© Copyright, Alliance Laundry Systems LLC – DO NOT COPY or TRANSMIT |
19 |
 Loading...