


 Loading...
Washer-Extractor
Cabinet Freestanding
HX, SX and UX OPL Models
Refer to Page 8 for Model Numbers
CFS462N
|
|
|
www.comlaundry.com |
Part No. 9001900 |
|
|
|
||
|
|
|
December 2005 |
Service
Table of Contents
Section 1 – Safety Information |
|
|
General Safety Precautions ..................................... |
3 |
|
Important Safety Instructions .................................. |
4 |
|
Locating an Authorized Servicer ............................ |
6 |
|
Section 2 – Introduction |
|
|
Customer Service .................................................... |
7 |
|
Model Identification ................................................ |
8 |
|
Section 3 – Troubleshooting |
|
|
1. |
WE-8 Control Has No Visible Display (P and |
|
|
N-Voltage Models) ........................................ |
10 |
2. |
WE-8 Control Has No Visible Display (Q and |
|
|
X-Voltage Models) ........................................ |
14 |
3. |
No Fill Analysis ............................................. |
18 |
4. |
Water Runs Continuously into the Washer- |
|
|
Extractor ......................................................... |
22 |
5. |
Door Lock Switch Analysis: Display Shows |
|
|
“Door Error” .................................................. |
26 |
6. |
Door Lock Switch Analysis: Display Reads |
|
|
“Please Close Door” ....................................... |
30 |
7. |
Door Lock Switch Analysis: “Door Won’t |
|
|
Unlock” .......................................................... |
34 |
8. |
No Output Voltage to Components ................ |
38 |
9. |
No Motor Operation With No AC |
|
|
Drive Fault ..................................................... |
42 |
10. |
No Motor Operation With AC Drive Fault .... |
46 |
11. |
The Motor is Running, But at an Abnormal |
|
|
Speed .............................................................. |
50 |
|
Preliminary Checks: ..................................... |
50 |
|
Secondary Checks: ....................................... |
50 |
|
Calibration of the Machine........................... |
50 |
12. |
No Spin .......................................................... |
51 |
13. |
Machine Did Not Fill Alarm Analysis ........... |
52 |
14. |
Empty Alarm Analysis ................................... |
56 |
15. |
Automatic Supply Dispenser Analysis .......... |
60 |
16. |
No Keypad Board Functions .......................... |
62 |
17. |
Excessive Cycle Time .................................... |
63 |
18. |
Excessive Vibration and/or Noise |
|
|
During Spin .................................................... |
64 |
Section 4 – Service Procedures |
|
|
19. |
Top Cover Removal and Replacement .......... |
65 |
20. |
Keypad Removal and Installation .................. |
65 |
21. |
Computer Board Removal and Installation |
...66 |
22. |
Keymode Switch Removal and Installation |
...69 |
23. |
AC Drive Switch Removal and Installation |
..70 |
24. |
Rear Panel Removal and Replacement .......... |
71 |
25. |
Side Panel Removal and Installation ............. |
71 |
26. |
Drive Belt Removal and Replacement ........... |
72 |
27. |
Water Valve Removal and Replacement ....... |
73 |
28. |
Drain Valve .................................................... |
74 |
29. |
Door Gasket Removal and Replacement ....... |
74 |
30.Motor Removal and Replacement (18, 25, 35, 55 and 75-Pound Capacity
Models) .......................................................... |
75 |
31.Motor Removal and Replacement
(100, 135 and 165-Pound Capacity Models) .76
© Copyright 2005, Alliance Laundry Systems LLC
All rights reserved. No part of the contents of this book may be reproduced or transmitted in any form or by any means without the expressed written consent of the publisher.
9001900 |
© Copyright, Alliance Laundry Systems LLC – DO NOT COPY or TRANSMIT |
1 |
2 |
© Copyright, Alliance Laundry Systems LLC – DO NOT COPY or TRANSMIT |
9001900 |

Section 1
Safety Information
Throughout this manual and on machine decals, you will find precautionary statements (“CAUTION,” “WARNING,” and “DANGER”) followed by specific instructions. These precautions are intended for the personal safety of the operator, user, servicer and those maintaining the machine.
a DANGER
Indicates an imminently hazardous situation that, if not avoided, will cause severe personal injury or death.
a WARNING
Indicates a hazardous situation that, if not avoided, could cause severe personal injury or death.
a CAUTION
Indicates a hazardous situation that, if not avoided, may cause minor or moderate personal injury or property damage.
Additional precautionary statements (“IMPORTANT” and “NOTE”) are followed by specific instructions.
IMPORTANT
The word “IMPORTANT” is used to inform the reader of specific procedures where minor machine damage will occur if the procedure is not followed.
NOTE
The word “NOTE” is used to communicate installation, operation, maintenance or servicing information that is important but not hazard related.
General Safety Precautions
In the interest of safety, some general precautions relating to the operation of this machine follow.
WARNING
•Failure to install, maintain and/or operate this product according to the manufacturer’s instructions may result in conditions which can produce serious injury, death and/or property damage.
•Do not repair or replace any part of the product or attempt any servicing unless specifically recommended or published in this Service Manual and unless you understand and have the skills to carry out the servicing.
•Whenever ground wires are removed during servicing, these ground wires must be reconnected to ensure that the product is properly grounded and to reduce the risk of fire, electric shock, serious injury or death.
W006R2
(continued)
9001900 |
© Copyright, Alliance Laundry Systems LLC – DO NOT COPY or TRANSMIT |
3 |
Section 1 Safety Information
WARNING
To reduce the risk of electric shock, fire, explosion, serious injury or death:
•Disconnect electric power to the washer-extractor before servicing.
•Never start the washer-extractor with any guards/panels removed.
•Whenever ground wires are removed during servicing, these ground wires must be reconnected to ensure that the washer-extractor is properly grounded.
W460
WARNING
Repairs that are made to your products by unqualified persons can result in hazards due to improper assembly or adjustments subjecting you or the inexperienced person making such repairs to the risk of serious injury, electrical shock or death.
W007
WARNING
If you or an unqualified person perform service on your product, you must assume the responsibility for any personal injury or property damage which may result. The manufacturer will not be responsible for any injury or property damage arising from improper service and/or service procedures.
W008
Always contact your dealer, distributor, service agent or the manufacturer about any problems or conditions you do not understand.
Important Safety Instructions
WARNING
To reduce the risk of fire, electric shock, serious injury or death to persons when using your washer, follow these basic precautions:
W023E
1.Read all instructions before using the washer-extractor.
2.Refer to the GROUNDING INSTRUCTIONS in the INSTALLATION manual (supplied with your washerextractor) for the proper grounding of the washer-extractor.
3.Do not wash textiles that have been previously cleaned in, washed in, soaked in or spotted with gasoline, drycleaning solvents or other flammable or explosive substances. They give off vapors that could ignite or explode.
4.Do not add gasoline, dry-cleaning solvents or other flammable or explosive substances to the wash water. These substances give off vapors that could ignite or explode.
5.Under certain conditions, hydrogen gas may be produced in a hot water system that has not been used for two weeks or more. HYDROGEN GAS IS EXPLOSIVE. If the hot water system has not been used for such a period, before using a washer-extractor, turn on all hot water faucets and let the water flow from each for several minutes. This will release any accumulated hydrogen gas. The gas is flammable. Do not smoke or use an open flame during this time.
4 |
© Copyright, Alliance Laundry Systems LLC – DO NOT COPY or TRANSMIT |
9001900 |
Section 1 Safety Information
6.Do not allow children to play on or in a washer-extractor. Close supervision of children is necessary when the washer-extractor is used near children.
7.Before the washer-extractor is removed from service or discarded, remove the door to the washing compartment.
8.Do not reach into the washer-extractor if the wash basket is moving.
9.Do not install or store the washer-extractor where it will be exposed to water and/or weather.
10.Do not tamper with the washer-extractor’s controls.
11.Do not repair or replace any part of the washer-extractor or attempt any servicing unless specifically recommended in the user-maintenance instructions or in published user-repair instructions that the user understands and has the skills to carry out.
12.To reduce the risk of an electrical shock or fire, DO NOT use an extension cord or an adapter to connect the washer-extractor to an electrical power source.
13.Use the washer-extractor only for its intended purpose, washing clothes.
14.ALWAYS disconnect the washer-extractor from its electrical supply before attempting any service.
15.Install the washer-extractor according to the INSTALLATION INSTRUCTIONS. All connections for water, drain, electrical power and grounding must comply with local codes and, when required, be made by licensed personnel.
16.To reduce the risk of fire, textiles which have traces of any flammable substances such as vegetable oil, cooking oil, machine oil, flammable chemicals, thinner, etc. or anything containing wax or chemicals such as in mops or cleaning cloths, must not be put into the washer-extractor. These flammable substances may cause the fabric to ignite.
17.Do not use fabric softeners or products to eliminate static unless recommended by the manufacturer of the fabric softener or product.
18.Keep the washer-extractor in good condition. Bumping or dropping the washer-extractor can damage its safety features. If this occurs, have the washer-extractor checked by a qualified service person.
19.Replace worn power cords and/or loose plugs.
20.Be sure that water connections have a shut-off valve and that fill hose connections are tight. CLOSE the shutoff valves at the end of each wash day.
21.The loading door MUST BE CLOSED any time the washer-extractor is to fill, tumble or spin. DO NOT bypass the loading door switch and permit the washer-extractor to operate with the loading door open.
22.Always read and follow the manufacturer’s instructions on packages of laundry and cleaning aids. Heed all warnings and precautions. To reduce the risk of poisoning or chemical burns, keep them out of the reach of children at all times (preferably in a locked cabinet).
23.Always follow the fabric care instructions supplied by the textile manufacturer.
24.Never operate the washer-extractor with any guards and/or panels removed.
25.DO NOT operate the washer-extractor with missing or broken parts.
26.DO NOT by-pass any safety devices.
27.Failure to install, maintain and/or operate this washer-extractor according to the manufacturer's instructions may result in conditions that can produce bodily injury and/or property damage.
NOTE: The WARNING and IMPORTANT SAFETY INSTRUCTIONS appearing in this manual are not meant to cover all possible conditions and situations that may occur. Common sense, caution and care must be exercised when installing, maintaining and operating the washer-extractor.
Any problems or conditions not understood should be reported to the dealer, distributor, service agent or the manufacturer.
9001900 |
© Copyright, Alliance Laundry Systems LLC – DO NOT COPY or TRANSMIT |
5 |
Section 1 Safety Information
Locating an Authorized Servicer
Alliance Laundry Systems is not responsible for personal injury or property damage resulting from improper service. Review all service information before beginning repairs.
Warranty service must be performed by an authorized technician, using authorized factory parts. If service is required after the warranty expires, Alliance Laundry Systems also recommends contacting an authorized technician and using authorized factory parts.
6 |
© Copyright, Alliance Laundry Systems LLC – DO NOT COPY or TRANSMIT |
9001900 |
Section 2
Introduction
Customer Service
Alliance Laundry Systems is not responsible for personal injury or property damage resulting from improper service. Review all service information before beginning repairs.
If literature or replacement parts are required, contact the source from whom the machine was purchased or contact Alliance Laundry Systems at (920) 748-3950 for the name of the nearest authorized parts distributor.
For technical assistance, call (920) 748-3121.
9001900 |
© Copyright, Alliance Laundry Systems LLC – DO NOT COPY or TRANSMIT |
7 |
Section 2 Introduction
Model Identification
Information in this manual is applicable to these washer-extractors.
HX18PVQM6 |
HX75PVQU6 |
SX35PVQU6 |
UX18PVPA6 |
UX25PVXM6 |
UX75PVNU6 |
HX18PVQU6 |
HX100PVNU6 |
SX35PVXM6 |
UX18PVPU6 |
UX25PVXU6 |
UX75PVPU6 |
HX18PVXM6 |
HX100PVQU6 |
SX35PVXU6 |
UX18PVQA6 |
UX35PVNA6 |
UX75PVQU6 |
HX18PVXU6 |
HX135PVNU6 |
SX55PVNU6 |
UX18PVQM6 |
UX35PVNU6 |
UX100PVNU6 |
HX25PVQM6 |
HX135PVQU6 |
SX55PVQU6 |
UX18PVQU6 |
UX35PVPA6 |
UX100PVPU6 |
HX25PVQU6 |
HX165PVNU6 |
SX55PVXU6 |
UX18PVXA6 |
UX35PVPU6 |
UX100PVQU6 |
HX25PVXM6 |
HX165PVQU6 |
SX75PVNU6 |
UX18PVXM6 |
UX35PVQA6 |
UX135PVNU6 |
HX25PVXU6 |
SX18PVQM6 |
SX75PVQU6 |
UX18PVXU6 |
UX35PVQM6 |
UX135PVPU6 |
HX35PVQM6 |
SX18PVQU6 |
SX100PVNU6 |
UX25PVNA6 |
UX35PVQU6 |
UX135PVQU6 |
HX35PVQU6 |
SX18PVXM6 |
SX100PVQU6 |
UX25PVNU6 |
UX35PVXA6 |
UX165PVNU6 |
HX35PVXM6 |
SX18PVXU6 |
SX135PVNU6 |
UX25PVPA6 |
UX35PVXM6 |
UX165PVPU6 |
HX35PVXU6 |
SX25PVQM6 |
SX135PVQU6 |
UX25PVPU6 |
UX35PVXU6 |
UX165PVQU6 |
HX55PVNU6 |
SX25PVQU6 |
SX165PVNU6 |
UX25PVQA6 |
UX55PVNU6 |
|
HX55PVQU6 |
SX25PVXM6 |
SX165PVQU6 |
UX25PVQM6 |
UX55PVPU6 |
|
HX55PVXU6 |
SX25PVXU6 |
UX18PVNA6 |
UX25PVQU6 |
UX55PVQU6 |
|
HX75PVNU6 |
SX35PVQM6 |
UX18PVNU6 |
UX25PVXA6 |
UX55PVXU6 |
|
8 |
© Copyright, Alliance Laundry Systems LLC – DO NOT COPY or TRANSMIT |
9001900 |
Section 3
Troubleshooting
WARNING
To reduce the risk of electrical shock, fire, explosion, serious injury or death:
•Disconnect electrical power to the washer-extractor before servicing it.
•Close the gas shut-off valve to the washer-extractor (when applicable) before servicing it.
•Never start the washer-extractor with any guards/panels removed.
•Whenever ground wires are removed during servicing, these ground wires must be reconnected to ensure that the washer-extractor is properly grounded.
W461R1
9001900 |
© Copyright, Alliance Laundry Systems LLC – DO NOT COPY or TRANSMIT |
9 |
Section 3 Troubleshooting
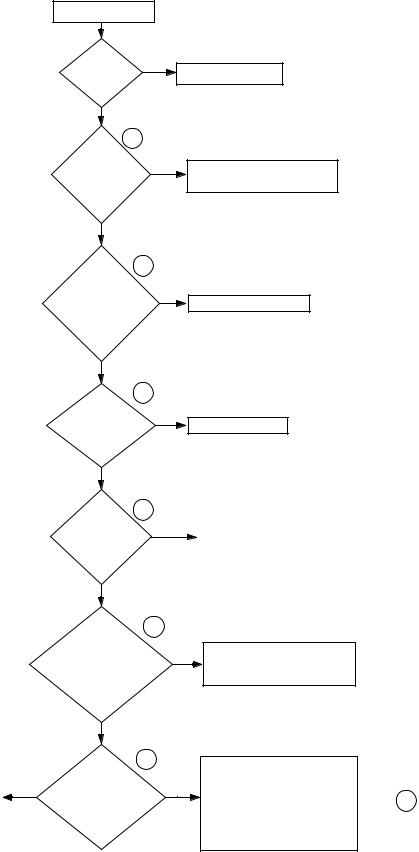
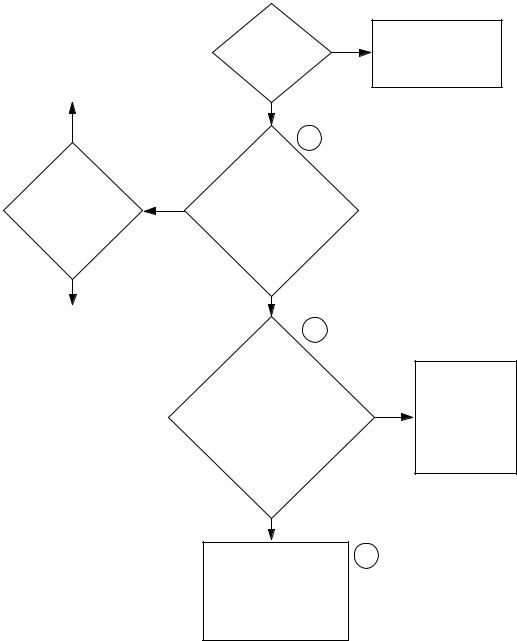
1. WE-8 CONTROL HAS NO VISIBLE DISPLAY (P AND N-VOLTAGE MODELS)
The WE-8 control has no visible display.
Is
the main NO power circuit
breaker on?
YES
1
Is there
voltage NO (380-480 Volts)
into the control transformer?
YES
Turn on the main power circuit breaker.
Check the wiring between the main power block and the control transformer. Repair or replace the wiring as needed.
|
2 |
|
|
Is there |
|
|
|
voltage |
NO |
|
|
(200-240 Volts) |
|
|
|
out of the |
|
Replace the control transformer. |
|
control |
|
|
|
transformer? |
|
|
|
YES |
|
|
|
|
3 |
|
|
Is there |
|
|
|
voltage (120 |
NO |
|
|
Volts) into |
|
Replace the 3.15 Amp fuse. |
|
and out of the |
|
||
|
|
|
|
3.15 Amp |
|
|
|
fuse? |
|
|
|
YES |
|
|
|
Is there |
4 |
|
|
voltage (120 |
NO |
|
Reset and return (either by pulling or by |
Volts) into and |
|
twisting and pulling) the E-stop switch. |
|
|
|
||
out of both sides of |
|
|
If, after resetting and returning, there is |
the E-stop |
|
|
still no voltage, replace the E-stop |
switch? |
|
|
switch. |
YES |
|
|
|
|
|
|
|
|
|
Is there |
5 |
|
|
|
|
|
|
voltage (220 |
|
|
|
Volts) between the |
NO |
|
|
L2 (blue) and L1 (brown) |
|
|
|
wires going into the |
|
|
|
power connector |
|
|
|
on the main |
|
|
|
board? |
|
|
|
YES |
|
|
|
Is the |
6 |
|
|
125 mA fuse |
|
|
YES |
below the power |
NO |
|
connector on the |
||
Replace the 125 mA fuse. |
|
main board blown? |
|
|
An ohms test is the |
|
|
|
|
|
|
|
|
|
|
|
|
recommended |
|
|
|
check for |
|
|
|
the fuse. |
|
Check the L2 (blue) and L1 (brown) wires between the E-stop switch and the power connector on the main board. Repair or replace the wires as needed.
Check the cable between the main board and the keypad for any loose or broken connections. Repair or replace the cable as needed.
7
If the cable is intact, please contact Alliance Laundry Systems’ customer service department before replacing
the main board, keypad or cable between the main board and keypad.
CFD2S
10 |
© Copyright, Alliance Laundry Systems LLC – DO NOT COPY or TRANSMIT |
9001900 |
Section 3 Troubleshooting
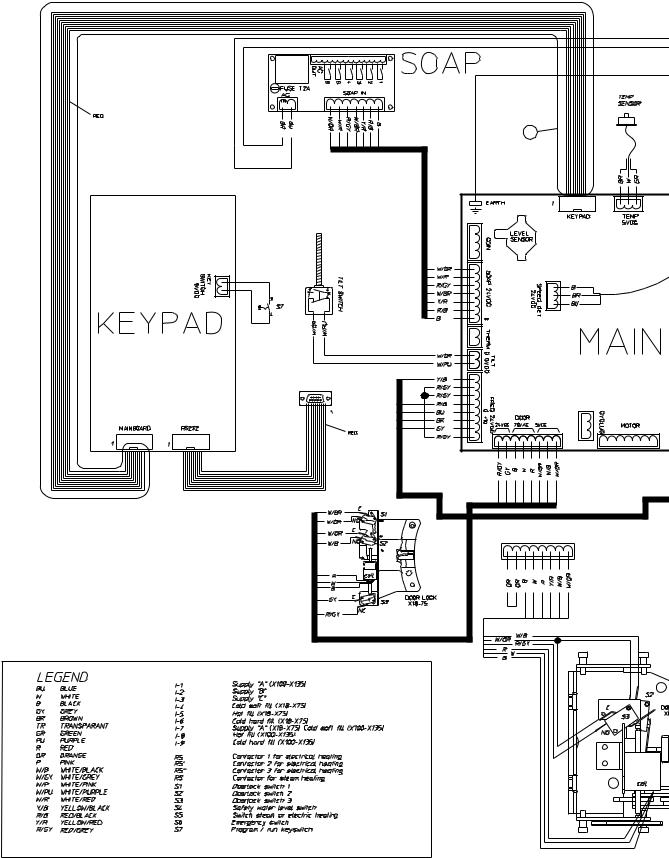
Please refer to the following 2 pages for wiring diagram information.
9001900 |
© Copyright, Alliance Laundry Systems LLC – DO NOT COPY or TRANSMIT |
11 |

Section 3 Troubleshooting
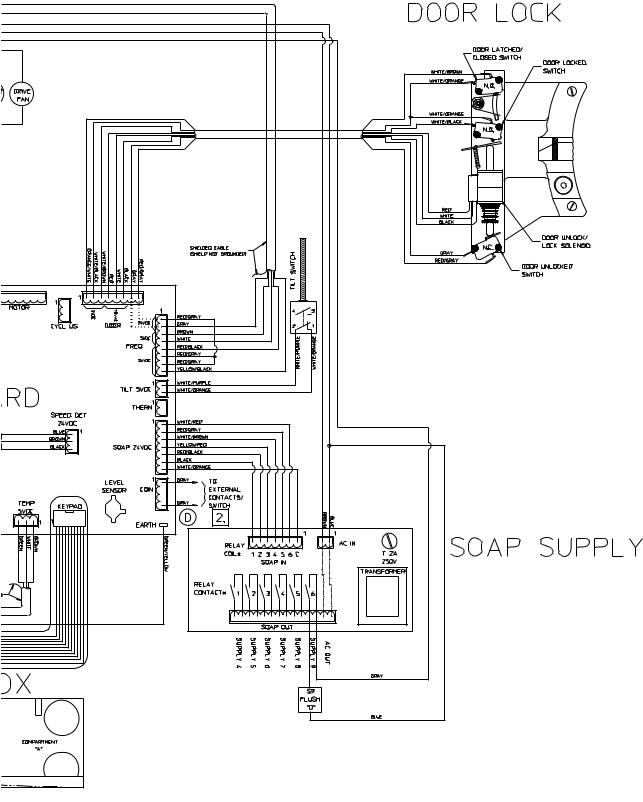
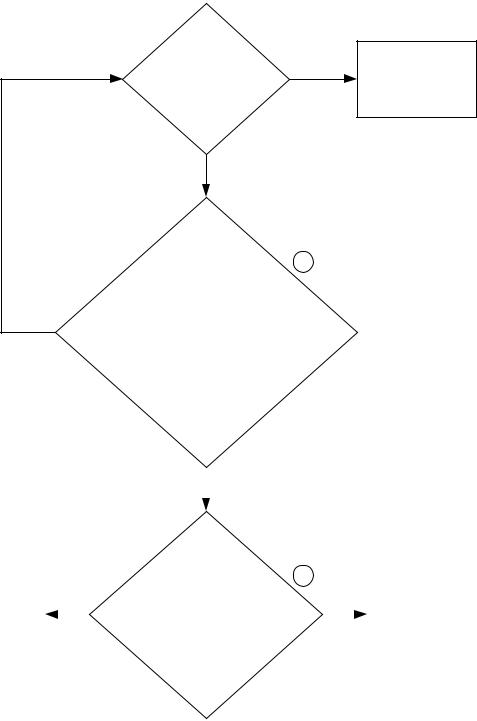
WE-8 Control Has No Visible Display (P and N-Voltage Models) (Sheet 1 of 2)
|
4 |
|
2 |
3 |
|
|
4 |
5 |
1 |
|
|
|
|
6 |
|
|
7 |
NOTE: Refer to the wiring diagram supplied with your machine.
12 |
© Copyright, Alliance Laundry Systems LLC – DO NOT COPY or TRANSMIT |
9001900 |
Section 3 Troubleshooting
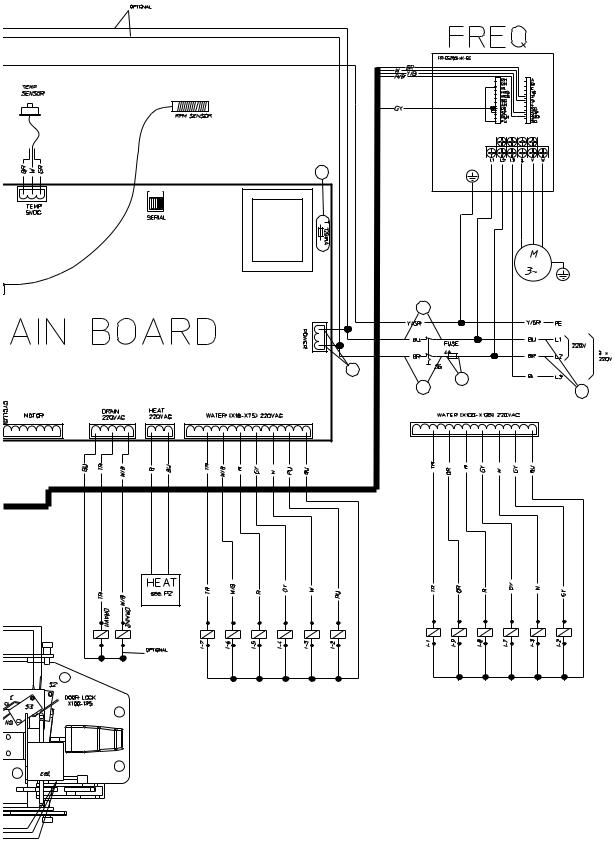
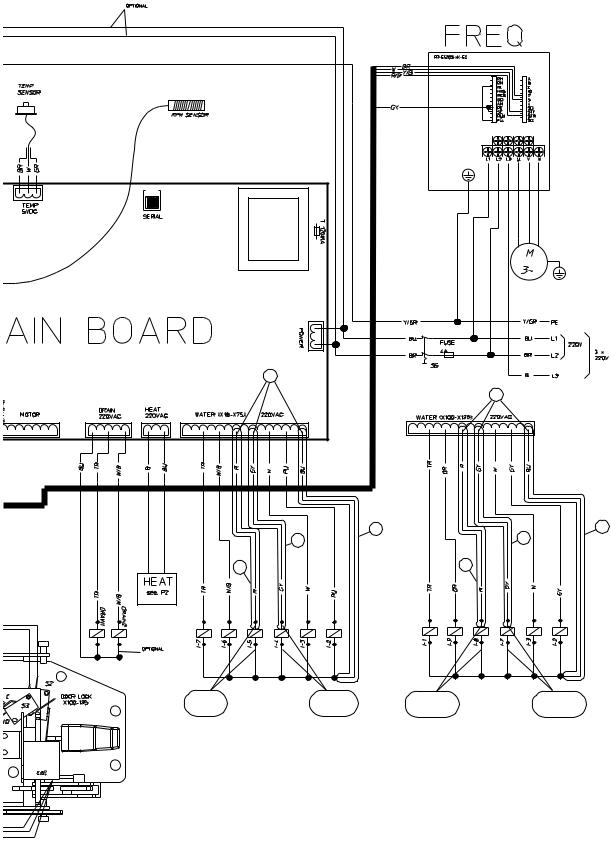
WE-8 Control Has No Visible Display (P and N-Voltage Models) (Sheet 2 of 2)
CFD3S 063787600D
9001900 |
© Copyright, Alliance Laundry Systems LLC – DO NOT COPY or TRANSMIT |
13 |
Section 3 Troubleshooting
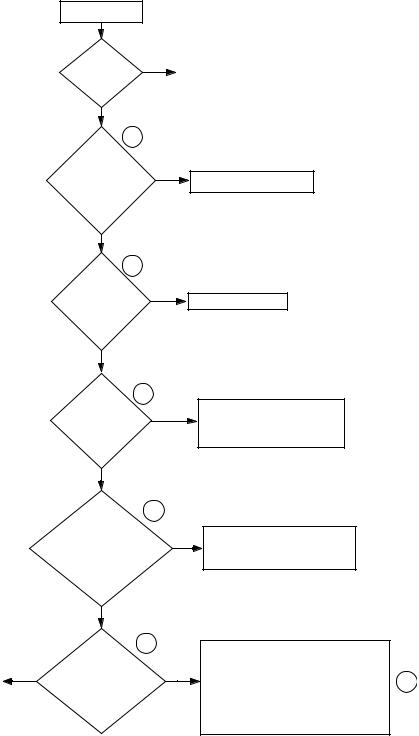
2. WE-8 CONTROL HAS NO VISIBLE DISPLAY (Q AND X-VOLTAGE MODELS)
The WE-8 control has no visible display.
Is |
|
|
the main |
NO |
|
power circuit |
|
Turn on the main power |
breaker |
|
circuit breaker. |
on? |
|
|
YES |
|
|
Is |
1 |
|
there |
|
|
voltage |
|
|
(200-240 Volts) |
|
|
coming out of the |
NO |
|
main power block between wires L2 (blue) and L1 (brown)?
YES
2 |
|
|
Is there |
|
|
Voltage (120 |
NO |
|
Volts) into |
||
|
||
and out of the |
|
|
3.15 Amp |
|
|
fuse? |
|
|
YES |
|
|
Is there |
3 |
|
|
||
voltage (120 |
NO |
|
Volts) into and |
||
|
||
out of both sides of |
|
|
the e-stop |
|
|
switch? |
|
Check the main power circuit breaker and power to the machine.
Replace the 3.15 Amp fuse.
Reset and return (either by pulling or by twisting and pulling) the E-stop switch. If, after resetting and returning, there is still no voltage, replace the E-stop switch.
YES
|
|
Is there |
4 |
|
|
|
|
|
|
voltage (220 |
|
|
|
Volts) between the |
NO |
|
|
L2 (blue) and L1 (brown) |
|
|
|
wires going into the |
|
|
|
power connector |
|
|
|
on the main |
|
|
|
board? |
|
|
|
YES |
|
|
|
Is the |
5 |
|
|
125 mA fuse |
|
|
YES |
above the power |
NO |
|
connector on the |
||
Replace the 125 mA fuse. |
|
main board blown? |
|
|
An ohms test is the |
|
|
|
|
|
|
|
|
|
|
|
|
recommended |
|
|
|
check for |
|
|
|
the fuse. |
|
Check the L2 (blue) and L1 (brown) wires between the E-stop switch and the power connector on the main board. Repair or replace the wires as needed.
Check the cable between the main board and the keypad for any loose or broken connections. repair or replace the cable
as needed.
6
If the cable is intact, please contact Alliance Laundry Systems’ customer service department before replacing
the main board, keypad or cable between the main board and keypad.
CFD4S
14 |
© Copyright, Alliance Laundry Systems LLC – DO NOT COPY or TRANSMIT |
9001900 |
Section 3 Troubleshooting
Please refer to the following 2 pages for wiring diagram information.
9001900 |
© Copyright, Alliance Laundry Systems LLC – DO NOT COPY or TRANSMIT |
15 |
Section 3 Troubleshooting
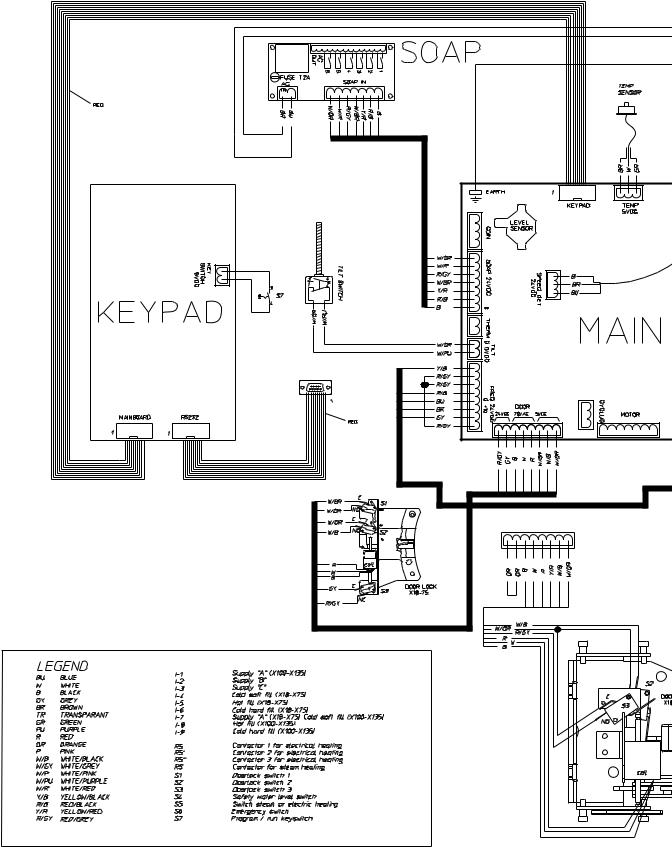
WE-8 Control Has No Visible Display (Q and X-Voltage Models) (Sheet 1 of 2)
6 |
NOTE: Refer to the wiring diagram supplied with your machine.
16 |
© Copyright, Alliance Laundry Systems LLC – DO NOT COPY or TRANSMIT |
9001900 |
Section 3 Troubleshooting
WE-8 Control Has No Visible Display (Q and X-Voltage Models) (Sheet 2 of 2)
5 |
|
|
3 |
|
|
|
3.15 A |
|
4 |
2 |
|
3 |
||
1 |
||
|
CFD5S
9001900 |
© Copyright, Alliance Laundry Systems LLC – DO NOT COPY or TRANSMIT |
17 |
Section 3 Troubleshooting
3. NO FILL ANALYSIS
|
|
|
Is |
|
|
|
|
there water |
NO |
|
|
|
coming in through |
|
|
|
|
|
|
|
Replace the valve’s solenoid if |
|
the water supply |
|
|
available. If the solenoid isn’t |
|
lines? |
|
|
available, replace the entire |
|
|
|
|
valve. |
|
|
|
|
|
|
YES |
|
|
NO |
|
1 |
|
|
Is there |
|
Is there voltage |
|
|
|
(220 Volts) between the |
|
|
|
magnetism within |
YES |
|
|
|
two wires of the |
|
||
|
the center |
|
||
|
|
water valve that |
|
|
|
walls of the |
|
|
|
|
|
has been |
|
|
|
valve |
|
|
|
|
|
programmed to turn |
|
|
|
solenoid? |
|
|
|
|
|
on? |
|
|
|
|
|
|
|
|
YES |
|
|
|
|
|
|
NO |
|
|
Replace or repair the |
|
|
|
|
mechanical parts of the valve |
|
2 |
|
|
with a repair kit if available. If |
|
|
|
|
|
|
|
|
|
a repair kit isn’t available, |
|
Is |
|
|
replace the entire valve. |
|
|
|
|
|
there voltage |
|
|
|
|
|
|
|
|
|
|
|
|
|
|
|
(220 Volts) between |
|
|
|
|
the wire from the main |
|
|
|
|
board harness on the water |
|
|
|
|
valve that has been programmed |
|
|
|
|
to turn on? |
|
|
|
|
The red wire is the hot fill, |
|
|
|
|
the gray wire is the cold fill |
|
|
|
|
and the blue wire |
|
|
|
|
is the neutral. |
|
YES
Check the wiring between the main board and the water valve that has been programmed to turn on. Repair or replace the wiring as needed.
Note: There may be a modular connector between the wire and the main board.
Check the main water valve shut-offs to make sure that they are turned on. Check inside of the water hoses and in-line screens for any blockages.
Assuming that all checks were done correctly, replace the
NO main board or contact Alliance Laundry Systems’ customer service department to verify that all checks have been done correctly.
3
CFD18S
18 |
© Copyright, Alliance Laundry Systems LLC – DO NOT COPY or TRANSMIT |
9001900 |
Section 3 Troubleshooting
Please refer to the following 2 pages for wiring diagram information.
9001900 |
© Copyright, Alliance Laundry Systems LLC – DO NOT COPY or TRANSMIT |
19 |
Section 3 Troubleshooting
No Fill Analysis (Sheet 1 of 2)
NOTE: Refer to the wiring diagram supplied with your machine.
20 |
© Copyright, Alliance Laundry Systems LLC – DO NOT COPY or TRANSMIT |
9001900 |
Section 3 Troubleshooting
No Fill Analysis (Sheet 2 of 2)
2
2
3 |
3 |
3 |
3 |
3 |
3 |
1 Hot Fill |
1 Cold Fill |
1 Hot Fill |
1 Cold Fill |
X18 - 75 |
X18 - 75 |
X100 - 135 |
X100 - 135 |
CFD19S
9001900 |
© Copyright, Alliance Laundry Systems LLC – DO NOT COPY or TRANSMIT |
21 |
Section 3 Troubleshooting
4. WATER RUNS CONTINUOUSLY INTO THE WASHER-EXTRACTOR
NOTE: This information applies to the three main fill valves as well as the three supply valves. The first task in this process is to determine which valve is staying on. This may be done by individually shutting off the water supply t each valve. Find the location where the water is flushing into the machine and follow the hose back to the solenoid Once the valve has been identified, proceed as follows:
Turn the main
power to the
NO
machine off. Does the water shut off?
YES
1
Is there voltage (220 Volts) between the two wires of the solenoid on the water valve that is staying on?
NO
For example, if the 1-5 (hot fill on X18-75) is staying on, is there voltage (220 Volts) between the common (red) and neutral (blue) wires of the solenoid?
Clean the valve or install a repair kit inside the valve if available. If a repair kit isn’t available, replace the entire valve.
|
|
|
|
YES |
|
|
|
Check the microprocessor |
|
|
|
|
|
|
|
|
|
|
|
|
|
|
|
|
|
display to make sure that |
|
|
|
|
|
|
|
|
the microprocessor isn’t |
|
|
|
|
|
|
|
|
calling for the water |
|
|
|
|
|
|
|
|
valve to turn on when it |
|
|
|
Is the |
|
|
|
shouldn’t be. If it is, turn |
|
|
|
|
main board |
|
|
|
off the power to the machine |
|
|
|
|
(water) harness |
|
|
|
for at least 20 seconds and |
|
|
|
|
connected correctly |
2 |
|
|
then turn the power back |
|
|
|
|
as shown on the wiring |
|
|
|
on. Make sure that the |
|
|
|
|||||||
Repair or replace the |
|
|
schematic and is it intact? |
|
|
|
display reads “CYCLE 00.” |
|
|
NO |
|
YES |
|
||||
main board (water) |
|
|
|
|||||
|
|
Note: Make sure there are |
|
|
|
If the microprocessor is |
||
harness as needed. |
|
|
|
|
|
|||
|
|
no wires loose, shorted |
|
|
|
still calling for the water |
||
|
|
|
|
|
|
|||
|
|
|
or disconnected |
|
|
|
valve to turn on when it |
|
|
|
|||||||
|
|
|
from the main |
|
|
|
shouldn’t be, assuming |
|
|
|
|
board (water) |
|
|
|
that all checks were done |
|
|
|
|
harness. |
|
|
|
correctly, replace the |
|
|
|
|
|
|
|
|
|
main board or contact |
|
|
|
|
|
|
|
|
Alliance Laundry Systems’ |
|
|
|
|
|
|
|
|
customer service |
|
|
|
|
|
|
|
|
department to verify that |
|
|
|
|
|
|
|
|
all checks have been done |
|
|
|
|
|
|
|
|
correctly. |
|
|
|
|
|
|
|
|
|
CFD20S
22 |
© Copyright, Alliance Laundry Systems LLC – DO NOT COPY or TRANSMIT |
9001900 |
Loading...