


XGUITAR
Quick Start Owner’s Manual
Manual de inicio rápido para el usuario (Spanish)
Guide d’installation rapide (Français)
Schnelles Hinweisbuch (Deutsch)
Manuale rapido di utilizzazione (Italiano)
Box Contents:
X Guitar
Quick Start Owner’s Manual
Important Safety Instructions
4 AA Batteries
Schachtelinhalt:
X Guitar
Schnellbedienungsanleitung
Wichtige Sicherheitshinweise
4 AA Batterien
Contenue de la boîte :
X Guitar
Guide d’utilisation simplifié
Consignes de sécurité importantes
4 piles de format AA
Contenido de la caja:
X Guitar
Manual de inicio rápido del usuario
Instrucciones de seguridad importantes
4 Baterías AA
Contenuto della Confezione:
X Guitar
Manuale rapido di utilizzazione
Importanti Istruzioni di Sicurezza
4 batterie AA

This page intentionally left blank.

1
Quick Start Owner's Manual (English)
Introduction
Congratulations on your purchase of the Alesis X Guitar. The X Guitar is a high-
performance guitar that includes both a traditional three-pickup system and an advanced,
built-in stereo multieffects processor. Here are some of its important highlights:
● A fully-featured electric guitar in the most popular style of all time.
● A built-in multi-effects unit with dozens of guitar-optimized effects like distortion,
compression, cabinet modeling, delay, wah, phase shifting, and reverb.
● A tuner that intelligently mutes the guitar.
● Built-in knobs and buttons for fine control over the effects.
● An input jack for an optional expression pedal, allowing for even greater real-time control
over the effects.
● The output jack works with headphones, so you can play in private, in stereo.
● To preserve battery life, plug in an optional 9-volt power adapter.
● You can turn the effects off completely to use the instrument as a traditional electric
guitar.
Please Read and Retain This Manual and Register Your
X Guitar
The X Guitar has a lot of features. Please read these instructions and retain them for future
reference. If you ever lose this manual, you can download it from http://www.alesis.com.
Speaking of the Internet, please go to http://www.alesis.com to register your new Alesis X
Guitar. Registration helps you by ensuring that we can keep you up to date on any last-
minute product issues. If you want, Alesis can also send you information on other products
that might interest you.
Registration helps us, too. When you let us know the types of music products you use and
dream about, you help us bring you cutting-edge products like the X Guitar.
2
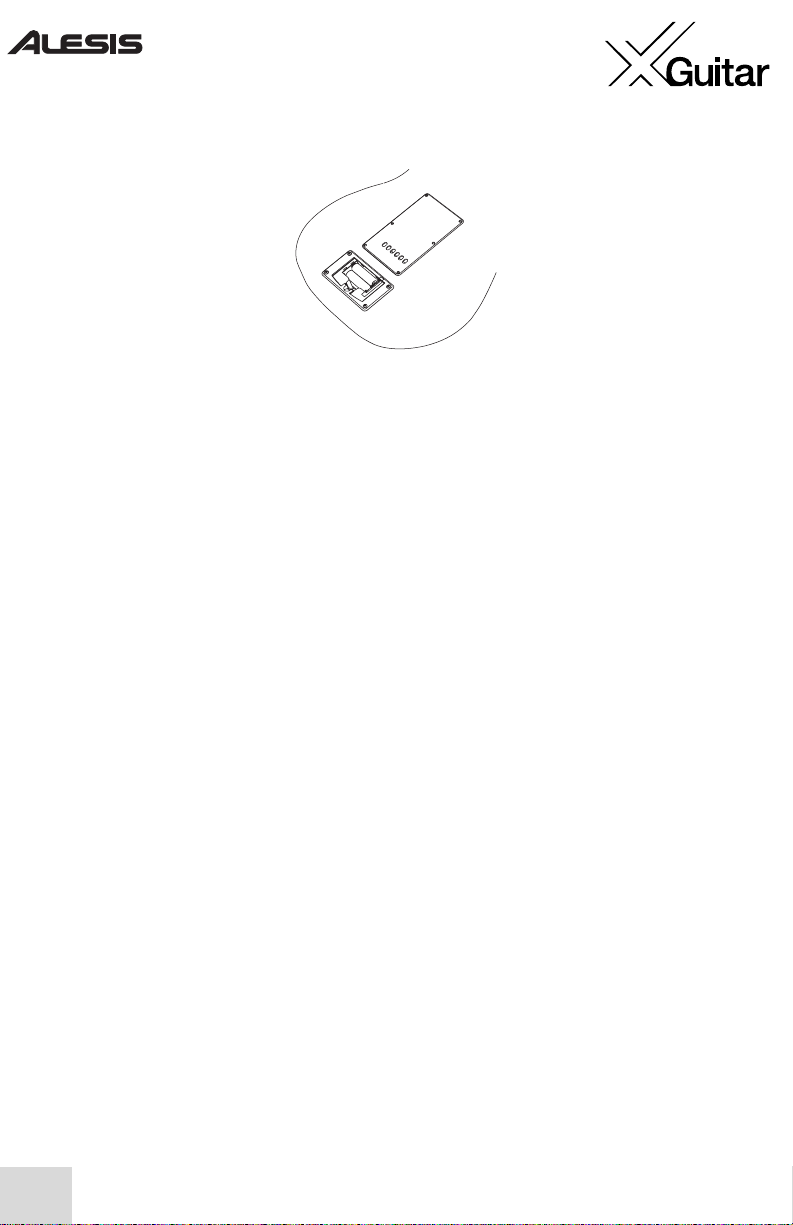
First Things First: Installing the Batteries
With no batteries, the X Guitar operates like a traditional electric guitar. However, to use
the X Guitar’s built-in effects and tuner, you need to install four AA batteries (or use an
optional 9 volt adapter). Batteries are included in your X Guitar package.
To install the batteries, flip the guitar over and open the battery compartment on the back.
As with all battery-powered devices, don’t mix and match new and partially used batteries,
remove the batteries if you don’t intend to play the X Guitar for a month or more, and keep
the X Guitar out of extreme heat or cold.
You can expect about 30 hours of normal use with Alkaline batteries. Note that the
batteries continue to drain even if you’re not playing the X Guitar, so be sure to turn the
guitar off (see instructions below) when you’re done using it. (Frugal or forgetful people
may want to invest in a set of rechargeable batteries, which work very well in the X Guitar.)
If you use a 9-volt adapter, the batteries will be bypassed.
3
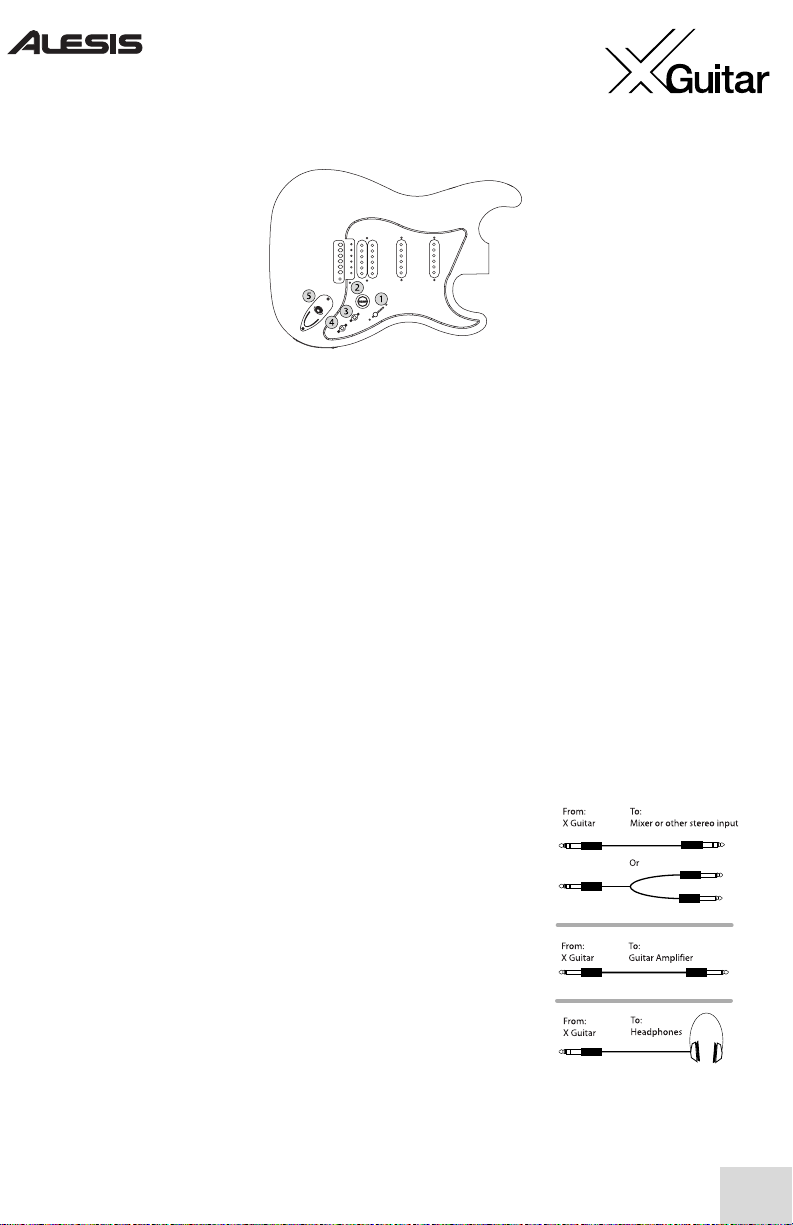
Front Controls
The front of the guitar combines traditional controls with two special switches for the built-
in effects.
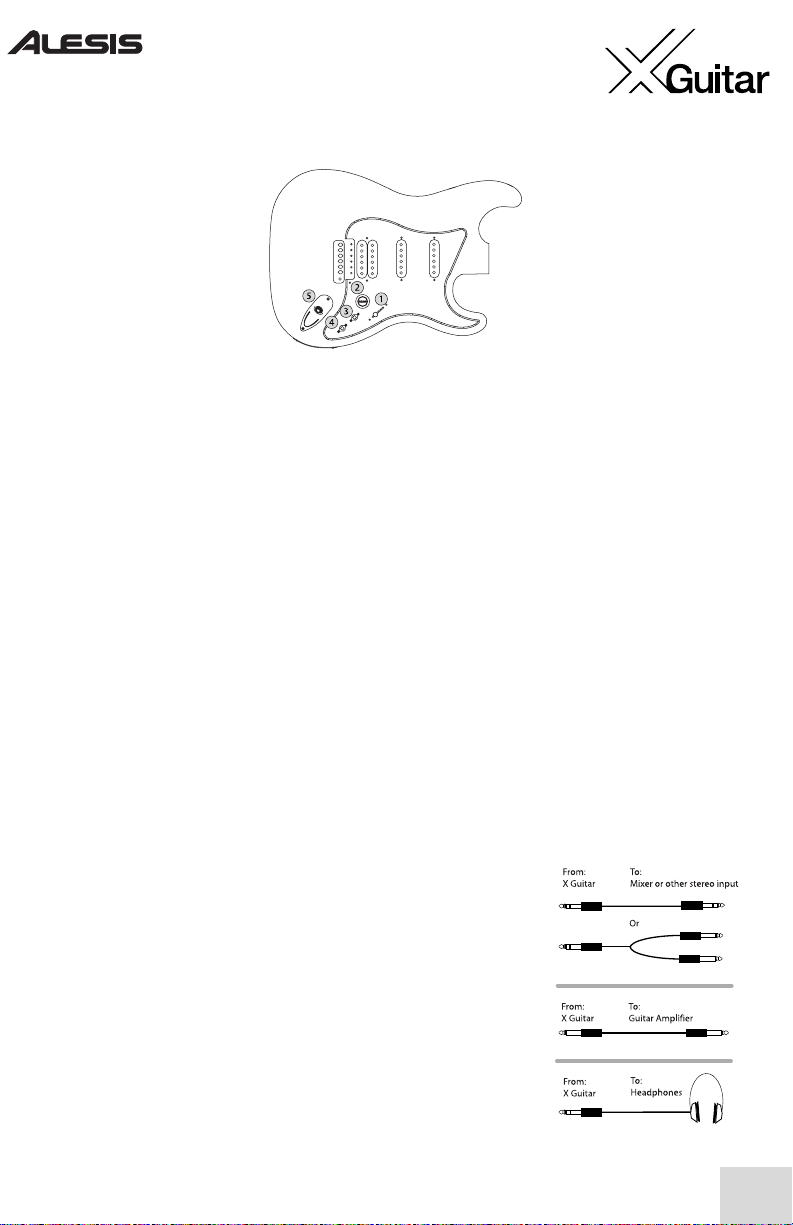
1.
Pickup Selector Switch
– The five-position switch selects one of the following pickup
combinations:
1-Bridge only. 2-Bridge + Middle. 3-Middle only. 4-Middle + Neck. 5-Neck only.
All three pickups are humbucking models, which greatly reduce noise relative to non-
humbucking pickups. The bridge-position pickup has the traditional side-by-side
humbucker configuration. The middle- and neck-position pickups use a “stacked single-
coil” configuration.
2.
Volume Knob
- This knob attenuates (lowers) the output from the X Guitar’s pickups.
It is independent of the effects and acts before them.
3.
Program Up/Down Switch
– Increment or decrement the effect program using this
switch.
4.
Effects On/Off Switch
– Flip this to the upward position to turn on the effects. Be
sure to turn it off after playing to conserve the batteries.
5.
Output Jack
– For stereo output, plug a TRS cable into this
jack to connect the guitar to a mixer or recording device. (You
may need to use “Y” cables or a special breakout cord.)
Plug in a TS (mono) cable to connect to a guitar amplifier.
Plug in a pair of headphones for private performance.
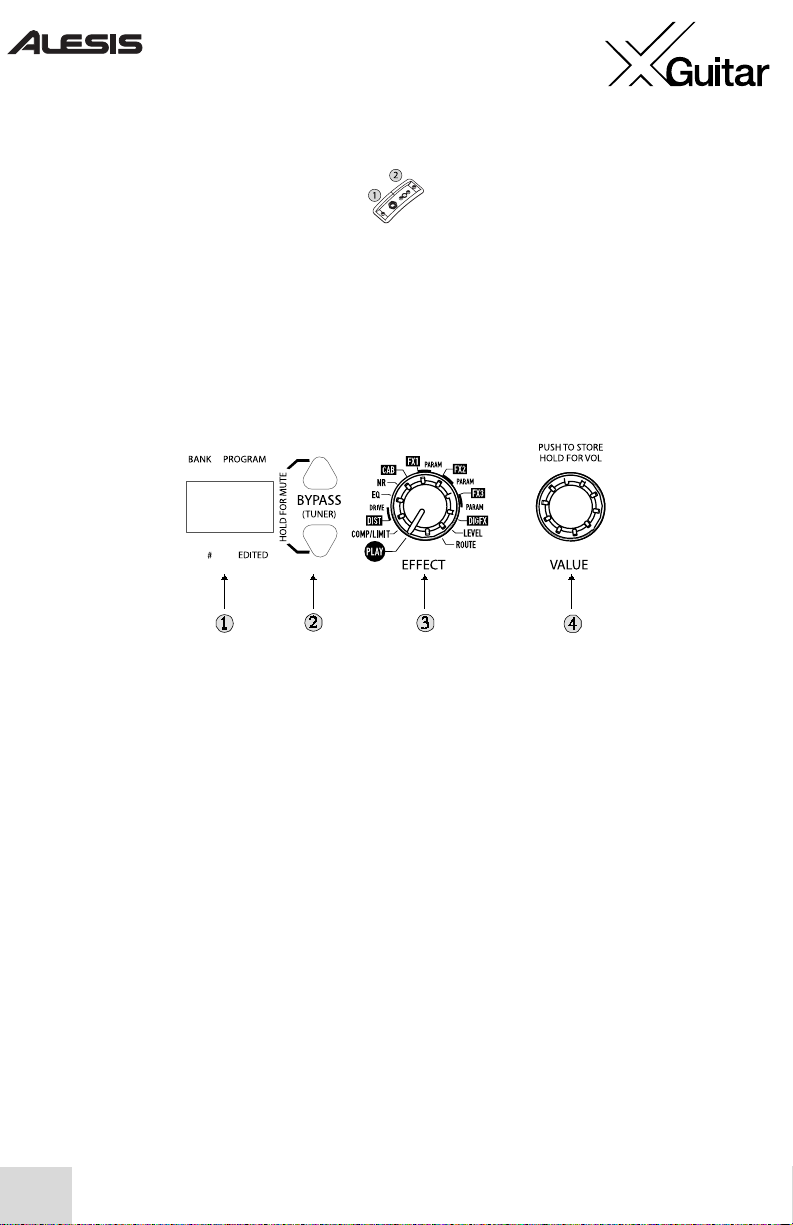
4
Bottom Jacks
1.
Expression Pedal Input
– Plug in an optional expression pedal to control one of the
effects within the multi-effects processor.
2.
AC Adapter Jack
– Plug in an optional AC adapter using this outlet.
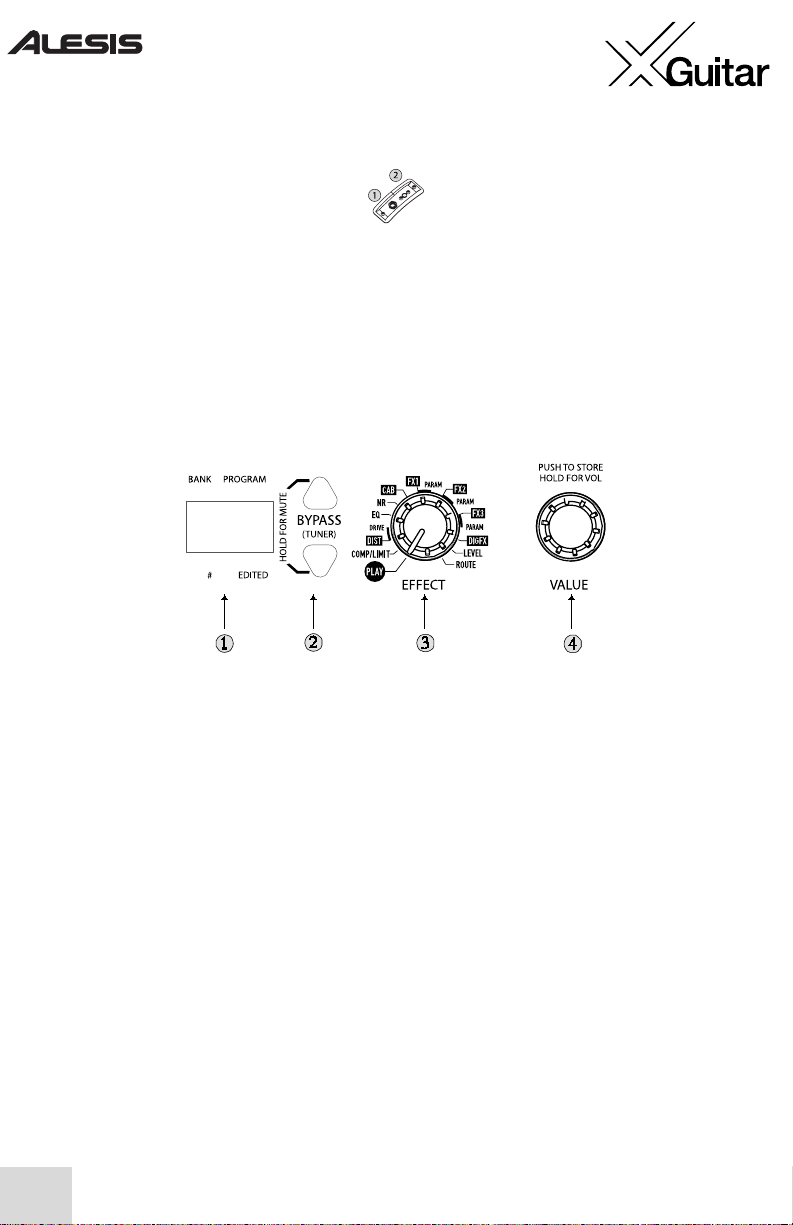
Effect Processor Controls
Use the controls on the top of the X Guitar to operate the built-in effects.
1.
Display
– In PLAY mode, the display shows the bank letter (A-H) on the left and the
bank’s program number (0-9) on the right. A small dot on the lower right hand side
indicates that you’ve edited a program. Another small dot in the bottom middle of the
display is dedicated to indicating sharp notes when the tuner is activated.
2.
Program Up/Down
buttons
– Use these buttons to access different programs. Press
them both together to mute the guitar and use the built-in tuner.
3.
Effect Knob
– In Play mode, pressing the PROGRAM UP/DOWN buttons or turning
the VALUE knob cycles accesses different programs. Turning the EFFECT knob to any
other position allows you to edit the effects. An effects reference is provided in the
following pages.
4.
Value Knob
– Turn this knob to change the value of whatever’s selected using the
EFFECT knob. Press VALUE to store programs. Press and turn VALUE to raise or lower
the overall level of the effects module. This feature can be valuable for matching the signal
strength from the X Guitar to the amplifier, mixer, or other device to which the guitar is
connected.

5
Exploring the X Guitar’s effects
The X Guitar contains an advanced, stereo effects processor. Distortion, compression,
delays, choruses, reverbs, and much more allow you to create a wide variety of popular,
vintage, and experimental electric guitar sounds.
Begin by exploring the X Guitar’s default programs. Turn the
Effect
knob all the way to the
left to select
Play
. Now, play your guitar and explore the programs by pressing the
Program Up
and
Program Down
buttons or twisting the
Value
knob.
You’ll hear programs ranging from ultra-clean to rocking to jazzy to out-and-out nasty. If
you have the chance, be sure to plug a pair of stereo headphones directly into the X Guitar’s
output to experience these effects in stereo. Some of the effects really come alive in stereo.
Modifying the effects programs
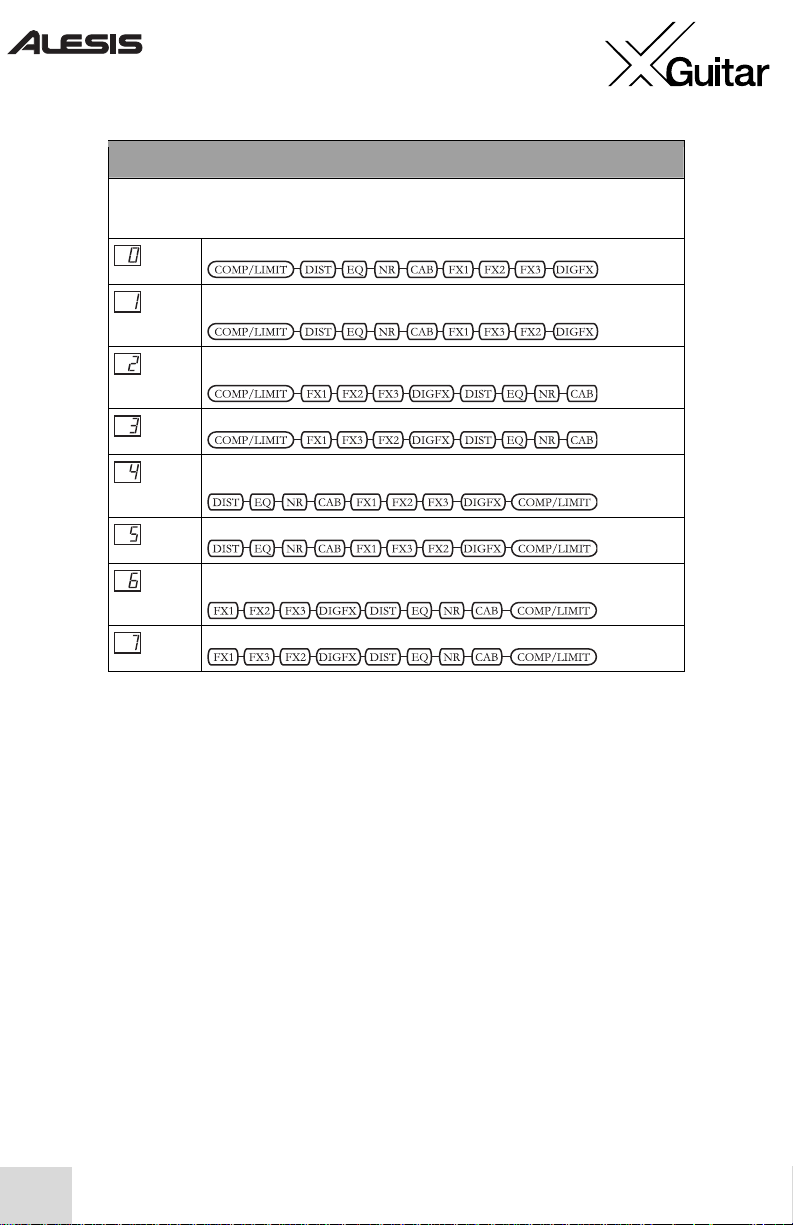
There’s a lot more to the X Guitar’s effects than just what’s in the presets. The X Guitar has
eight separate effect modules, as shown below:
These effects are accessed using the
EFFECT
knob.
Move the
EFFECT
knob clockwise out of the
Play
position in order to edit the effects.
Once you change an effect, the
EDITED
LED on the bottom right of the display will light.
From left to right, here are your options:
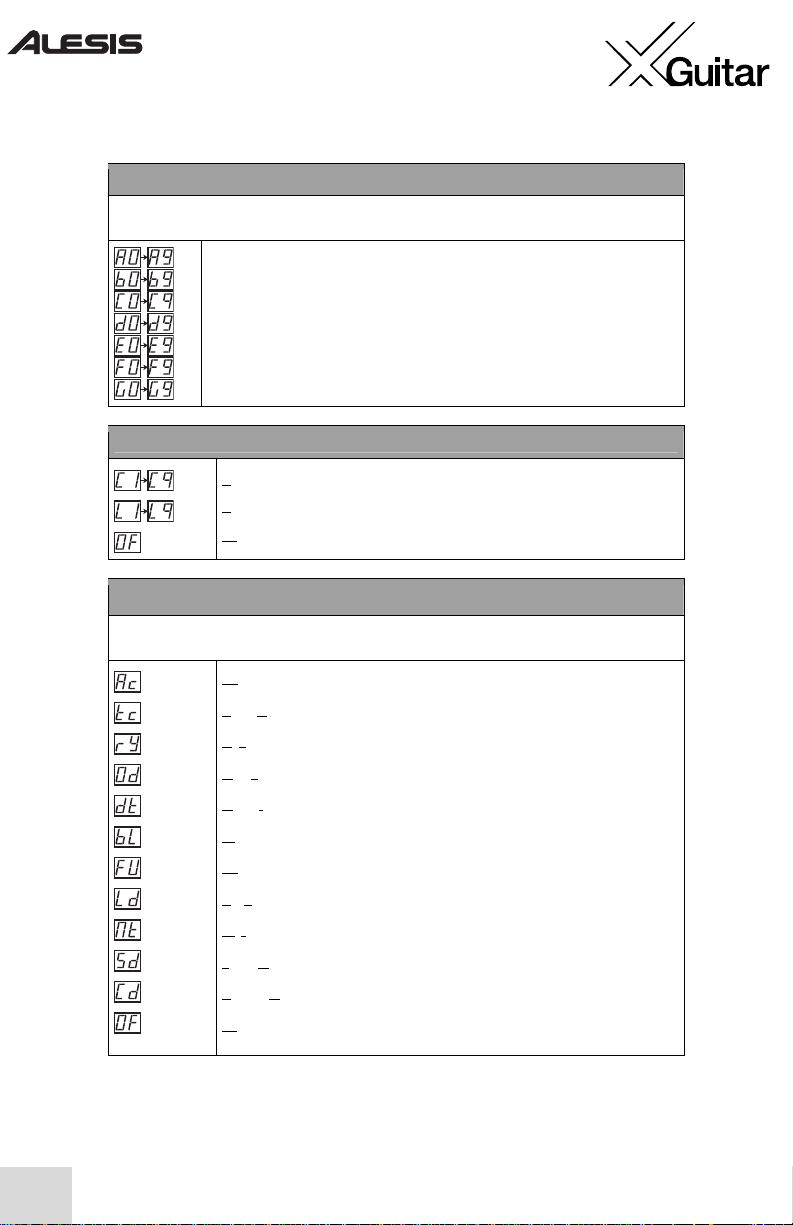
6
PLAY
In this setting, the display shows you the current program number. This is the mode you should choose
for typical live performances, as it allows you to switch programs easily via the foot pedals.
Indicates the bank letter and program number of the current program.
COMP/LIMIT (Compressor/Limiter)
Compression. Adds sustain and smoothness by lowering the dynamic range.
Limiting. Retains the original volume, but smoothes out the loudest peaks.
Off. Turns COMP/LIMIT off.
DIST (Distortion)
This setting adds that universal effect that was first used in rock music decades ago and now has
become a staple for guitarists in many genres.
Acoustic.
Emulates the sound of an acoustic guitar.
T
ube Clean.
Simulates the clean sound of a classic tube amplifier.
R
hythm.
A slightly distorted sound; great for rhythm playing.
O
verdrive.
Provides more grit than the Rhythm setting, like you’re really
pushing those amplifier tubes.
D
istortion.
Adds crunchiness to your sound.
Bl
ues.
A warm yet slightly crunchy sound associated with some of the
blues-guitar greats.
Fu
zz. That classic fuzz distortion effect of the 60s. Just listen and you’ll
see how it got the name.
L
ead. A searing overdrive that will make your solos scream.
M
etal. A heavily overdriven sound with a long sustain.
S
tack Drive. A heavy, driving distortion that sounds like you’re playing through
a massive tube stack amp.
C
ombo Drive. Another heavyweight distortion; sounds like a tube stack amp with
a well-defined midrange.
Of
f. Turns DIST off.
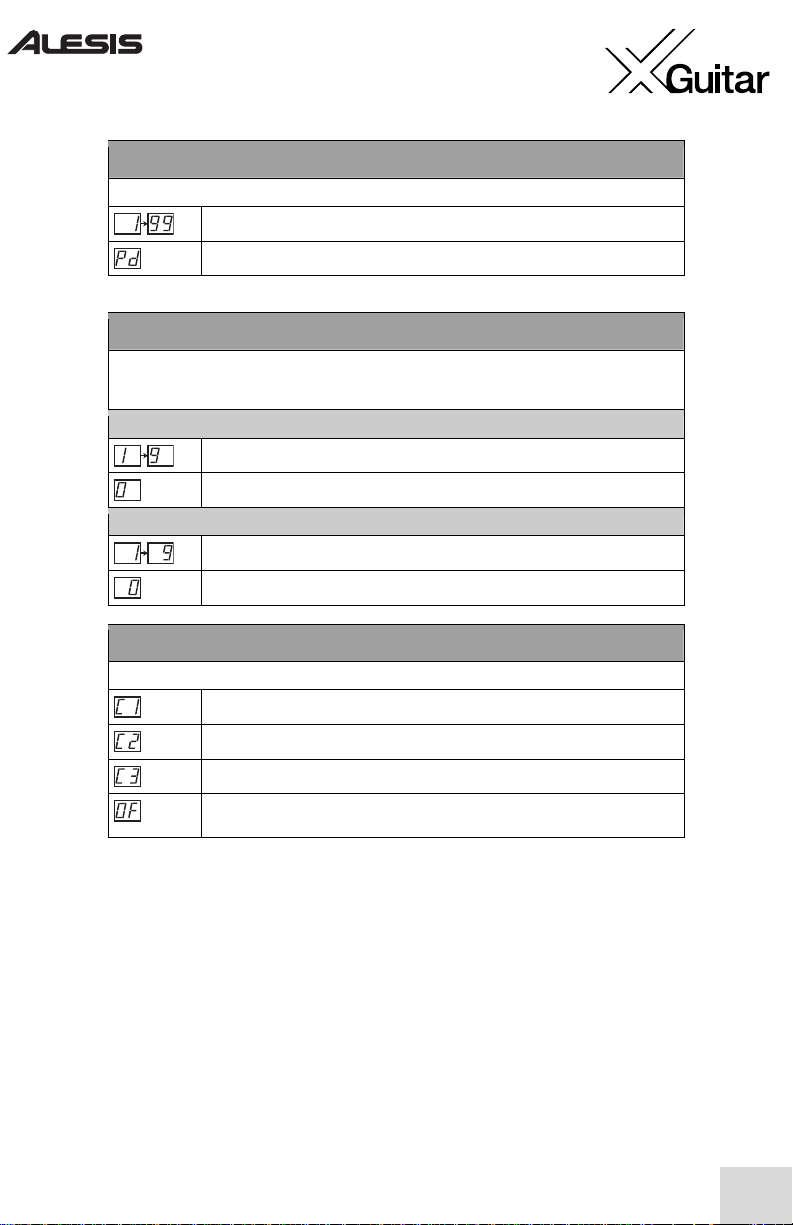
7
DRIVE
This is a parameter of the DIST module.
Increasing levels of drive/gain for the DIST module.
Pedal control of the drive/gain.
NR (Noise Reduction)
This is a combination of two effects—hum elimination and noise reduction. Hum elimination works by
cutting out the frequency that contains the hum (60Hz). Noise reduction works by gating the signal
(muting the signal until its level rises above a certain point).
Hum Elimination (Left digit of display)
Increasing levels of hum elimination (60Hz harmonic notch filters).
Turns off hum elimination.
Noise Reduction (Right digit of display)
Increasing levels of gate threshold.
Turns off noise reduction.
CAB (Cabinet Simulator)
This module allows your Wildfire to emulate cabinet setups of various sizes.
A single 12” driver cabinet.
A 2 x 12” driver cabinet.
A 4 x 10” driver cabinet.
Off
Turns off CAB.
8
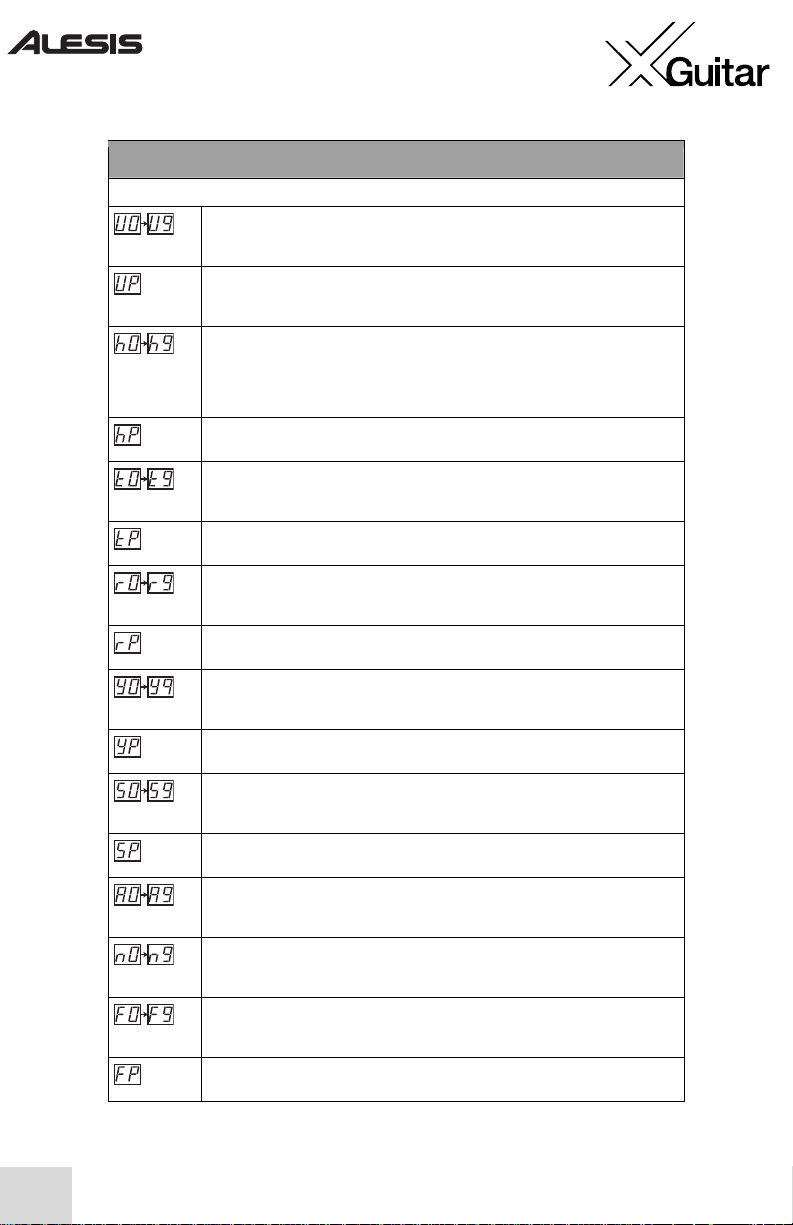
FX1 (Multi-Effect Module 1, Mono to Stereo Effects)
This module gives you a choice of mono effects. You may assign one effect at a time to this module.
Auto Wah
A wah sound controlled by playing intensity. Attack the strings aggressively for more
effect. Higher values indicate higher input sensitivity.
Pedal-Controlled Wah
A wah sound controlled by moving the optional expression pedal up and down as you
play.
Phaser
An effect that shifts the phase of the signal and adds it to the original sound (in
simpler terms, it adds a duplicate signal that is delayed a bit). The phaser gives your
guitar a full, pulsating sound. Higher values result in more feedback, producing a more
intense effect.
Pedal-Controlled Phaser
A phaser effect with its feedback controlled by the expression pedal.
Tremolo
Varies the volume of the signal, creating a rising and falling effect. Higher values result
in greater depth of variation.
Pedal-Controlled Tremolo
A tremolo effect with its depth controlled by the expression pedal.
Ring Modulation
An effect that modulates the amplitude of the signal, giving it a metallic sound. Higher
values result in greater modulation depth.
Pedal-Controlled Ring Modulation
Ring modulation with its depth controlled by the expression pedal.
Cry
Creates an effect similar to that of a voice box, adding a human-like crying effect to
the sound. Higher values result in greater intensity.
Pedal-Controlled Cry
A cry effect with its filter frequency controlled by the expression pedal.
Random Sample and Hold Step Filter
For this effect, the filter cutoff frequency changes abruptly to a new psuedo-random
value at a fixed time interval, producing an arpeggiator-like sound.
Pedal-Controlled Step Filter
A step filter with its depth controlled by the expression pedal.
Slow Attack
Reduces the attack rate of the signal, slowing the rate at which the volume of the
sound rises when you attack a string. Higher values result in higher sensitivity.
Auto Pan
Pans the signal back and forth from left to right at a constant rate determined by the
PARAM setting. Higher values result in increased pan depth.
Flanger
Shifts the pitch of the signal up and down, creating a swirling effect. Higher values
result in longer delay.
Pedal-Controlled Flanger
A flanger with its delay controlled by the expression pedal.
9
FX1 – Continued
Rotary Speaker
Emulates the sound of the classic rotary, creating a Doppler effect similar to that
achieved by an organ’s rotating speaker. Higher values result in greater intensity and
pan depth.
Pedal-Controlled Rotary Speaker
A rotary speaker effect with its intensity and pan depth controlled by the expression
pedal.
Chorus
Adds fullness to your sound by emulating a chorus of multiple instruments. Higher
values indicate greater modulation depth.
Pedal Chorus
A Chorus effect with its modulation depth controlled by the expression pedal.
Pitch Transpose
Transposes the pitch of the signal either up or down. P0 – P4 transpose the pitch
down a minor third, a major third, a perfect fourth and a perfect fifth respectively. P5
– P9 transpose the pitch up in the same manner.
Variable Pitch Transpose Up
Variably transposes the pitch upward from 0 to 2 octaves according to the setting of
the direct-control parameter (PARAM) for FX1.
Variable Pitch Transpose Down
Variably transposes the pitch downward from 0 to 2 octaves according to the setting
of the direct-control parameter (PARAM) for FX1.
Off
Turns off FX1.
10
PARAM (Direct-Control Parameter for FX1)
This parameter modifies the operation of the effect selected for the FX1 module. Changing between
effect types with dissimilar value ranges will scale this value accordingly. For example, if you set Phaser
to PARAM=63 and then switch to the Auto Wah effect, its PARAM value will be 12. Changing back to
Phaser will result in a PARAM value of 63.
Indicates the value of FX1’s direct-control parameter, according to the following:
For Auto Wah, Phaser, Tremolo, Step Filter, Auto Pan, Flanger and Chorus, indicates
the rate of the effect.
For Ring Mod, indicates the rate of the modulation.
For Slow Attack, indicates the rate of the attack.
For Rotary Speaker, indicates the rate of the speaker rotation.
For Pedal Pitch Transpose Up and Down, indicates the amount of pitch change in 1/4
semitones (from 1/4 semitone to more than 2 octaves). Wet/dry mix is fixed at 100%
wet.
For Cry, indicates the sensitivity of the filter modulation.
For Pitch Transpose with a fixed interval, denotes the wet/dry mix from 0 (100% dry)
to 10 (50% wet, 50% dry) to 20 (100% wet).
Indicates that the expression pedal controls the parameter.
Indicates that the effect assigned to the FX1 module does not have a direct-control
parameter (like Pedal Wah) or that FX1 is off.
FX2 (Multi-Effect Module 2, Stereo Effects)
This module gives you a choice of stereo effects. These effects include all those found in FX1 except
for Flanger, Rotary Speaker, Chorus and Pitch Transpose. FX2 also gives you the following additional
effect.
Auto Phaser
A phaser for which the delay is controlled by playing intensity.
PARAM (Direct-Control Parameter for FX2)
These parameters work exactly the same way as the direct-control parameter for FX1, with the
following addition.
For Auto Phaser, indicates the rate of the effect.

11
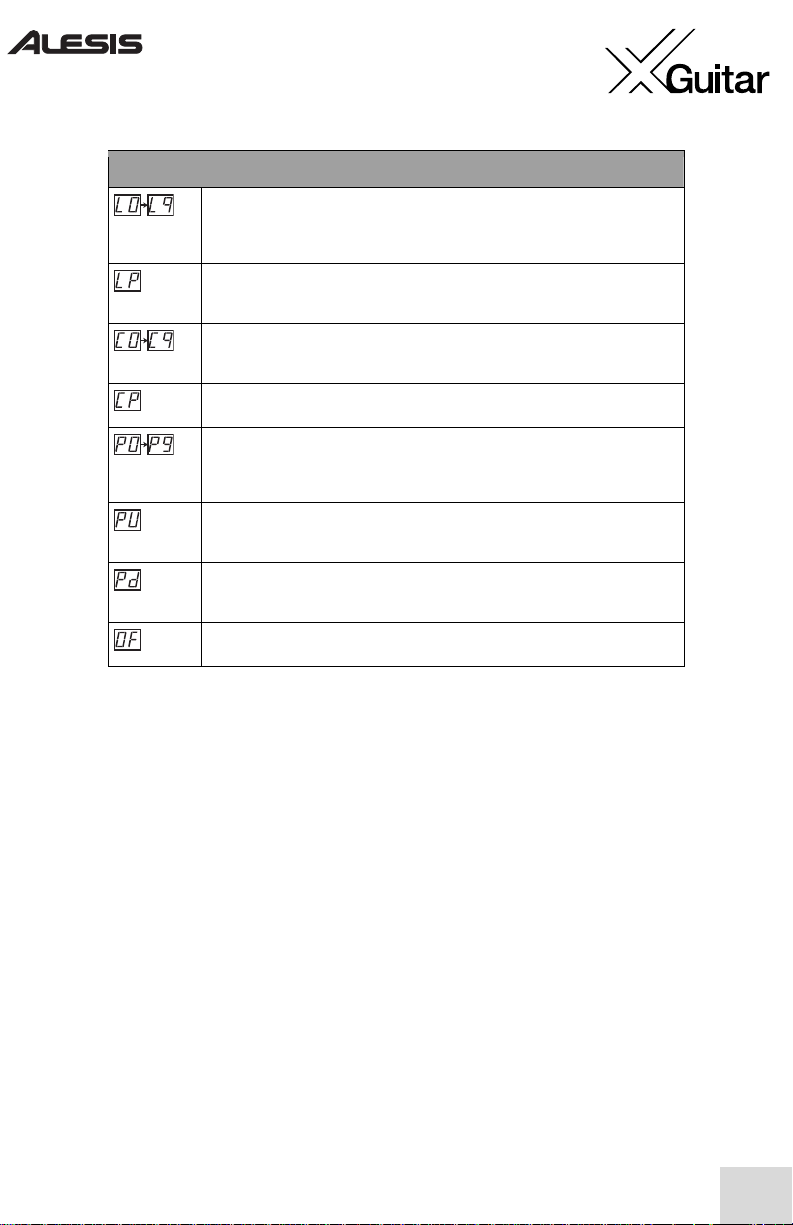
FX3 (Multi-Effect Module 3, Delay-Based Effects)
This module gives you a choice of delay-based effects. A delay is an echo of the original signal that can
occur at varying frequency and time.
Doubling
Doubles the signal with a slight delay, creating the effect of two instruments playing at
once. Higher values indicate higher intensity.
Pedal Doubling
Doubling effect with its intensity controlled by the expression pedal.
Ping Pong Delay
Creates a delay that bounces back and forth between the right and left sides of the
stereo spectrum. Higher values indicate more feedback.
Pedal Ping Pong
Ping Pong Delay effect with its amount of feedback controlled by the expression
pedal.
Tape Delay
Emulates the retro tape-delay effect that was created by recording a signal to tape and
playing it back as a delay. Higher values indicate more feedback.
Pedal Tape Delay
A Tape Delay effect with its feedback controlled by the expression pedal; great for
singling out notes or sections to echo.
Stereo Delay
A standard delay that occurs in stereo. Higher values indicate more feedback,
producing a longer-repeating echo.
Pedal Stereo Delay
A Stereo Delay effect for which the feedback level is controlled by the expression
pedal.
Echo
An echo for which higher values indicate a wetter signal and lower values indicate a
drier signal.
Pedal Echo
An echo for which the wet/dry mix is controlled by the expression pedal.
Hall Reverb
Simulates the effect of sound waves bouncing off of the walls of a concert hall. Higher
values indicate a wetter mix.
Pedal Hall Reverb
A Hall Reverb effect for which the wet/dry mix is controlled by the expression pedal.
Room Reverb
Simulates the effect of sound waves bouncing off of the walls of a room. Higher
values indicate a wetter mix.
Pedal Room Reverb
A Room Reverb effect for which the wet/dry mix is controlled by the expression
pedal.
Reverse Reverb
Creates a backwards-playing reverb that you hear immediately before you hear the
original signal, instead of after it. Higher values indicate a wetter mix.
Pedal Reverse Reverb
A Reverse Reverb effect with its wet/dry mix controlled by the expression pedal.

12
FX3 – Continued
Plate Reverb
Recreates the classic “plate reverb” sound achieved by using a metal plate. Higher
values indicate a wetter mix.
Pedal Plate Reverb
A Plate Reverb effect with its wet/dry mix controlled by the expression pedal.
Chorus – same as in FX1.
Pedal Chorus – same as in FX1.
Flanger – same as in FX1.
Pedal-Controlled Flanger – same as in FX1.
Rotary Speaker – same as in FX1.
Pedal-Controlled Rotary Speaker – same as in FX1.
Pitch Transpose – same as in FX1.
Variable Pitch Transpose Up – same as in FX1.
Variable Pitch Transpose Down – same as in FX1.
Off
Indicates FX3 is off.
PARAM (Direct-Control Parameter for FX3)
This direct-control parameter works in a similar fashion as the one for FX1.
For Doubling, Ping Pong, Tape Delay and Stereo Delay, indicates the length of the
delay, up to one second for Tape Delay and up to half a second for the others.
For Chorus, indicates the rate of the chorus.
For Flanger, indicates the rate of the flanger.
For Rotary Speaker, indicates the rate of the speaker rotation.
For Pedal Pitch Transpose Up and Down, indicates the amount of pitch change in 1/4
semitones (from 1/4 semitone to more than 2 octaves). Wet/dry mix is fixed at 100%
wet.
For all reverbs, higher values indicate a longer decay.
For fixed-interval Pitch Transpose, indicates the wet/dry mix from 0 (100% dry) to 10
(50% dry, 50% wet) to 20 (100% wet).
Indicates that the expression pedal controls the parameter.
Indicates FX3 is off.
13
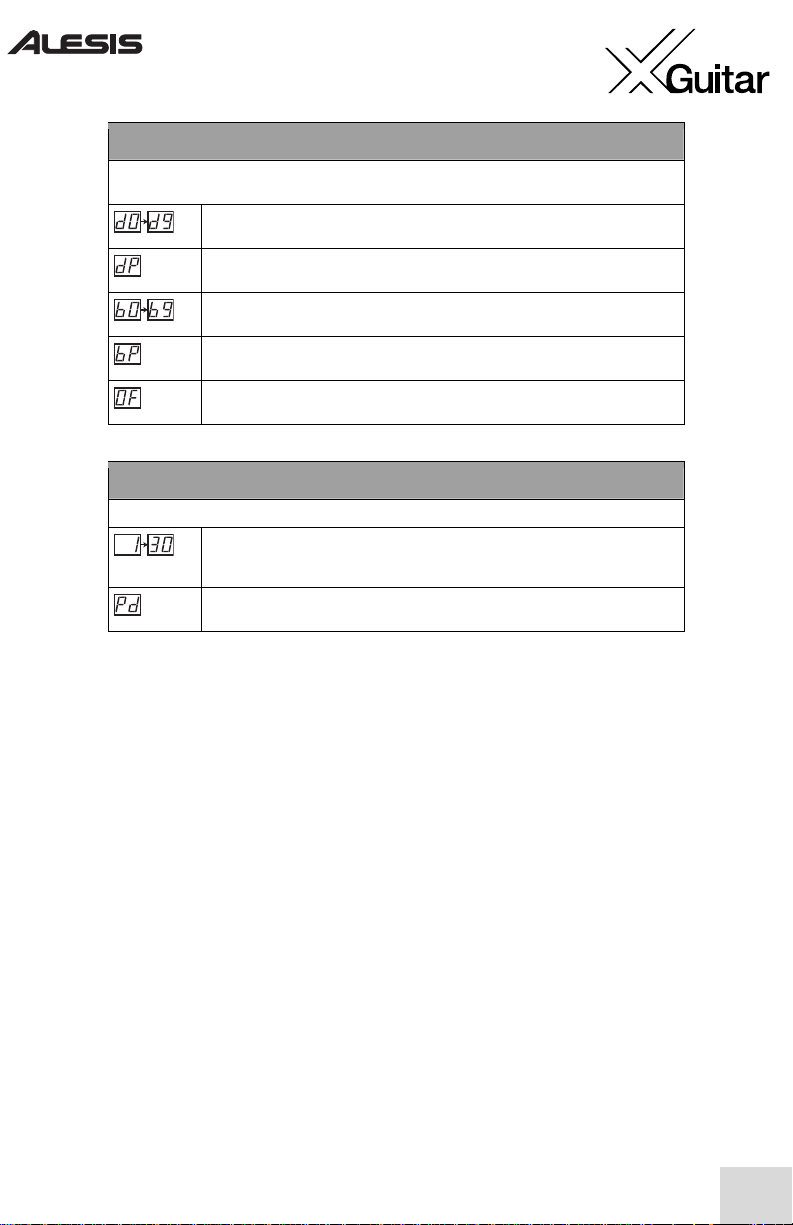
DIGFX (Digital Sampling Effects)
This effect module emulates the effect that different variations of digital sampling can have on an audio
signal.
Sample Rate Decimation
Lower values indicate lower decimation frequency (more decimation, more aliasing).
Pedal Sample Rate Decimation
A sample rate decimator effect controlled by the expression pedal.
Bit Reduction
Higher values indicate lower resultant bit depth.
Pedal Bit Reduction
Bit Reduction effect controlled by the expression pedal.
Off
Indicates that DIGFX is off.
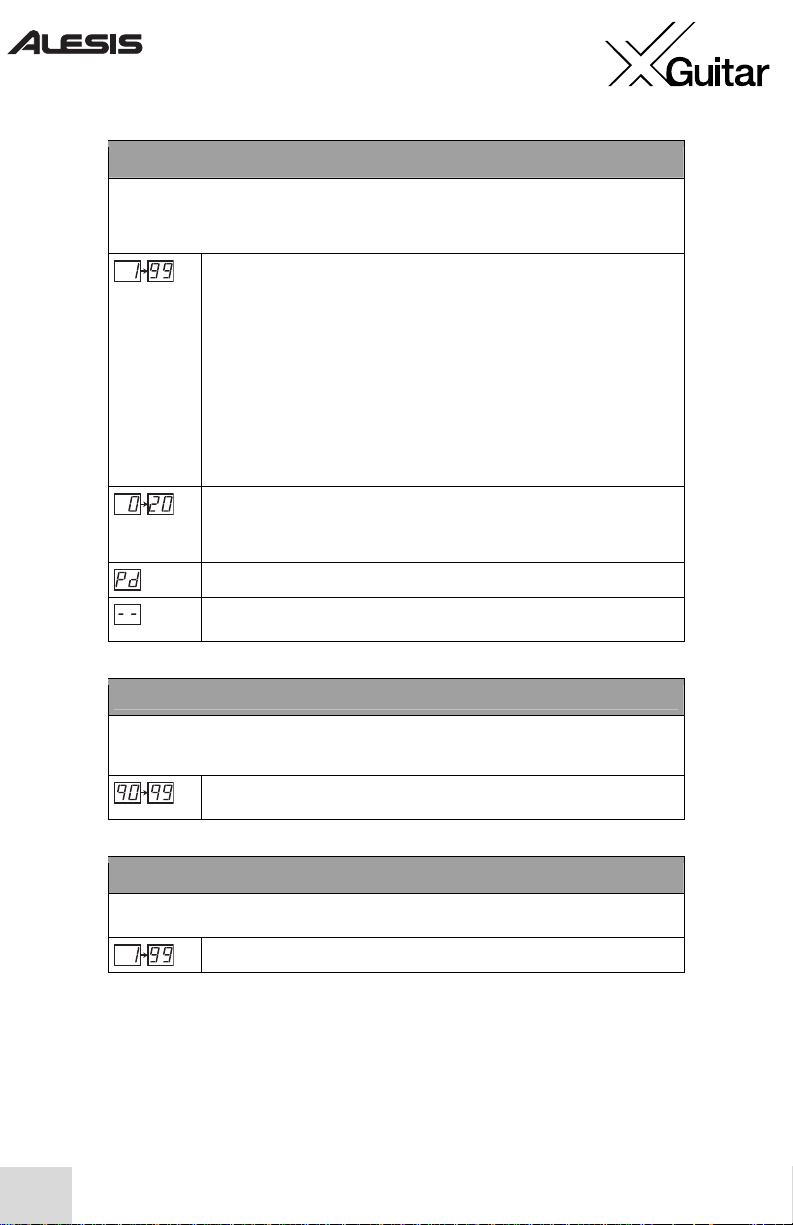
LEVEL
In this position, the display shows you the output level of the current program.
Level
Indicates the program output level in 2dB steps, where 25 is unity gain (0dB). Unity
gain is the point at which the level of the output is the same as the level of the input.
Pedal-Controlled Level
Program level that is controlled by the expression pedal.
14
ROUTE
In this position, the display indicates the current signal-routing order of the FX modules. This ordering
can have a big effect on your sound, as each effect in the configuration feeds into the next. Whatever
the configuration, the LEVEL setting always comes last in line.
This is the default order.
This one is the default order with FX2 and FX3 swapped to put the delay effects in
the middle of the modulation effects.
This order places the cabinet simulator at the end, allowing it to emulate multiple
effects pedals feeding into a cabinet.
This one is order 2 with FX2 and FX3 swapped.
This order is the default order with the compressor/limiter placed at the end, making
this one ideal for recording.
This one is order 4 with FX2 and FX3 swapped.
This is the one to go for if you’re recording and want to sound like you’re running
several effects pedals into a cabinet.
This configuration is order 6 with FX2 and FX3 swapped.

15
Storing effects programs
After you’ve created a configuration that you like, you can store it for future recall. To store
your changes, press the
VALUE
knob and then turn the knob to select a store location.
Press the
VALUE
knob again to store the program.
Copying effects programs from one location to another
Copying programs is easy. Just call up the program that you want to copy. Then, press the
VALUE
knob, twist it until you find the location where you want to store your copy, and
press
VALUE
again to store the program in its new location.
Restoring factory defaults for the effect settings
Once you have saved changes to a preset program, you can still recall the original settings.
To enter the RESTORE FACTORY PRESETS mode, simply hold down the
VALUE
knob
as you turn the unit on and then select the program to be restored (or AL for all programs).
Press the
VALUE
knob to confirm your selection. The display will blink rapidly several
times to indicate the restore was successful. Any program changes you have made will be
lost, so you might want to copy the program to another location first.
To exit the RESTORE FACTORY PRESETS mode, just turn the
EFFECTS
knob. You
can also turn the X Guitar off and then on again, without holding down any knobs or
buttons, to exit the RESTORE FACTORY PRESETS mode.
Deferred program change
In normal operation, the X Guitar switches immediately to the program you select.
However, in some situations — especially when playing live — you may want the ability to
scroll through program numbers while remaining in the current program setting. For
example, if you’ve got a clean and chorusy rhythm sound stored in program A3, and you
want to switch next to a bright lead sound stored in program C5, you don’t want to have to
hear all the programs in between. In these cases, use the X Guitar’s Deferred Program
Change mode.
While turning on the X Guitar, hold down either one of the
Program Up
or
Program
Down
buttons. Letters will scroll by on the display, spelling the word “deferred.”
In this mode, you can scroll through program numbers without having the program change
each time. When you arrive at a program you want to use, press the
Program Up
and
Program Down
buttons or both pedals at the same time in order to switch to that program.
To exit Deferred Program Change mode, turn the X Guitar off, and then turn it back on
again without holding down any buttons.
16
Bypassing the effects
To bypass the effects section entirely, hold down both the
Program Up
and
Program
Down
buttons – or press both footswitches – for less than half a second. The screen will
read by (
) to indicate that the effects have been bypassed.
You may now control the amplifier’s volume with the volume knob. Turning any other
knob restores the effects.
Using the built-in tuner
Press both the
Program Up
and
Program Down
buttons for more than half a second to
enter both Bypass and Mute mode.
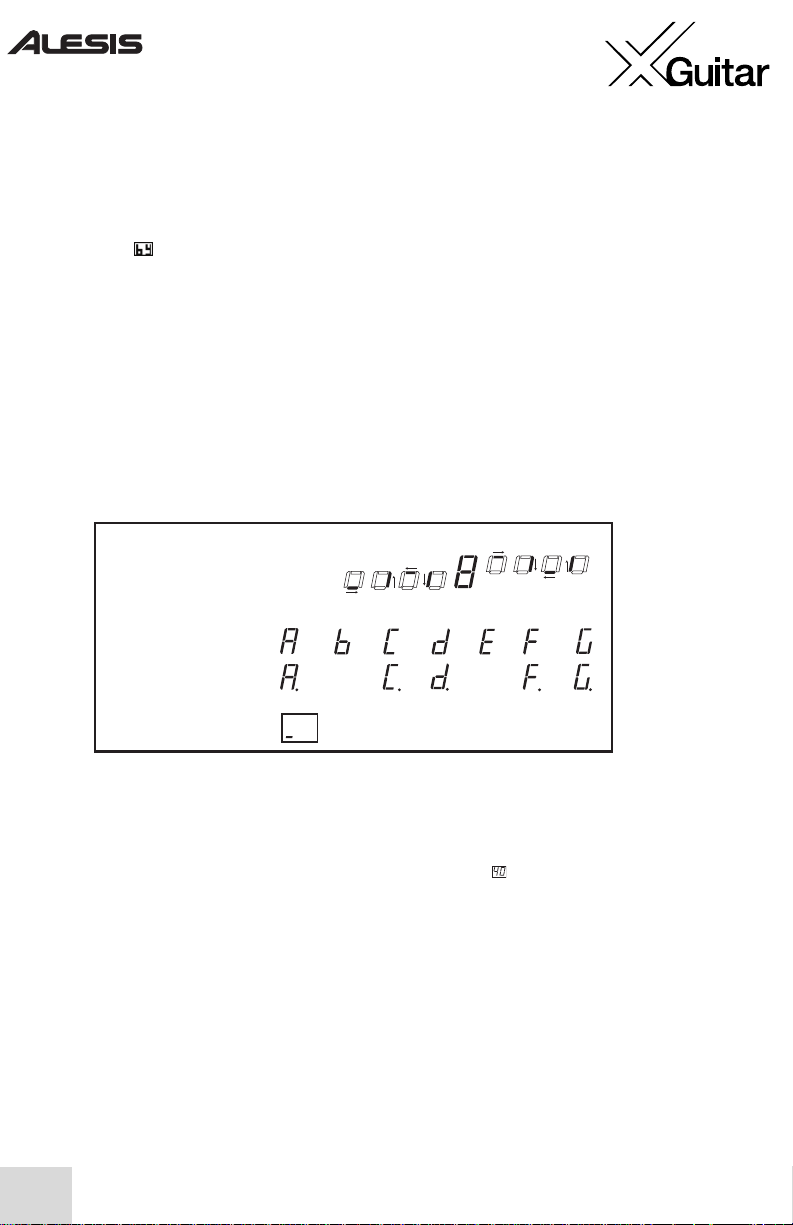
Play the open string you wish to tune. Use the following guide when tuning:
Tuning to a pitch other than A=440
If you turn the VALUE knob while using the tuner, the display shows you the setting for the
X Guitar’s pitch reference, which is set to 440Hz (shown as ) for the A note above middle
C. The possible range of values for this setting is 35 to 45, which represents 435Hz to 445Hz.
Every time you turn the X Guitar’s effects module on, the reference pitch is reset to 440Hz.
V
isual Guide to Tuning
The bottom four segments
rotate counterclockwise if pitch
is low. The top four rotate
clockwise if pitch is high. An 8
means pitch is in tune.
High
In tune
= no pitch detected
The twelve possible
pitches (a decimal point
indicates a sharp):
Lo
w

17
Manual de inicio rápido para el usuario (Español)
Introducción
Felicitaciones por su compra de la X Guitar de Alesis. X Guitar es una guitarra de alto
rendimiento que incluye tanto un sistema tradicional de tres captores (“three pick-up”) como
un procesador de multiefectos estéreo avanzado incorporado. He aquí algunos de los
aspectos más importantes:
● Una guitarra eléctrica provista de todas las características en el estilo más popular de todos
los tiempos.
● Una unidad multiefectos incorporada con docenas de efectos optimizados para la guitarra
como distorsión, compresión, modelaje de gabinete, retraso, wah, cambio de fase y
reverberación.
● Un afinador que silencia la guitarra inteligentemente.
● Perillas y botones incorporados para control fino de los efectos.
● Un conector de entrada para un pedal de expresión opcional, que permite un control aún
mejor de los efectos en tiempo real.
● El conector de salida funciona con auriculares, para que pueda reproducir en privado, en
estéreo.
● Para preservar la vida de la batería, enchufe un adaptador de alimentación opcional de 9
voltios.
● Puede desactivar los efectos completamente para usar el instrumento como una guitarra
eléctrica tradicional.
Por favor lea y guarde este Manual y registre su X
Guitar
La X Guitar tiene varias características. Por favor lea estas instrucciones y guárdelas para
consultar en el futuro. Si pierde este manual, puede bajarlo de http://www.alesis.com.
Hablando de Internet, por favor visite http://www.alesis.com para registrar su nueva X
Guitar de Alesis. Registrarse le ayuda asegurar que le notifiquemos de cualquier tema de
última hora relativo al producto. Si desea, Alesis también le puede enviar información de
otros productos que le puedan interesar.
La registración nos ayuda a nosotros también. Cuando nos informa sobre los tipos de
productos de música que usa y con los que sueña, nos ayuda a presentarle productos de
vanguardia como la X Guitar.

18
Lo primero es lo primero: Instalación de las baterías
Sin baterías, la X Guitar opera como una guitarra eléctrica tradicional. En cambio, para usar
los efectos y el afinador instalados de la X Guitar, necesita instalar cuatro baterías AA (o usar
un adaptador opcional de 9 voltios). Las baterías están incluidas en su paquete de la X
Guitar.
Para instalar las baterías, dé vuelta la guitarra y abra el compartimiento de atrás.
Como con todos los dispositivos que usan baterías, no mezcle baterías parcialmente usadas
con las nuevas, saque las baterías si no piensa tocar la X Guitar por un mes o más, y
mantenga la X Guitar fuera del calor o frío extremo.
Puede esperar unas 30 horas de uso normal con baterías alcalinas. Note que las baterías
continúan agotándose aun si no está tocando la X Guitar. Por lo tanto, asegúrese de apagar
la guitarra (vea las instrucciones abajo) cuando termine de usarla. (Puede que la gente
ahorrativa u olvidadiza quiera invertir en un juego de baterías recargables, que funcionan
muy bien con la X Guitar.)
Si está usando un adaptador de 9 voltios, las baterías serán puenteadas.
19
Controles frontales
El frente de la guitarra combina los controles tradicionales con dos interruptores especiales
para los efectos instalados.
1.
Interruptor selector del Pickup (captor)
– El interruptor de cinco posiciones
selecciona una de las combinaciones de pickup:
1-Puente solamente. 2-Puente + Centro. 3-Centro solamente.
4-Centro + Mástil. 5-Mástil solamente.
Los tres pickups son de modelo de humbucking, que reduce el ruido bastantemente con
relación a los pickups sin humbucking. El pickup de posición del puente cuenta con la
configuración lado a lado del humbucker tradicional. Los captores de las posiciones del
centro y del mástil usan una configuración de “stacked single-coil” (bobina apilada).
2.
Perilla de volumen
- Esta perilla atenúa (disminuye) la salida de los pickups de la X
Guitar. Es independiente de los efectos y actúa antes que ellos.
3.
Interruptor subir/bajar para programas
– Aumente o disminuya el programa de
efectos usando este interruptor.
4.
Interruptor de encendido/apagado de efectos
– Mueva este interruptor hacia arriba
para activar los efectos. Asegúrese de apagarlo después de tocar la guitarra para conservar
las baterías.
5.
Conector de salida
– Para salida estéreo, enchufe un cable de
TRS a este conector a fin de conectar la guitarra a un mezclador o
a una grabadora. (Puede ser que necesite usar cables en “Y” o un
cordón especial de división).
Enchufe un cable TS (mono) para conectar a un amplificador de
guitarra.
Enchufe un par de auriculares para disfrutar una función privada.
20
Conectores de fondo
1.
Entrada para el pedal de expresión
– Enchufe un pedal de expresión opcional para
controlar uno de los efectos dentro del procesador de multiefectos.
2.
Conector adaptador de corriente alterna
– Enchufe un adaptador opcional de
corriente alterna usando este tomacorriente.
Controles del procesador de efectos
Use los controles de la parte superior de la X Guitar para operar los efectos instalados.
1.
Pantalla
– En el modo PLAY, la pantalla muestra la letra de banco (A-H) en la parte
izquierda y el número de programa del banco (0-9) en la parte derecha. Un punto pequeño
de la parte derecha inferior le indica que ha editado un programa. Otro punto pequeño en la
parte central inferior de la pantalla está dedicado para indicar las notas agudas cuando el
afinador está activado.
2.
Botones de subir/bajar
– Use estos botones para acceder diferentes programas.
Presiónelos juntos para silenciar la guitarra y usar el afinador instalado.
3.
Perilla de efecto (EFFECT)
– En el modo PLAY, presionando los botones de
subir/bajar del PROGRAMA o girando la perilla de VALUE (valor), accede a los diferentes
programas. Girando la perilla EFFECT (efecto) a cualquier otra posición le permite editar
los efectos. Las siguientes páginas le proporciona una referencia a los efectos.
4.
Perilla de valor (VALUE)
– Gire esta perilla para cambiar el valor de lo que esté
seleccionado usando el botón EFFECT. Presione VALUE para almacenar los programas.
Presione y gire VALUE para aumentar o disminuir el nivel total del módulo de efectos. Esta
característica puede ser valiosa para hacer coincidir la intensidad de la señal de la X Guitar
con el amplificador, mezclador u otro dispositivo donde esté conectada la guitarra.

21
Explorando los efectos de la X Guitar
La X Guitar contiene un procesador de efectos estéreo avanzado. La distorsión, compresión,
retrasos, coros, reverberaciones y mucho más le permiten crear una gran variedad de sonidos
populares, antiguos y experimentales de la guitarra eléctrica.
Comience explorando los programas predeterminados de la X Guitar. Gire la perilla de
efectos completamente hacia la izquierda para seleccionar PLAY. Ahora, toque su guitarra y
explore los programas presionando los botones de arriba y abajo para programas o girando
la perilla de valor.
Escuchará programas que comprenden de ultra-limpio a rock, jazz y nasty. Si tiene la
oportunidad, asegúrese de enchufar un par de auriculares estéreo directamente a la salida de
la X Guitar para experimentar estos efectos en estéreo. Algunos de los efectos se resaltan
verdaderamente en estéreo.
Cómo modificar los programas de efectos
Hay mucho más en los efectos de la X Guitar que lo que hay en los predeterminados. La X
Guitar cuenta con ocho módulos de efectos individuales, como se muestra aquí abajo:
Se accede a estos efectos usando la perilla
EFFECT
.
Mueva la perilla
EFFECT
en el sentido de las agujas del reloj fuera de la posición PLAY
para poder editar los efectos. Después que cambie un efecto, se iluminará el LED
“EDITED” (Editado) de la parte derecha inferior de la pantalla. Aquí están sus opciones, de
izquierda a derecha:
22
PLAY
Aquí, la pantalla le muestra el número del programa actual. Este es el modo que debería elegir para
actuaciones en vivo, ya que le permite cambiar de programa fácilmente con los pedales de pie.
Indica la letra de banco y el número de programa actual.
COMP/LIMIT (Compresión del compresor/limitador)
Compresión. Agrega sustain (sostenidos) y suavidad al bajar el rango dinámico.
Limitación. Mantiene el volumen original, pero suaviza los picos más altos.
Off (Apagado). Apaga el COMP/LIMIT.
DIST (Distorsión)
Este ajuste agrega ese efecto universal que fue usado primeramente en la música rock hace décadas y
que ahora se ha convertido en un ingrediente principal en varios géneros.
Acústica.
Emula el sonido de una guitarra acústica.
T
ube Clean
(Tubo).
Simula el sonido limpio de un amplificador de tubos de alto vacío.
R
hythm
(Ritmo).
Un sonido con un poco de distorsión; perfecto para el ritmo.
O
verdrive.
Proporciona un sonido más áspero que el ajuste de ritmo, como si
estuviera forzando esos tubos del amplificador.
D
istortion
(Distorsión).
Le da un sonido crujiente.
Bl
ues.
Un sonido cálido y crujiente asociado con algunos de los mejores
artistas de guitarra de blues.
Fu
zz. Ese efecto de distorsión clásico de los años sesenta. Sólo escuche
y verá a qué le debe su nombre.
L
ead. Un overdrive punzante que hará gritar a sus solos.
M
etal. Un sonido distorsionado pesado con un largo sostenimiento.
S
tack Drive. Una distorsión pesada que suena como si estuviera tocando por
una impresionante pila de amplificadores de tubos.
C
ombo Drive. Otra distorsión pesada; suena como una pila de amplificadores de
tubos con una gama media bien definida.
Of
f. Apaga el DIST.
23
DRIVE (aumenta o disminuye el nivel de la distorsión)
Éste es un parámetro del módulo DIST.
Cómo aumentar los niveles de drive/ganancia para el módulo de DIST.
Pedal de control del drive/ganancia.
NR (Reducción de ruido)
Es una combinación de dos efectos –eliminación de zumbido y reducción de ruido. La eliminación de
zumbido funciona cortando la frecuencia que contiene el zumbido (60 Hz). La reducción de ruido
funciona bloqueando la señal (silenciando la señal hasta que su nivel aumente sobre un cierto punto).
Eliminación de zumbido (dígito izquierdo de la pantalla)
Niveles crecientes de eliminación de zumbido (filtros eliminadores de banda de
armónicas de 60 Hz)
Desactiva la eliminación de zumbido.
Reducción de ruido (Dígito derecho de la pantalla)
Niveles crecientes del umbral de compuerta.
Desactiva la reducción de ruido.
CAB (Cabinet Simulator - Simulador de caja acústica)
Este módulo le permite a su Roadfire de emular disposiciones de cajas acústicas de varios tamaños.
Una caja acústica única de drivers de 12 pulgadas.
Una caja acústica única de drivers de 2 x 12 pulgadas.
Una caja acústica única de drivers de 4 x 10 pulgadas.
Off
Apaga el CAB.
 Loading...