


Quick Start Owner’s Manual
Box Contents:
Sumo Keyboard Amplifier
Quick Start Owner’s Manual
Important Safety Instructions
Power Cord
Manual de inicio rápido para el usuario (Spanish)
Contenido de la caja:
Amplificador de teclado Sumo
Manual de inicio rápido del usuario
Instrucciones de seguridad importantes
Cable de alimentación
Guide d’installation rapide (Français)
Contenue de la boîte :
Amplificateur de clavier Sumo
Guide d’utilisation simplifié
Consignes de sécurité importantes
Câble d'alimentation
Schnelles Hinweisbuch (Deutsch)
Schachtelinhalt:
Sumo Keyboard-Verstärker
Schnellbedienungsanleitung
Wichtige Sicherheitshinweise
Netzkabel
Manuale rapido di utilizzazione (Italiano)
Contenuto della Confezione:
Amplificatore per tastiera Sumo
Manuale rapido di utilizzazione
Importanti Istruzioni di Sicurezza
Cavo di alimentazione

This page intentionally left blank.

Quick Start Owner's Manual (English)
Quick Setup for the Sumo
yMake sure all items listed on the front of this guide are in the Sumo's box.
yRead the Important Safety Instructions document included with the Sumo.
yStudy the Hookup Diagram below.
yMake sure all equipment is turned off and all gain knobs are set to zero.
yConnect your keyboard, microphone, or other equipment to the Sumo in the manner illustrated below.
yPlug in all devices and turn them on. Turn the Sumo on last, after all other devices.
yExperiment with the Sumo's effect settings.
yWhen finished, turn off the amp first, before turning off and disconnecting any equipment. This helps prevent damage to the Sumo.
yGo to http://www.alesis.com to register the Sumo.
1

Front panel operation
Sumo 300 only
1.Channel Volume – Raise or lower the volume for each channel.
2.Effect Mix – Mix in any amount of the master effect.
3.Channel 1 Bass and Treble – Boost or cut the bass and treble for channel 1 by up to +/- 15 dB using these controls.
Note: Channel 1 still runs through the Master EQ section. These controls operate in addition to the Master EQ for channel 1.
4.Master EQ – Boost or cut the bass, midrange, and treble across all input channels by up to +/- 15 dB using these controls.
5.Effect – Apply one of fifteen different stereo effects.
6.Master Volume Knob – controls the volume of the signal sent to the speaker, headphones, STEREO LINK OUTPUT and MAIN OUTPUT.
7.Power switch – Turn the Sumo on and off. When the Sumo is on, the blue Alesis logo illuminates.
2

Rear panel operation
Sumo 300 only
8.Power Cord Outlet – Plug a standard IEC cord into this jack and into a properly grounded AC outlet.
9.Fuse – Replaceable fuse. See the rear panel of the Sumo for details.
10.Fan – An internal fan keeps the Sumo running cool. The fan will remain off until the unit heats up. Do not obstruct the air flow around this area.
11.Main Output – Plug XLR cables into one or both of these outputs to send a +4 dBu line-level signal to a balanced input on a mixer, recorder, or other audio device. The Sumo’s effects are included in the Main Output signal.
Note: The internal speaker continues to operate when the Main Output jacks are used.
12.Headphones – Plug in a set of stereo headphones using a 1/4" stereo plug. Using the headphone jack disconnects the Sumo’s internal speaker.
13.Stereo Link Output – Use a ¼" tip-sleeve (TS) cable to connect this jack to the input of another amplifier for true stereo. The Sumo provides true stereo output instead of the standard mono; many of the Sumo’s excellent effects will sound even better when you listen to them in stereo. If you don’t have a second amplifier, you can enjoy the stereo effects by listening with headphones.
14.¼" Instrument Inputs – Use ¼" cables to connect synthesizers, drum machines, and other devices. Use two cables for stereo. For mono sources, use either one of the the left and right inputs.
Note: For the cleanest signal, use "balanced" tip-ring-sleeve (TRS) cables. "Unbalanced" tip-sleeve (TS) cables may also be used, but they are more likely to conduct hum and other electromagnetic noise.
15.Microphone Input – Plug a microphone into this input using an XLR cable. You can use both the microphone input and the ¼" inputs on channel 1 at the same time.
Note: The microphone input does not provide phantom power.
3

Effects
The Sumo contains an advanced, stereo effects processor with fifteen different programs. Here are those programs as you rotate the Master section’s Effect knob clockwise, beginning at the "off" position (with the knob pointing straight down).
Effect name |
Description |
Rotary |
Rotary speaker emulation. This effect is |
|
especially popular with organ sounds. |
Hall 1 |
The reverberation of a bright concert hall. |
Hall 2 |
The reverberation of a warm concert hall. |
Delay 1 |
A short (125 millisecond) slapback delay. |
Delay 2 |
A longer (190 millisecond) and longer-lasting |
|
(more regenerative) delay. |
Chorus |
Stereo chorusing, which adds a thickness to the |
|
sound. |
Flange |
Stereo flanging, which alters the phase of |
|
incoming audio signals to produce jet-airplane- |
|
like whooshing sounds. |
Room 1 |
The ambience of a studio constructed with hard |
|
wood walls. |
Room 2 |
A room sound optimized to acoustic instruments |
|
and synthesizers. Reverberation time is shorter |
|
than that for the other rooms. |
Room 3 |
A room sound optimized for guitars and other |
|
rhythm instruments. |
Plate 1 |
The classic plate reverb sound for vocals and |
|
lead instruments. |
Plate 2 |
A brighter, more sizzling plate reverb sound that |
|
works well on vocals and drums. |
Plate 3 |
A warmer, more vintage sounding plate reverb |
|
sound. |
Chorus/Room 1 |
A combination of chorus and reverb. |
Chorus/Room 2 |
A darker-sounding combination of chorus and |
|
reverb, with a touch of wah-wah. |
Choose an effect by using the Master section’s Effect knob. Then, within each individual channel, rotate the channel’s Effect knob to increase or decrease the amount of the effect to be applied to that channel.
Turn the Effect knob to "off" to disable the onboard effects.
4

Specifications
External audio inputs
Input Connectors: |
Balanced 1/4" TRS jacks |
(2 stereo pairs on Sumo 100. 4 stereo pairs on Sumo 300.) |
Maximum Input Level: |
XLR microphone input |
(1 input on both Sumo 100 and Sumo 300.) |
TRS inputs: |
-21.5 dBU (9.2VRMS) |
|
(channel volume at maximum) |
XLR input: |
-21 dBU (69mVRMS) |
Input Impedance @ 1 kHz: |
TRS inputs: |
10KΩ |
|
XLR input: |
>3KΩ |
External audio outputs
Output Connectors: |
Stereo Link Output: |
1/4" TRS |
|
Main L/R: |
XLR |
Maximum Output Level: |
Headphones: |
1/4" TRS |
Stereo Link output: |
+ 21.5dBu (9.2VRMS) |
|
(before clipping) |
Main L/R output: |
+ 21.5dBu (9.2VRMS) |
|
Headphone output: |
100 mW RMS |
Output Impedance: |
Stereo Link output: |
1KΩ |
|
Main L/R output: |
100Ω |
|
Headphone output: |
>25mW@8Ω, >140mW@75Ω, >60mW@600Ω |
Equalization circuit
Circuitry: |
Channel 1: |
|
Dual-Band analog EQ |
|
Master: |
|
Three-Band analog EQ |
Operation: |
Channel 1 |
Bass: |
± 15db @ 120 Hz |
|
Channel 1 |
Treble: |
± 15dB @ 6kHz |
|
Master EQ Bass: |
± 15db @ 120 Hz |
|
|
Master EQ Mid: |
± 15db @ 2.45 Hz (1.8 Q) |
|
|
Master EQ Treble: |
± 15 dB @ 6kHz |
|
Digital Effects
General Characteristics: Stereo, 28-bit effects.
Loudspeakers
General Characteristics: |
Sumo 100: |
12" |
(30.5 cm) woofer |
|
|
1" (2.5 cm) horn-mounted tweeter |
|
|
Sumo 300: |
15" |
(38 cm) woofer |
|
|
1" (2.5 cm) horn-mounted tweeter |
|
Amplification section
Power: |
Sumo 100: 100W (8Ω, 1kHz, 0.04% THD+N), 140W (8Ω, 1kHz, 1% THD+N) |
|
|
Sumo 300: 250W (8Ω, 1kHz, 0.04% THD+N), 300W (8Ω, 1kHz, 1% THD+N) |
|
Frequency Response: |
Main L/R output: |
20Hz-20kHz, ± 1.5dB |
(using main outputs) |
|
|
Power Consumption: |
Sumo 100: |
200 Watts max |
(120VAC/60Hz, |
Sumo 300: |
470 Watts max |
240VAC/50Hz) |
|
|
Physical
Dimensions (WxHxD): Sumo 100: 16" x 14" x 24.5" / 40.6 x 35.6 x 62.2 cm
Sumo 300: 19" x 16.5" x 29" / 48.3 x 41.9 x 73.7 cm
Weight: Sumo 100: 52.5 lbs / 23.8 kg
Sumo 300: 75 lbs / 34.0 kg
5

This page intentionally left blank.
6
Manual de inicio rápido para el usuario (Español)
Instalación rápida del Sumo
yAsegúrese de que todos los artículos incluidos al inicio de este manual estén incluidos en la caja del Sumo.
yLea las Instrucciones importantes de seguridad incluidas con el Sumo.
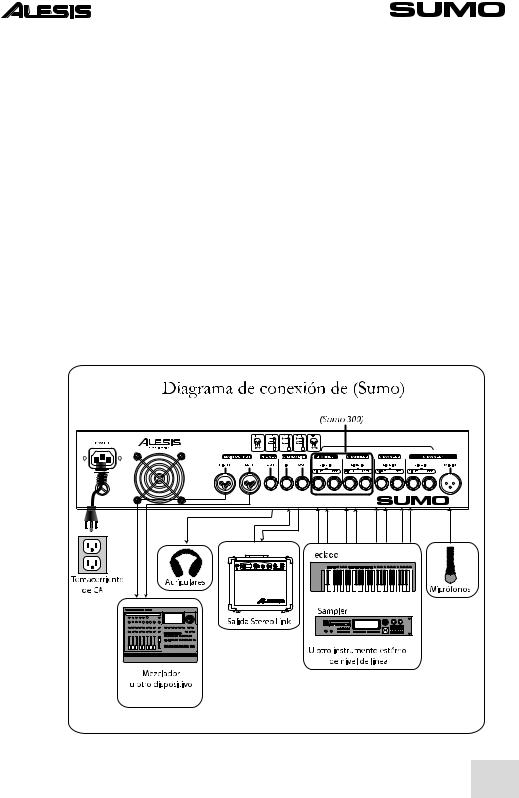
yEstudie el Diagrama de conexión de abajo.
yAsegúrese de que todos los equipos están apagados y de que todos los potenciómetros de ganancia están en posición cero.
yConecte su teclado, micrófono, u otros equipos al Sumo de la manera ilustrada más abajo.
yEnchufe todos los dispositivos y enciéndalos. Encienda el Sumo en último término, después de todos los demás dispositivos.
yExperimente con las combinaciones de efectos del Sumo.
yCuando termine, apague el amplificador primero, antes de apagar y desconectar cualquier equipo. Esto ayuda a evitar daños al Sumo.
yVisite http://www.alesis.com para registrar el Sumo.
7

Como operar el panel frontal
Sumo 300
1.Volumen de canal – Aumente o disminuya el volumen para cada canal.
2.Mezclado de efectos – Mezcle cualquier cantidad del efecto master.
3.Graves y agudos del Canal 1 – Aumente o corte los graves y agudos para el canal 1 hasta 15 dB usando estos controles.
Nota: Canal 1 sigue pasando por la sección del ecualizador del Master. Estos controles operan además del ecualizador del Master para el canal 1.
4.Ecualizador del Master – Aumente o corte los agudos, gama media y graves en todos los canales de entrada hasta 15 dB usando estos controles.
5.Efecto – Aplique uno de los quince diferentes efectos estéreo.
6.Perilla MASTER VOLUME (Volumen principal) – controla el volumen de la señal enviada al altavoz, auriculares, SALIDA DEL ENLACE ESTÉREO y SALIDA PRINCIPAL.
7.Interruptor de encendido – Enciende y apaga el Sumo. Cuando el Sumo está encendido, se ilumina el logotipo azul de Alesis.
8
 Loading...