


Quick Start Owner’s Manual
Box Contents:
Roadfire Guitar Amplifier
Quick Start Owner’s Manual
Important Safety Instructions
Power Cord
Manual de inicio rápido para el usuario (Spanish)
Contenido de la caja:
Amplificador de guitarra Roadfire
Manual de inicio rápido del usuario
Instrucciones de seguridad importantes
Cable de alimentación
Guide d’installation rapide (Français)
Contenue de la boîte :
Amplificateur de guitare Roadfire
Guide d’utilisation simplifié
Consignes de sécurité importantes
Câble d'alimentation
Schnelles Hinweisbuch (Deutsch)
Schachtelinhalt:
Roadfire Gitarrenverstärker
Schnellbedienungsanleitung
Wichtige Sicherheitshinweise
Netzkabel
Manuale rapido di utilizzazione (Italiano)
Contenuto della Confezione:
Amplificatore Chitarra Roadfire Manuale rapido di utilizzazioneImportanti Istruzioni di Sicurezza
Cavo di alimentazione

This page intentionally left blank.

Quick Start Owner's Manual (English)
Quick Setup for the Roadfire
yMake sure all items listed on the front of this guide are in the Roadfire's box.
yRead the Important Safety Instructions document included with the Roadfire.
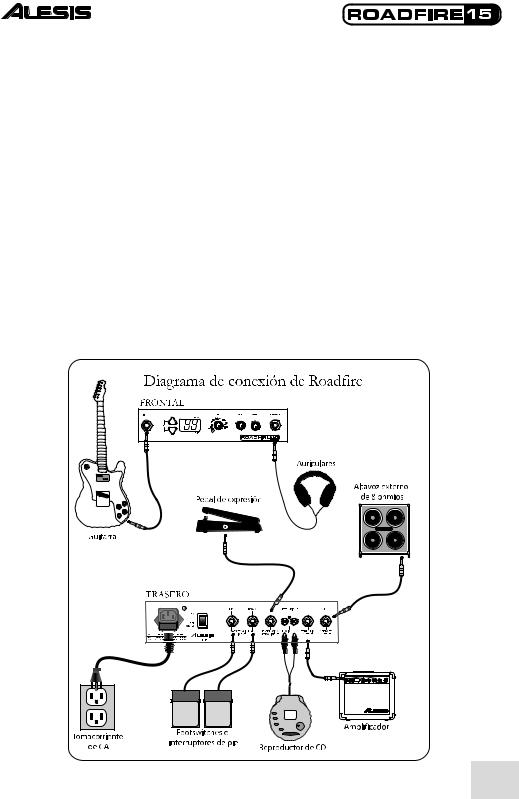
yStudy the Hookup Diagram below.
yMake sure all equipment is turned off and all gain knobs are set to zero.
yConnect your guitar and other equipment to the Roadfire in the manner illustrated below.
yPlug in all devices and turn them on. Note: Leave the Roadfire plugged in for at least eight hours before operating it under battery power for the first time.
yTurn the EFFECT knob to the PLAY position. Use the PROGRAM UP/DOWN buttons to audition all of the Roadfire's built in effects.
yWhen finished, turn off the amp before disconnecting any equipment to prevent damage to the speaker.
yGo to http://www.alesis.com to register the Roadfire.
1

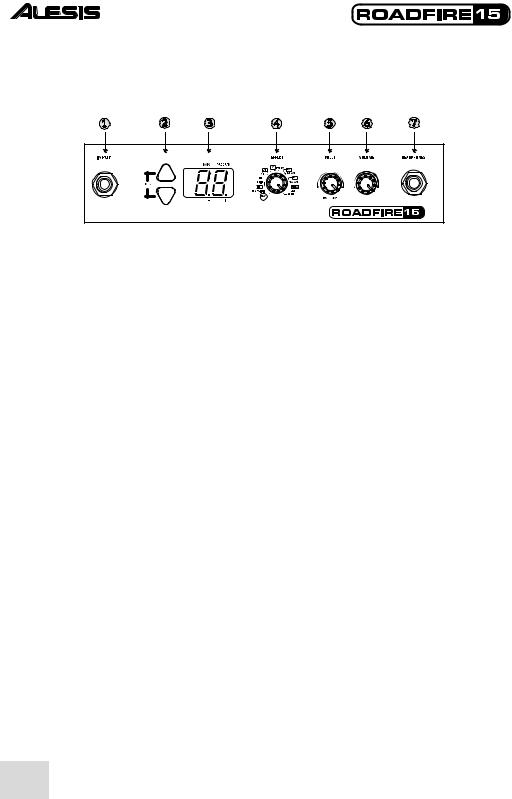
Front panel operation
1.Input – Plug your guitar into this 1/4" unbalanced input using a TS cable.
2.Program Up/Down Buttons – Change the program number with these buttons. When pressed together, they put the unit into both Bypass and Mute modes and access the tuner.
3.Display – indicates bank and program, shows parameter values, and displays the pitch in tuner mode.
4.EFFECT Knob – puts the Roadfire in PLAY mode or EDIT mode. You are in EDIT mode when this knob is set to anything other than PLAY.
5.VALUE Knob – adjusts parameter values and program numbers; stores changes.
6.MASTER VOLUME Knob – controls the volume of the signal sent to the speaker, headphones, STEREO LINK OUTPUT and SPEAKER OUTPUT.
7.HEADPHONES Jack – Plug in your headphones using a 1/4" stereo plug.
2

Rear panel operation
8.Power Cord Outlet – Plug a standard IEC cord into this jack and into a properly grounded AC outlet.
9.Fuse – Replaceable fuse. See the rear panel of the Roadfire for details.
10.Power Connection Light – This light illuminates whenever the Roadfire is plugged in.
11.Power Switch – Turns the Roadfire on and off. The Roadfire charges the internal battery as required even when this switch is set to “off.”
12.FOOTSWITCH UP/DOWN INPUT – Plug footswitches into these 1/4" jacks. Footswitches serve the same functions as the Program Up and Down buttons.
13.EXPRESSION PEDAL INPUT – Plug an expression pedal into this 1/4" jack for easy control over EFFECT parameters.
14.AUX INPUT – Plug a CD player or other audio device into these RCA jacks and play along!
15.STEREO LINK OUTPUT – Use a 1/4" TS cable to connect this jack to the input of another amplifier for true stereo. The Roadfire provides true stereo output instead of the standard mono; many of the Roadfire’s excellent effects will sound even better when you listen to them in stereo. If you don’t have a second amplifier, you can enjoy the stereo effects by listening with headphones.
16.SPEAKER OUTPUT – Use a 1/4" TS cable to connect this jack to an external 8-ohm speaker. Doing so disconnects the internal speaker.
3

Using the Roadfire’s built-in battery
Basics
The Roadfire contains a rechargeable, lead-acid battery. The battery can be fully discharged and recharged up to 1,000 times.
Before using the Roadfire, plug it in to an AC outlet for eight hours to ensure a full charge.
The battery is not user-replaceable and is not user-serviceable. Battery replacement or service, while rarely required, must be performed by an authorized Alesis service center.
Operating time
Under normal playing conditions, the Roadfire operates on internal battery power for three to four hours. If the amplifier is used quietly, battery life can extend to about eight hours. If the amplifier is used full-out with no rest, the battery will last about two hours (for instance, if you were using the Roadfire with an external CD player and the CD were playing constantly).
Charging
The Roadfire is designed to charge its internal battery easily, safely, and reliably. When you plug the Roadfire into an AC outlet, the Roadfire switches to AC power operation and charges the battery at the same time. Once the battery is fully charged, the Roadfire automatically switches to a “trickle charge” mode. There is no risk of battery overcharging, so you can leave the Roadfire plugged in continously, just like a regular amplifier.
The “AC power” light on the back of the Roadfire remains lit whenever the amplifier is connected to a live AC outlet.
Unlike nickel-cadmium and other battery types, the Roadfire’s battery does not develop a "memory" over time. Feel free to charge the Roadfire’s battery partially. Do not make any special efforts to run the battery down completely.
Disposal
The Roadfire’s battery is hazardous to the environment if it is not properly disposed. Check with your municipality or local “big-box” hardware store for advice on safely disposing the Roadfire.
4

Exploring the Roadfire’s effects
The Roadfire contains an advanced, stereo effects processor dedicated to electric guitars. Distortion, compression, delays, choruses, reverbs, and much more allow you to create a wide variety of popular, vintage, and experimental electric guitar sounds.
Begin by exploring the Roadfire’s default programs. Turn the Effect knob all the way to the left to select Play. Now, play your guitar and explore the programs by pressing the Program Up and Program Down buttons, twisting the Value knob, or by using optional footswitches attached to the rear of the unit.
You’ll hear programs ranging from ultra-clean to rocking to jazzy to out-and-out nasty. If you have the chance, be sure to plug a pair of stereo headphones into the back of the Roadfire to experience these effects in stereo. Some of the effects – good as they are coming out of the Roadfire’s internal speaker – really come alive in stereo.
Modifying the effects programs
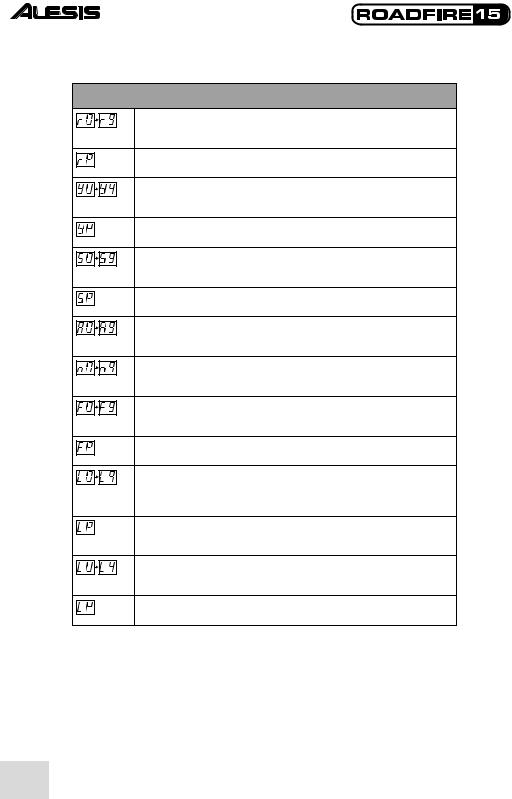
There’s a lot more to the Roadfire’s effects than just what’s in the presets. The Roadfire has eight separate effect modules, as shown below:
These effects are accessed using the EFFECT knob on the front of the Roadfire.
Move the EFFECT knob clockwise out of the Play position in order to edit the effects. Once you change an effect, the EDITED LED on the bottom right of the display will light. From left to right, here are your options:
PLAY
In this setting, the display shows you the current program number. This is the mode you should choose for typical live performances, as it allows you to switch programs easily via the foot pedals.
Indicates the bank letter and program number of the current program.
5

COMP/LIMIT (Compressor/Limiter)
Compression. Adds sustain and smoothness by lowering the dynamic range.
Limiting. Retains the original volume, but smoothes out the loudest peaks.
Off. Turns COMP/LIMIT off.
DIST (Distortion)
This setting adds that universal effect that was first used in rock music decades ago and now has become a staple for guitarists in many genres.
Acoustic. |
Emulates the sound of an acoustic guitar. |
Tube Clean. |
Simulates the clean sound of a classic tube amplifier. |
Rhythm. |
A slightly distorted sound; great for rhythm playing. |
Overdrive. |
Provides more grit than the Rhythm setting, like you’re really |
Distortion. |
pushing those amplifier tubes. |
Adds crunchiness to your sound. |
|
Blues. |
A warm yet slightly crunchy sound associated with some of the |
Fuzz. |
blues-guitar greats. |
That classic fuzz distortion effect of the 60s. Just listen and you’ll |
|
Lead. |
see how it got the name. |
A searing overdrive that will make your solos scream. |
|
Metal. |
A heavily overdriven sound with a long sustain. |
Stack Drive. |
A heavy, driving distortion that sounds like you’re playing through |
Combo Drive. |
a massive tube stack amp. |
Another heavyweight distortion; sounds like a tube stack amp with |
|
Off. |
a well-defined midrange. |
Turns DIST off. |
DRIVE
This is a parameter of the DIST module.
Increasing levels of drive/gain for the DIST module.
Pedal control of the drive/gain.
6

NR (Noise Reduction)
This is a combination of two effects—hum elimination and noise reduction. Hum elimination works by cutting out the frequency that contains the hum (60Hz). Noise reduction works by gating the signal (muting the signal until its level rises above a certain point).
Hum Elimination (Left digit of display)
Increasing levels of hum elimination (60Hz harmonic notch filters).
Turns off hum elimination.
Noise Reduction (Right digit of display)
Increasing levels of gate threshold.
Turns off noise reduction.
CAB (Cabinet Simulator)
This module allows your Roadfire to emulate cabinet setups of various sizes.
A single 12” driver cabinet.
A 2 x 12” driver cabinet.
A 4 x 10” driver cabinet.
Off
Turns off CAB.
FX1 (Multi-Effect Module 1, Mono to Stereo Effects)
This module gives you a choice of mono effects. You may assign one effect at a time to this module.
Auto Wah
A wah sound controlled by playing intensity. Attack the strings aggressively for more effect. Higher values indicate higher input sensitivity.
Pedal-Controlled Wah
A wah sound controlled by moving the optional expression pedal up and down as you play.
Phaser
An effect that shifts the phase of the signal and adds it to the original sound (in simpler terms, it adds a duplicate signal that is delayed a bit). The phaser gives your guitar a full, pulsating sound. Higher values result in more feedback, producing a more intense effect.
Pedal-Controlled Phaser
A phaser effect with its feedback controlled by the expression pedal.
Tremolo
Varies the volume of the signal, creating a rising and falling effect. Higher values result in greater depth of variation.
Pedal-Controlled Tremolo
A tremolo effect with its depth controlled by the expression pedal.
7
FX1 – Continued
Ring Modulation
An effect that modulates the amplitude of the signal, giving it a metallic sound. Higher values result in greater modulation depth.
Pedal-Controlled Ring Modulation
Ring modulation with its depth controlled by the expression pedal.
Cry
Creates an effect similar to that of a voice box, adding a human-like crying effect to the sound. Higher values result in greater intensity.
Pedal-Controlled Cry
A cry effect with its filter frequency controlled by the expression pedal.
Random Sample and Hold Step Filter
For this effect, the filter cutoff frequency changes abruptly to a new psuedo-random value at a fixed time interval, producing an arpeggiator-like sound.
Pedal-Controlled Step Filter
A step filter with its depth controlled by the expression pedal.
Slow Attack
Reduces the attack rate of the signal, slowing the rate at which the volume of the sound rises when you attack a string. Higher values result in higher sensitivity.
Auto Pan
Pans the signal back and forth from left to right at a constant rate determined by the
PARAM setting. Higher values result in increased pan depth.
Flanger
Shifts the pitch of the signal up and down, creating a swirling effect. Higher values result in longer delay.
Pedal-Controlled Flanger
A flanger with its delay controlled by the expression pedal.
Rotary Speaker
Emulates the sound of the classic rotary, creating a Doppler effect similar to that achieved by an organ’s rotating speaker. Higher values result in greater intensity and pan depth.
Pedal-Controlled Rotary Speaker
A rotary speaker effect with its intensity and pan depth controlled by the expression pedal.
Chorus
Adds fullness to your sound by emulating a chorus of multiple instruments. Higher values indicate greater modulation depth.
Pedal-Controlled Chorus
A Chorus effect with its modulation depth controlled by the expression pedal.
8
FX1 – Continued
Pitch Transpose
Transposes the pitch of the signal either up or down. P0 – P4 transpose the pitch down a minor third, a major third, a perfect fourth and a perfect fifth respectively. P5
– P9 transpose the pitch up in the same manner.
Variable Pitch Transpose Up
Variably transposes the pitch upward from 0 to 2 octaves according to the setting of the direct-control parameter (PARAM) for FX1.
Variable Pitch Transpose Down
Variably transposes the pitch downward from 0 to 2 octaves according to the setting of the direct-control parameter (PARAM) for FX1.
Off
Turns off FX1.
PARAM (Direct-Control Parameter for FX1)
This parameter modifies the operation of the effect selected for the FX1 module. Changing between effect types with dissimilar value ranges will scale this value accordingly. For example, if you set Phaser to PARAM=63 and then switch to the Auto Wah effect, its PARAM value will be 12. Changing back to Phaser will result in a PARAM value of 63.
Indicates the value of FX1’s direct-control parameter, according to the following:
For Auto Wah, Phaser, Tremolo, Step Filter, Auto Pan, Flanger and Chorus, indicates the rate of the effect.
For Ring Mod, indicates the rate of the modulation.
For Slow Attack, indicates the rate of the attack.
For Rotary Speaker, indicates the rate of the speaker rotation.
For Pedal Pitch Transpose Up and Down, indicates the amount of pitch change in 1/4 semitones (from 1/4 semitone to more than 2 octaves). Wet/dry mix is fixed at 100% wet.
For Cry, indicates the sensitivity of the filter modulation.
For Pitch Transpose with a fixed interval, denotes the wet/dry mix from 0 (100% dry) to 10 (50% wet, 50% dry) to 20 (100% wet).
Indicates that the expression pedal controls the parameter.
Indicates that the effect assigned to the FX1 module does not have a direct-control parameter (like Pedal Wah) or that FX1 is off.
9
FX2 (Multi-Effect Module 2, Stereo Effects)
This module gives you a choice of stereo effects. These effects include all those found in FX1 except for Flanger, Rotary Speaker, Chorus and Pitch Transpose. FX2 also gives you the following additional effect.
Auto Phaser
A phaser for which the delay is controlled by playing intensity.
PARAM (Direct-Control Parameter for FX2)
These parameters work exactly the same way as the direct-control parameter for FX1, with the following addition.
For Auto Phaser, indicates the rate of the effect.
FX3 (Multi-Effect Module 3, Delay-Based Effects)
This module gives you a choice of delay-based effects. A delay is an echo of the original signal that can occur at varying frequency and time.
Doubling
Doubles the signal with a slight delay, creating the effect of two instruments playing at once. Higher values indicate higher intensity.
Pedal Doubling
Doubling effect with its intensity controlled by the expression pedal.
Ping Pong Delay
Creates a delay that bounces back and forth between the right and left sides of the stereo spectrum. Higher values indicate more feedback.
Pedal Ping Pong
Ping Pong Delay effect with its amount of feedback controlled by the expression pedal.
Tape Delay
Emulates the retro tape-delay effect that was created by recording a signal to tape and playing it back as a delay. Higher values indicate more feedback.
Pedal Tape Delay
A Tape Delay effect with its feedback controlled by the expression pedal; great for singling out notes or sections to echo.
Stereo Delay
A standard delay that occurs in stereo. Higher values indicate more feedback, producing a longer-repeating echo.
Pedal Stereo Delay
A Stereo Delay effect for which the feedback level is controlled by the expression pedal.
Echo
An echo for which higher values indicate a wetter signal and lower values indicate a drier signal.
Pedal Echo
An echo for which the wet/dry mix is controlled by the expression pedal.
10

FX3 – Continued
Hall Reverb
Simulates the effect of sound waves bouncing off of the walls of a concert hall. Higher values indicate a wetter mix.
Pedal Hall Reverb
A Hall Reverb effect for which the wet/dry mix is controlled by the expression pedal.
Room Reverb
Simulates the effect of sound waves bouncing off of the walls of a room. Higher values indicate a wetter mix.
Pedal Room Reverb
A Room Reverb effect for which the wet/dry mix is controlled by the expression pedal.
Reverse Reverb
Creates a backwards-playing reverb that you hear immediately before you hear the original signal, instead of after it. Higher values indicate a wetter mix.
Pedal Reverse Reverb
A Reverse Reverb effect with its wet/dry mix controlled by the expression pedal.
Plate Reverb
Recreates the classic “plate reverb” sound achieved by using a metal plate. Higher values indicate a wetter mix.
Pedal Plate Reverb
A Plate Reverb effect with its wet/dry mix controlled by the expression pedal.
Chorus – same as in FX1.
Pedal Chorus – same as in FX1.
Flanger – same as in FX1.
Pedal-Controlled Flanger – same as in FX1.
Rotary Speaker – same as in FX1.
Pedal-Controlled Rotary Speaker – same as in FX1.
Pitch Transpose – same as in FX1.
Variable Pitch Transpose Up – same as in FX1.
Variable Pitch Transpose Down – same as in FX1.
Off
Indicates FX3 is off.
11

PARAM (Direct-Control Parameter for FX3)
This direct-control parameter works in a similar fashion as the one for FX1.
For Doubling, Ping Pong, Tape Delay and Stereo Delay, indicates the length of the delay, up to one second for Tape Delay and up to half a second for the others.
For Chorus, indicates the rate of the chorus.
For Flanger, indicates the rate of the flanger.
For Rotary Speaker, indicates the rate of the speaker rotation.
For Pedal Pitch Transpose Up and Down, indicates the amount of pitch change in 1/4 semitones (from 1/4 semitone to more than 2 octaves). Wet/dry mix is fixed at 100% wet.
For all reverbs, higher values indicate a longer decay.
For fixed-interval Pitch Transpose, indicates the wet/dry mix from 0 (100% dry) to 10 (50% dry, 50% wet) to 20 (100% wet).
Indicates that the expression pedal controls the parameter.
Indicates FX3 is off.
DIGFX (Digital Sampling Effects)
This effect module emulates the effect that different variations of digital sampling can have on an audio signal.
Sample Rate Decimation
Lower values indicate lower decimation frequency (more decimation, more aliasing).
Pedal Sample Rate Decimation
A sample rate decimator effect controlled by the expression pedal.
Bit Reduction
Higher values indicate lower resultant bit depth.
Pedal Bit Reduction
Bit Reduction effect controlled by the expression pedal.
Off
Indicates that DIGFX is off.
LEVEL
In this position, the display shows you the output level of the current program.
Level
Indicates the program output level in 2dB steps, where 25 is unity gain (0dB). Unity gain is the point at which the level of the output is the same as the level of the input.
Pedal-Controlled Level
Program level that is controlled by the expression pedal.
12

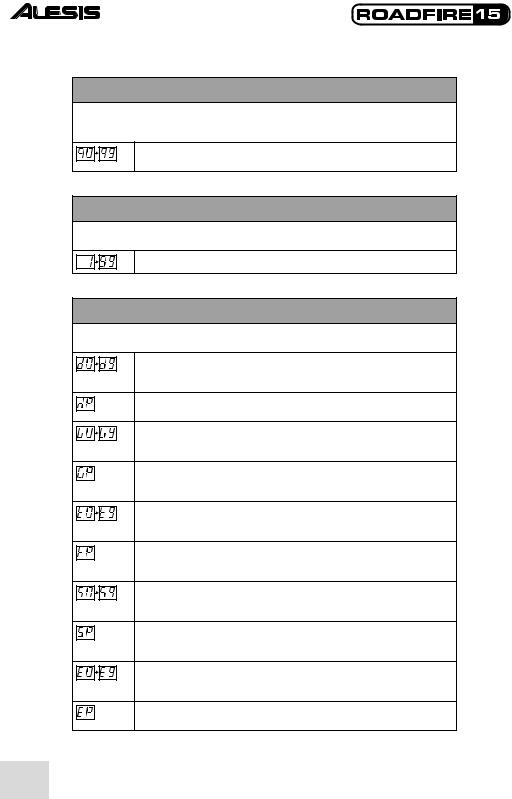
ROUTE
In this position, the display indicates the current signal-routing order of the FX modules. This ordering can have a big effect on your sound, as each effect in the configuration feeds into the next. Whatever the configuration, the LEVEL setting always comes last in line.
This is the default order.
This one is the default order with FX2 and FX3 swapped to put the delay effects in the middle of the modulation effects.
This order places the cabinet simulator at the end, allowing it to emulate multiple effects pedals feeding into a cabinet.
This one is order 2 with FX2 and FX3 swapped.
This order is the default order with the compressor/limiter placed at the end, making this one ideal for recording.
This one is order 4 with FX2 and FX3 swapped.
This is the one to go for if you’re recording and want to sound like you’re running several effects pedals into a cabinet.
This configuration is order 6 with FX2 and FX3 swapped.
13

Storing effects programs
After you’ve created a configuration that you like, you can store it for future recall. To store your changes, press the VALUE knob and then turn the knob to select a store location. Press the VALUE knob again to store the program.
Copying effects programs from one location to another
Copying programs is easy. Just call up the program that you want to copy. Then, press the VALUE knob, twist it until you find the location where you want to store your copy, and press VALUE again to store the program in its new location.
Restoring factory defaults for the effect settings
Once you have saved changes to a preset program, you can still recall the original settings. To enter the RESTORE FACTORY PRESETS mode, simply hold down the VALUE knob as you turn the unit on and then select the program to be restored (or AL for all programs). Press the VALUE knob to confirm your selection. The display will blink rapidly several times to indicate the restore was successful. Any program changes you have made will be lost, so you might want to copy the program to another location first.
To exit the RESTORE FACTORY PRESETS mode, just turn the EFFECTS knob. You can also turn the Roadfire off and then on again, without holding down any knobs or buttons, to exit the RESTORE FACTORY PRESETS mode.
Deferred program change
In normal operation, the Roadfire switches immediately to the program you select. However, in some situations — especially when playing live — you may want the ability to scroll through program numbers while remaining in the current program setting. For example, if you’ve got a clean and chorusy rhythm sound stored in program A3, and you want to switch next to a bright lead sound stored in program C5, you don’t want to have to hear all the programs in between. In these cases, use the Roadfire’s Deferred Program Change mode.
While turning on the Roadfire, hold down either one of the Program Up or Program Down buttons. Letters will scroll by on the display, spelling the word “deferred.”
In this mode, you can scroll through program numbers without having the program change each time. When you arrive at a program you want to use, press the Program Up and Program Down buttons or both pedals at the same time in order to switch to that program.
To exit Deferred Program Change mode, turn the Roadfire off, and then turn it back on again without holding down any buttons.
14
Bypassing the effects
To bypass the effects section entirely, hold down both the Program Up and Program Down buttons – or press both footswitches – for less than half a second. The screen will read by ( ) to indicate that the effects have been bypassed.
You may now control the amplifier’s volume with the volume knob. Turning any other knob restores the effects.
Using the built-in tuner
Press both the Program Up and Program Down buttons – or press both footswitches at the same time – for more than half a second to enter both Bypass and Mute mode.
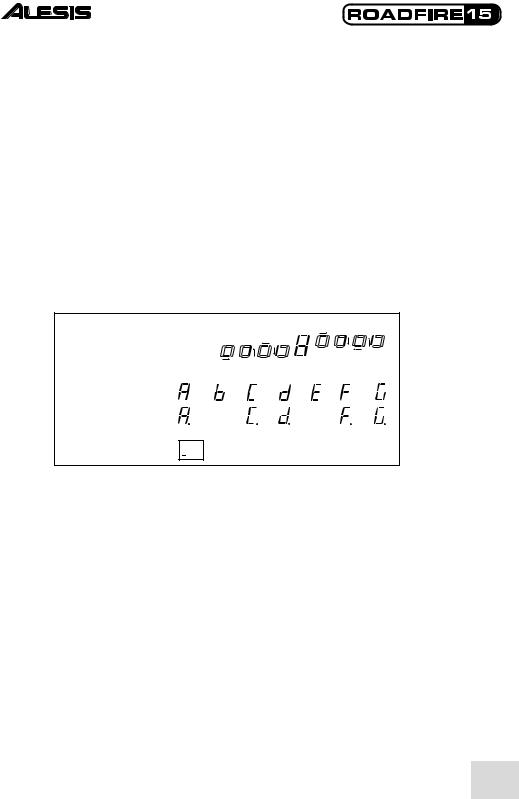
Play the open string you wish to tune. Use the following guide when tuning:
Visual Guide to Tuning |
|
The bottom four segments |
Low |
rotate counterclockwise if pitch |
|
is low. The top four rotate |
High |
clockwise if pitch is high. An 8 |
In tune |
means pitch is in tune. |
|
The twelve possible |
|
pitches (a decimal point |
|
indicates a sharp): |
|
|
= no pitch detected |
Tuning to a pitch other than A=440
If you turn the VALUE knob while using the tuner, the display shows you the setting for the Roadfire’s pitch reference, which is set to 440Hz (shown as 


 ) for the A note above middle C. The possible range of values for this setting is 35 to 45, which represents 435Hz to 445Hz.
When you turn the Roadfire on and off again, the reference pitch is reset to 440Hz.
15

This page intentionally left blank.
16
Manual de inicio rápido para el usuario (Español)
Instalación rápida del Roadfire
yAsegúrese de que todos los artículos incluidos al inicio de este manual están incluidos en la caja del Roadfire.
yLea las Instrucciones importantes de seguridad incluidas con el Roadfire.
yEstudie el Diagrama de conexión aquí abajo.
yAsegúrese de que todos los equipos están apagados y de que todos los potenciómetros de ganancia están en posición cero.
yConecte su guitarra y otros equipos al Roadfire de la manera indicada más abajo.
yEnchufe todos los dispositivos y enciéndalos. Nota: Deje el Roadfire enchufado por al menos ocho horas antes de hacerlo funcionar bajo alimentación de baterías por primera vez.
yGire la perilla de efectos EFFECT a la posición PLAY (Reproducir). Use los botones PROGRAM UP/DOWN para probar todos los efectos instalados en el Roadfire.
yCuando termine, apague el amplificador antes de desconectar cualquier equipo para evitar daños al altavoz.
yVisite http://www.alesis.com para registrar el Roadfire.
17
Cómo operar el panel frontal
1.Entrada – Enchufe su bajo a esta entrada no balanceada de 1/4" usando un cable TS.
2.Botones Arriba/Abajo de programa – Cambie el número del programa con estos botones. Cuando se pulsan al mismo tiempo, colocan la unidad en los modos de desvío (Bypass) y Mute y tienen acceso el afinador (tuner).
3.Visualización – Indica el banco y el programa, muestra los valores de los parámetros y visualiza el pitch en el modo de afinador (tuner).
4.Botón EFFECT (efecto) – Coloca el Bassfire en el modo PLAY (tocar) o EDIT (modificar). Se encuentra en el modo EDIT cuando esta perilla está en cualquier posición que no sea PLAY.
5.El botón VALUE (valor) – Ajusta los valores de los parámetros y los números de los programas; almacena los cambios.
6.Botón MASTER VOLUME (Volumen principal) – Controla el volumen de la señal enviada al altavoz, auriculares, la SALIDA DE LA CONEXIÓN A ESTÉREO y la SALIDA DEL ALTAVOZ.
7.Conexión a los HEADPHONES (auriculares) – Enchufe sus auriculares usando un enchufe de estéreo de 1/4".
18
Cómo operar el panel posterior
1.Tomacorriente del cordón de alimentación – Enchufe un cordón estándar IEC a este conector y a un tomacorriente de corriente alterna conectado a tierra correctamente.
2.Fusible – Fusible reemplazable. Mire el panel posterior del Bassfire para ver más detalles.
3.Luz de la conexión de encendido – La luz de alimentación de corriente alterna (AC power) permanece iluminada cuando el amplificador está conectado a un tomacorriente de CA.
4.Interruptor de encendido – Enciende y apaga el Roadfire. El Roadfire carga la batería interna según se requiera aun cuando este interruptor está colocado en la posición de "apagado".
5.Entrada de FOOTSWITCH UP/DOWN – Enchufe los interruptores de pie a estos jacks de 1/4". Los interruptores de pie tienen la misma función que los botones hacia arriba y abajo para programas.
6.Entrada EXPRESSION PEDAL – Enchufe un pedal de expresión a este jack de 1/4" para tener un control fácil de los parámetros de efectos.
7.Entrada AUX – ¡Enchufe un reproductor de CD u otro dispositivo de audio a estos jacks de RCA y toque con la música!
8.Salida STEREO LINK – Use un cable TS de 1/4" TS para conectar este jack a la entrada de otro amplificador para estéreo real. El Bassfire proporciona una salida de estéreo real en vez del mono estándar; muchos de los efectos excelentes de Bassfire sonarán aún mejor cuando los escuche en estéreo. Si no tiene otro amplificador, puede disfrutar de los efectos de estéreo escuchando con auriculares.
9.Salida EXTERNAL SPEAKER – Use un cable TS de 1/4" TS para conectar este jack a un altavoz externo de 8 ohmios. Esto desconecta el altavoz interno.
19

Cómo usar la batería instalada del Roadfire
Conceptos básicos
El Roadfire contiene una batería recargable de plomo-ácido. La batería puede descargarse y cargarse totalmente hasta 1.000 veces.
Antes de usar el Roadfire, enchúfelo al tomacorriente de CA durante ocho horas para asegurar que se cargue totalmente.
La batería no puede ser reemplazada ni reparada por el usuario. La sustitución o el servicio de batería, que se necesita raramente, puede hacerla un centro de servicio de Alesis autorizado.
Tiempo de funcionamiento
Bajo condiciones normales de reproducción, el Roadfire funciona con alimentación por batería interna durante tres a cuatro horas. Si el amplificador se usa silenciosamente, la vida de la batería se puede extender hasta ocho horas. Si el amplificador se usa a plena salida sin descansar, la batería durará unas dos horas (por ejemplo, si estuviese usando el Roadfire con un reproductor de CD externo y el CD estuviera reproduciendo constantemente).
Carga
El Roadfire está diseñado para cargar su batería interna fácil, segura y confiablemente. Cuando enchufa el Roadfire a una toma de corriente alterna, el Roadfire conmuta al funcionamiento con alimentación de corriente alterna y carga la batería al mismo tiempo. Cuando la batería está completamente cargada, el Roadfire cambia automáticamente al modo de carga de compensación. No hay ningún riesgo de que la batería se sobrecargue, de modo que puede dejar el Roadfire enchufado continuamente, igual que un amplificador común.
La luz de alimentación de corriente alterna (AC power) de la parte posterior del Roadfire permanece iluminada cuando el amplificador está conectado a un tomacorriente de CA.
A diferencia de las baterías de níquel-cadmio y de otros tipos, la batería del Roadfire no desarrolla una “memoria” con el tiempo. Puede cargar parcialmente la batería del Roadfire sin problemas. No haga ningún esfuerzo especial para agotar la batería completamente.
Disposición final
La batería del Roadfire es peligrosa para el medio ambiente si no se desecha correctamente. Consulte a su municipio o ferretería local para recibir consejos acerca de cómo desechar el Roadfire con seguridad.
20

Cómo explorar los efectos del Roadfire
El Roadfire contiene un procesador de efectos estéreo avanzado dedicado para guitarras electrónicas. La distorsión, compresión, retrasos, coros, reverberaciones y mucho más le permiten crear una gran variedad de sonidos populares, antiguos y experimentales de la guitarra eléctrica.
Comience explorando los programas predeterminados del Roadfire. Gire la perilla de efectos completamente hacia la izquierda para seleccionar PLAY. Ahora, toque su guitarra eléctrica y explore los programas presionando los botones de subir y bajar del programa, girando la perilla de valor [VALUE], o usando los interruptores de pedal opcionales fijados en la parte posterior de la unidad.
Escuchará programas que comprenden de ultra-limpio a rock, jazz y nasty. Si tiene la oportunidad, asegúrese de enchufar un par de auriculares estéreo en la parte de atrás del Roadfire para escuchar estos efectos en estéreo. Algunos de los efectos –aunque suenan bien cuando salen del altavoz interno del Roadfire– le dan más vida al sonido en estéreo.
Cómo modificar los programas de efectos
Puede encontrar mucho más en los efectos del Roadfire que lo que se encuentra en los efectos preajustados. El Roadfire cuenta con ocho módulos de efectos individuales, como se muestra abajo:
Se accede a estos efectos se acceden usando la perilla EFFECT de la parte frontal del Roadfire.
Después de mover el botón EFFECT fuera de la posición PLAY, estará listo para empezar a modificar los efectos. Después de que cambie un efecto, se encenderá la luz del LED de edición en la parte derecha de la pantalla. He aquí sus opciones de derecha a izquierda:
21
PLAY
Aquí, la pantalla le muestra el número del programa actual. Este es el modo que debería elegir para actuaciones en vivo, ya que le permite cambiar de programa fácilmente con los pedales de pie.
Indica la letra de banco y el número de programa actual.
COMP/LIMIT (Compresión del compresor/limitador)
Compresión. Agrega sustain (sostenidos) y suavidad al bajar el rango dinámico.
Limitación. Mantiene el volumen original, pero suaviza los picos más altos.
Off (Apagado). Apaga el COMP/LIMIT.
DIST (Distorsión)
Este ajuste agrega ese efecto universal que fue usado primeramente en la música rock hace décadas y que ahora se ha convertido en un ingrediente principal en varios géneros.
Acústica.
Tube Clean (Tubo). Rhythm (Ritmo). Overdrive.
Distortion (Distorsión). Blues.
Fuzz.
Lead.
Metal.
Stack Drive.
Combo Drive.
Off.
Emula el sonido de una guitarra acústica.
Simula el sonido limpio de un amplificador de tubos de alto vacío.
Un sonido con un poco de distorsión; perfecto para el ritmo.
Proporciona un sonido más áspero que el ajuste de ritmo, como si estuviera forzando esos tubos del amplificador.
Le da un sonido crujiente.
Un sonido cálido y crujiente asociado con algunos de los mejores artistas de guitarra de blues.
Ese efecto de distorsión clásico de los años sesenta. Sólo escuche y verá a qué le debe su nombre.
Un overdrive punzante que hará gritar a sus solos.
Un sonido distorsionado pesado con un largo sostenimiento.
Una distorsión pesada que suena como si estuviera tocando por una impresionante pila de amplificadores de tubos.
Otra distorsión pesada; suena como una pila de amplificadores de tubos con una gama media bien definida.
Apaga el DIST.
22
DRIVE (aumenta o disminuye el nivel de la distorsión)
Éste es un parámetro del módulo DIST.
Cómo aumentar los niveles de drive/ganancia para el módulo de DIST.
Pedal de control del drive/ganancia.
NR (Reducción de ruido)
Es una combinación de dos efectos –eliminación de zumbido y reducción de ruido. La eliminación de zumbido funciona cortando la frecuencia que contiene el zumbido (60 Hz). La reducción de ruido funciona bloqueando la señal (silenciando la señal hasta que su nivel aumente sobre un cierto punto).
Eliminación de zumbido (dígito izquierdo de la pantalla)
Niveles crecientes de eliminación de zumbido (filtros eliminadores de banda de armónicas de 60 Hz)
Desactiva la eliminación de zumbido.
Reducción de ruido (Dígito derecho de la pantalla)
Niveles crecientes del umbral de compuerta.
Desactiva la reducción de ruido.
CAB (Cabinet Simulator - Simulador de caja acústica)
Este módulo le permite a su Roadfire de emular disposiciones de cajas acústicas de varios tamaños.
Una caja acústica única de drivers de 12 pulgadas.
Una caja acústica única de drivers de 2 x 12 pulgadas.
Una caja acústica única de drivers de 4 x 10 pulgadas.
Off
Apaga el CAB.
23
 Loading...