


ALESIS
NanoCompressor
Reference Manual

Introduction
INTRODUCTION
Thank you for purchasing the Alesis NanoCompressor Dynamics Processor. To take full advantage of the NanoCompressor’s functions, and to enjoy long and troublefree use, please read this user’s manual carefully.
How To Use This Manual
This manual is divided into the following sections describing the various functions of the NanoCompressor. Though we recommend you take time to read through the entire manual once carefully, those having general knowledge about compressor/limiters should use the table of contents to look up specific functions.
Chapter 1: Your First Session with the NanoCompressor. This chapter is a basic introduction for connecting and operating the NanoCompressor.
Chapter 2: Connections. This chapter explains how to connect the NanoCompressor to an instrument, mixing console or amplifier.
Chapter 3: Description of Controls. An explanation of all connectors and knobs on the NanoCompressor. Use this chapter as a quick reference guide when searching for specific information.
Chapter 4: Applications. This chapter lists several applications for the NanoCompressor, and suggests ways of connecting and operating the unit in these situations.
Chapter 5: Troubleshooting. This chapter contains troubleshooting tips and service information should problems occur.
Conventions
The knobs and rear panel connectors are referred to in this manual just as their names appear on the NanoCompressor, using all capital letters and in brackets
(Example: [RATIO] Knob, [SIDECHAIN] jack, etc.).
When something important appears in the manual, an icon (like the one on the left) will appear in the left margin. This symbol indicates that this information is vital when operating the NanoCompressor.
NanoCompressor Manual |
1 |

Your First Session with the NanoCompressor
CONTENTS |
|
Your First Session with the NanoCompressor ......................... |
7 |
Unpacking and Inspection ....................................................................................................... |
7 |
Basic Connections...................................................................................................................... |
7 |
Setting Levels ............................................................................................................................. |
8 |
What’s on the Front Panel? ...................................................................................................... |
8 |
Auditioning The Compressor.................................................................................................. |
10 |
Bypassing Compression ........................................................................................................... |
10 |
Placement and Installation....................................................................................................... |
10 |
Rack Mounting.................................................................................................................... |
10 |
Connections.......................................................................... |
11 |
AC Power Hookup.................................................................................................................... |
11 |
Line Conditioners and Protectors ............................................................................. |
11 |
Audio Connections.................................................................................................................... |
11 |
Typical Applications................................................................................................... |
12 |
Connecting Directly to an Instrument...................................................................... |
12 |
Mixer Inserts ................................................................................................................ |
13 |
Using the NanoCompressor with a Powered Mixer ............................... |
14 |
Mixer Main Outputs ................................................................................................... |
14 |
Avoiding Ground Loops............................................................................................ |
14 |
Description of Controls.......................................................... |
17 |
Front Panel.................................................................................................................................. |
17 |
Threshold...................................................................................................................... |
17 |
Ratio .............................................................................................................................. |
17 |
Attack............................................................................................................................ |
18 |
Release .......................................................................................................................... |
18 |
Pumping and Breathing............................................................................... |
18 |
Output........................................................................................................................... |
18 |
Hard/Soft ..................................................................................................................... |
19 |
Peak/RMS .................................................................................................................... |
19 |
Input/Output............................................................................................................... |
19 |
Bypass/Comp.............................................................................................................. |
19 |
Rear Panel ................................................................................................................................... |
20 |
Power ............................................................................................................................ |
20 |
Sidechain....................................................................................................................... |
20 |
Input (Left/Mono & Right)........................................................................................ |
20 |
Output (Left & Right) ................................................................................................. |
20 |
Applications ......................................................................... |
21 |
Instrument Settings ................................................................................................................... |
21 |
Vocal Limiting ............................................................................................................. |
21 |
Vocal Compression and Spoken Word .................................................................... |
21 |
Drums ........................................................................................................................... |
21 |
Bass................................................................................................................................ |
22 |
Electric Guitar .............................................................................................................. |
22 |
Sidechain Applications ............................................................................................................. |
22 |
De-Essing...................................................................................................................... |
22 |
Ducking......................................................................................................................... |
23 |
Troubleshooting ................................................................... |
27 |
Trouble-Shooting Index............................................................................................................ |
27 |
Maintenance/Service ................................................................................................................ |
28 |
Cleaning........................................................................................................................ |
28 |
NanoCompressor Manual |
3 |

Contents
Refer All Servicing To Alesis..................................................................................... |
28 |
Obtaining Repair Service ........................................................................................... |
28 |
Customers in the USA and Canada ........................................................... |
28 |
Customers outside the USA and Canada.................................................. |
28 |
Specifications ....................................................................... |
29 |
4 |
NanoCompressor Manual |
Your First Session with the NanoCompressor
CHAPTER 1
YOUR FIRST SESSION
WITH THE
NANOCOMPRESSOR
Unpacking and Inspection
Your NanoCompressor was packed carefully at the factory, and the shipping carton was designed to protect the unit during shipping. Please retain this container in the highly unlikely event that you need to return the NanoCompressor for servicing.
The shipping carton should contain the following items:
•This instruction manual
•Alesis NanoCompressor with the same serial number as shown on shipping carton
•AC Power Supply Adapter (Alesis P3)
•Mounting Screw and Rubber Feet
•Alesis warranty card
It is important to register your purchase; if you have not already filled out your warranty card and mailed it back to Alesis, please take the time to do so now.
Basic Connections
The NanoCompressor will work in many different applications, whether you are connecting an instrument directly into it, or connecting it with a mixing console. Briefly described here are the basic connections to get you up and running quickly. For more information on connections, please refer to Chapter 2.
•Mono. Connect a 1/4" phone cord to the [LEFT] INPUT of the NanoCompressor
from a mono source. Connect another 1/4" phone cord from the [LEFT] OUTPUT of the NanoCompressor to an amplification system or mixer input.
|
|
|
|
|
|
NanoCompressor Manual |
5 |
|
Your First Session with the NanoCompressor
•Stereo. Connect two 1/4" phone cords to the [LEFT] & [RIGHT] INPUTS of the NanoCompressor from a stereo source, and two 1/4" phone cords from the
[LEFT] & [RIGHT] OUTPUTS of the NanoCompressor to a stereo amplification system or two mixer inputs.
•Insert. This is the most common application for a compressor. Acquire an Insert cable, which has a balanced 1/4” plug on one end of the cable and two mono 1/4” plugs on the other. First, connect the “send” from the mixer (typically connected to the tip of the insert, but check your mixer’s reference manual) to the
[LEFT] INPUT of the NanoCompressor. Connect the other mono connector to the
[LEFT] OUTPUT of the NanoCompressor to return the signal to the mixer. Finally, plug the stereo insert jack into the mixer insert.
Compression is a dynamic effect that is applied to an entire signal. Unlike reverb or delay, where a new sound is created and added to the original sound, the compressor should have the complete signal going through it. This is why compressors are patched into mixer inserts, instead of being patched into effects sends and returns like digital effects processors.
Setting Levels
Proper setting of the output levels is crucial in order to achieve the maximum signal- to-noise ratio. As a good rule of thumb, it is usually best to first set the [OUTPUT] level controls at 12 o’clock or 50%. Then, press the [BYPASS/COMP] button in and
out while listening and watching the output meter. Turn the [OUTPUT] level up or down so that the output level is roughly the same whether the unit is bypassed or compressing.
If the Input meter on the NanoCompressor begins to clip (turn red), decrease the volume of the source (instrument, mixer send, etc.). If the NanoCompressor’s level is causing the mixer or amp to distort, turn the Output Level down. For more detail on level setting, see page 18.
6 |
NanoCompressor Manual |

Your First Session with the NanoCompressor
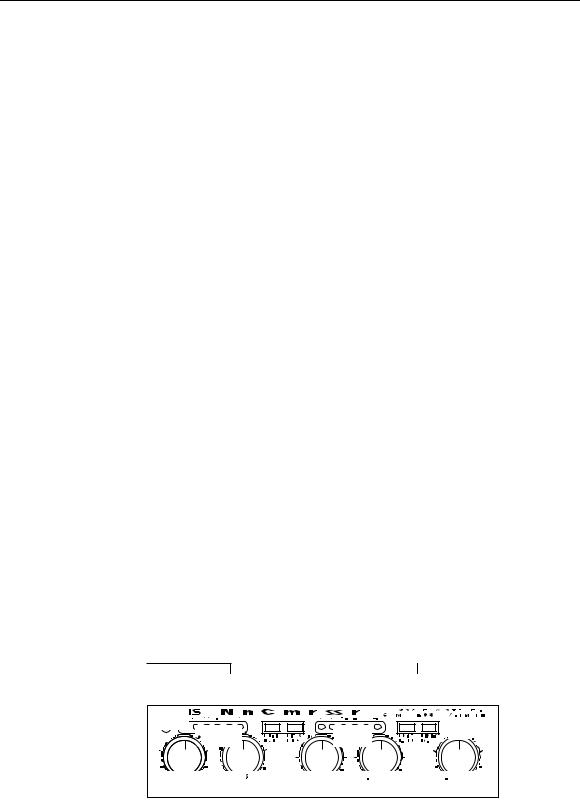
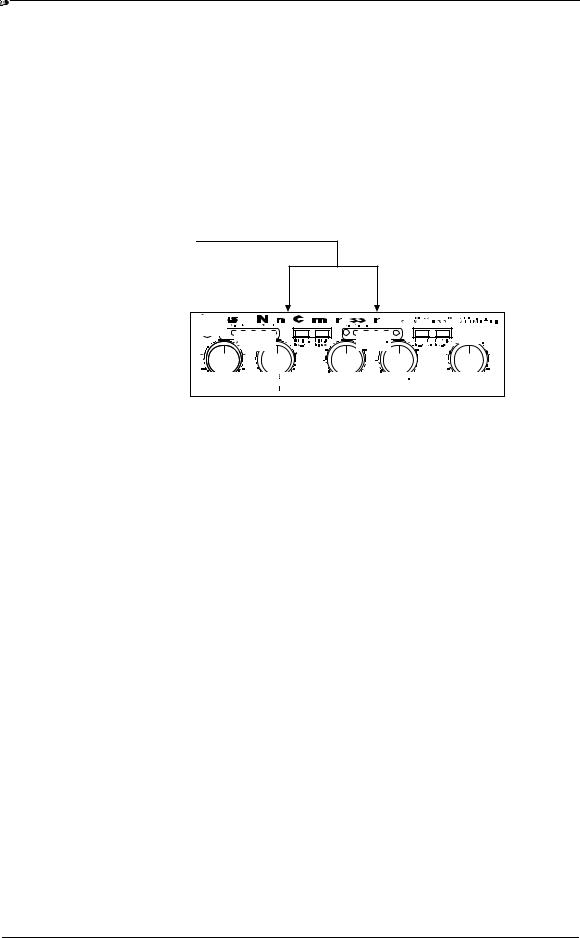
What’s on the Front Panel?
The NanoCompressor’s front panel contains the following:
Power LED. The Power LED is illuminated whenever the NanoCompressor's power adapter is plugged in.
Threshold. The Threshold control sets the level above which signals will be compressed or limited. The range is from -40dB to +8dB, with -10dBu (or 0 VU) marked with an arrow ( ) near the knob.
Ratio. The Ratio control sets the compression slope, or how much gain reduction will be done once the signal crosses the threshold level. If the ratio is set for 4:1, for example, and the input signal is 4dB above the threshold level, the NanoCompressor will reduce the output level by 3dB.
Gain Reduction Meter. This meter shows how much the compressor is reducing the input signal.
Hard/Soft Knee Switch. This controls the character of the compression near the Threshold level, either hard (abrupt compression above threshold) or soft knee (gradual transition to compression).
Peak/RMS Switch. This controls whether the compression will be Peak or RMS (average) style. When set to RMS, the Attack and Release controls will be disabled.
Attack. This is the amount of time it will take for the NanoCompressor to start compressing when the input signal crosses over the threshold. This control is disabled when compression is set for RMS.
Release. This is the amount of time it will take for the NanoCompressor to stop compressing when the input signal crosses under the threshold. This control is disabled when compression is set for RMS.
Signal Meter. The signal meter can be switched to either monitor the input or the output. This meter shows the louder of the left or right side.
Input/Output Switch. This switch determines whether the Signal Meter is displaying the Input or Output level.
Bypass/Comp Switch. This switch allows you to bypass the compressor for an A/B comparison of the source signal.
Output. This knob sets the output level of the compressor. It is useful for making up level which has been reduced in the compression process.
NanoCompressor Manual |
7 |

Your First Session with the NanoCompressor
Auditioning the Compressor
If you’re using a compressor for the first time, this section will explain how to get your NanoCompressor up and running. First, get a signal into the NanoCompressor using one of the methods listed in “Basic Connections”, above. Once you can see level on the Signal Meters, set the controls like this:
•[RATIO] set for 4:1 (about 12 o’clock)
•[PEAK/RMS] set for RMS
•[HARD/SOFT] Knee set for SOFT
•([ATTACK] and [RELEASE] controls are disabled in RMS mode, so don’t use them yet.)
•Make sure [BYPASS/COMP] is set for COMP
Next, turn the [THRESHOLD] control all the way up (clockwise) and slowly start turning it down (counter-clockwise). As you lower the threshold, you will see the
[REDUCTION] meter start to show more and more gain reduction. For this example,
set the [THRESHOLD] knob so that the [REDUCTION] meter shows -3 to -6 dB of gain reduction. This will give your input signal a nice, even sound which is perfect for recording vocals or bass guitar.
Bypassing Compression
At any time you can bypass the compressor, thereby allowing the direct signal to pass through the NanoCompressor unchanged. This is done by pressing the
[BYPASS/COMP] switch so that it is set for COMP (pushed out). Note that the [OUTPUT] knob does not function when the NanoCompressor is bypassed.
Placement and Installation
The NanoCompressor may be mounted almost anywhere it's needed: on a table, on top of an amp, or next to a mixing console. In any case, make sure to place it safely where it will not fall or be damaged. If it will be on furniture, make sure to attach the provided rubber feet to the bottom of the unit. While the NanoCompressor itself doesn't generate any magnetic or hum fields, its power supply may do so. Make sure to place the power supply away from other audio equipment that is sensitive to induced fields, and away from the signal wiring. In rare instances, the NanoCompressor itself may pick up noise fields generated by other equipment such as large power amplifiers; in this case, move the NanoCompressor until the noise goes away.
Rack Mounting
The most secure mounting is on a "universal" rack shelf, available from various rack manufacturers or your music dealer. The NanoCompressor's height conforms to single-space mounting, and up to three NanoCompressors may be mounted side-by- side in a standard universal EIA 19" equipment rack.
8 |
NanoCompressor Manual |
 Loading...