


Portable Powered Mixer with Built-in Digital Effects and CD Player
Owner’s Manual
BOX CONTENTS
•MIXER
•POWER CABLE
Mezclador portátil con efectos digitales integrados y el lector de cd
Manual de usuario
(ESPAÑOL)
CONTENIDOS DE LA CAJA
•MEZCLADOR
•CABLE DE ALIMENTACIÓN
Tragbarer Powered Mixer mit eingebauten digitalen Effekten und CD-Spieler
Bedienungsanleitung
(DEUTSCH)
SCHACHTELINHALT
•MISCHPULT
•NETZKABEL
Console de mixage amplifiée avec effets numériques intégrés et le lecteur de CD
Guide de l’utilisateur
(FRANÇAIS)
CONTENU DE LA BOÎTE
•CONSOLE DE MIXAGE
•CÂBLE D’ALIMENTATION
Mixer portatile con effetti digitali incorporati ed il Lettore CD
Manuale d'uso
(ITALIANO)
CONTENUTO DELLA CONFEZIONE
•MIXER
•CAVO DI ALIMENTAZIONE


GIGAMIX 4CD OWNER’S MANUAL
Before making any power connections, make sure the GigaMix’s power switch is turned off.
•Plug the female end of the power cable into the GigaMix’s power socket.
•Plug the male (plug) end into a properly grounded power outlet.
Making Audio Connections
Start by making sure the GigaMix’s power switch is turned off. Then use either 1/4” or XLR cables to connect your instruments and microphones to the GigaMix. After this, you may connect speakers to the GigaMix. There are several ways to do this:
•Main (house) speakers. Connect two cables from the GigaMix’s two rear outputs to a matched set of speakers. For optimal power output, the total rated load of the speakers attached to these outputs should be 4 ohms.
Note: You may daisy-chain several speakers, if necessary, as long as the total rated load of the speakers attached to this output is no lower than 4 ohms.
Note: the front panel Main Output jack is not powered. It may be used to run the Main mix into another mixer for recording purposes.
•Unpowered monitors. If you want to use an external amplifier to power your monitors, connect a cable from the GigaMix’s front-panel Monitor Output jack to a high-quality amplifier. Then connect the output of that amplifier to one or more monitor speakers according to the instructions in the amplifier’s manual.
Connecting a Tape Player
To connect a tape player or other device, plug the left and right audio outputs of your source device into the 2-Track Return jacks. Control the level of the music with the 2- TRACK/CD LEVEL knob in the Main section.
Note: Plugging cables into the 2-Track Return jacks will disable the built-in CD Player.
To capture the performance on a recording device, connect two cables from the 2-Track Send jacks to the audio inputs of the destination device. Adjust the recording level using the destination device’s input controls.
Connecting External Effects
To use an external effects device such as a reverb or chorus, connect an audio cable from the Effects Send jack of the GigaMix to the input of the external effects device. Then run an audio cable from the output of the effects device to one of the Effect Return input jacks on the GigaMix. If your external effects device has stereo outputs, use two cables to connect the left and right outputs of that device to the Effect Return jacks on the GigaMix.
The level sent to the external device is controlled by each channel’s EFFECT knob. The amount of external effect coming back to the GigaMix is controlled by a combination of the controls on the external effects device and the EFFECT RETURN controls for the Main and Monitor sections of the GigaMix.
Note: Plugging a cable into the Effect Send jack will disable the built-in digital effects of the GigaMix.
1

Channel Operation
Setting levels (mic/line channels). Plug the cable into the appropriate input jack. If you are using a microphone or an instrument with a low output level (such as an acoustic guitar), pressing the +30dB switch will give you an extra measure of pre-amplification. After this is set properly, control the volume of the input with the LEVEL knob.
Setting levels (dual-line channels). Plug the cable(s) into the appropriate input jack(s). After this is done, control the volume of the input with the LEVEL knob.
Effect level. Dial in the desired amount of effects (reverb, chorus, etc.) using the EFFECT knob. The effects are post-fader, which means that as the input level is increased, the amount of signal being sent to the effects will also increase. If you want to increase the level of the instrument, you may need to turn down the EFFECT knob.
If you want to use an external effect device, plug a cable into the Effect Send jack. (This will disable the built-in digital effects of the GigaMix.) Then connect the outputs of the external device to the Effect Return jacks on the GigaMix.
Monitor level. To control the amount of a given channel being sent to the Monitor Output jack, use the MON knob.
Equalizer controls. There are three knobs in the EQ section for each channel: HI, MID, and LO. These give you the ability to shape the sound of each channel individually before it is sent to the outputs.
Operating the Effects Section
Selecting the effects program. The GigaMix has 100 different effect programs from which to choose. They are arranged into categories for ease of location. To select a new program, turn the knob next to the PROGRAM display. When you reach the desired number, push the knob to call up the new program.
Bypassing the effects. To hear what the mix sounds like without effects, press the BYPASS button. The yellow LED will light to indicate that the effects are bypassed. To bring the effects back in, press the button again.
Note: You may also use a footswitch to bypass the effects. To do so, plug a footswitch into the EFFECT BYPASS/FOOTSWITCH jack at the bottom middle area of the front panel.
Effects Clip/Signal LEDs. If you are using the built-in effects, make sure the combined effect settings of each channel are lighting the green LED (Signal) but not lighting the red LED (Clip). If the signal into the effects is clipping, reduce the setting of the EFFECT knobs for one or more channels.
2

The Main Section
Controlling the master volume. The MAIN MIX knob is used to boost or reduce the overall level being sent to the Main outputs of the GigaMix.
The graphic equalizer. In addition to the three bands of EQ possessed by each channel, the Main section of the GigaMix has a 9-band graphic equalizer. This affects the overall sound of the mix before it is sent to the Main outputs.
Controlling the master effects level. Use the EFFECT RETURN knob to adjust the level of the effects for the entire mix.
Adjusting the CD/Tape volume. To raise or lower the volume of the incoming prerecorded music, use the 2-TRACK/CD LEVEL knob.
Phantom power. If you are using microphones that require phantom power, press the PHANTOM POWER button. This will not affect microphones that do not use phantom power.
Rumble filter. If you are experiencing excess microphone-handling noise or other lowfrequency noises bleeding into your microphones through the mic stands, for example, press the RUMBLE FILTER button. It will reduce all frequencies below 75 Hz (which also can help to reduce ground hum).
The Monitor Section
Controlling the monitor volume. The MONITOR MIX knob is used to boost or reduce the overall level being sent to the monitors.
Controlling the monitor effects level. Use the EFFECT RETURN knob to adjust the level of the effects for the entire monitor mix.
Adjusting the CD/Tape volume. To raise or lower the volume of the incoming prerecorded music, use the 2-TRACK/CD LEVEL knob.
3
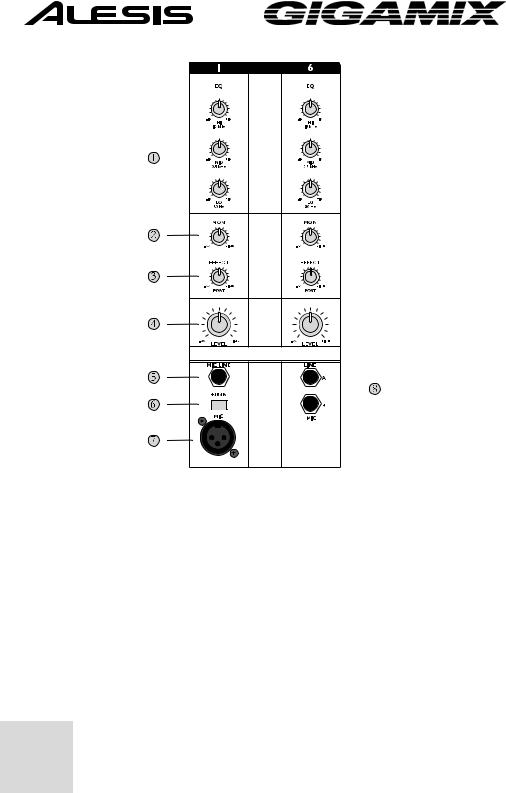
1.Equalizer controls enable you to shape the sound of the channel before it is sent to the outputs.
2.The MON knob controls the amount of a given channel being sent to the Monitor Output.
3.The EFFECT knob helps you dial in the desired amount of effects for the channel.
4.The LEVEL knob controls the volume of the channel.
5.This jack is for connecting an instrument to the GigaMix using a 1/4” TS (Tip-Sleeve) cable.
6.The +30dB button helps boost the volume of high-impedance/low-level sources.
7.The MIC input is a standard XLR connector for use with microphones and other sources.
8.Dual-line channels like this one allow two 1/4” TS connections to be used in one channel.
4
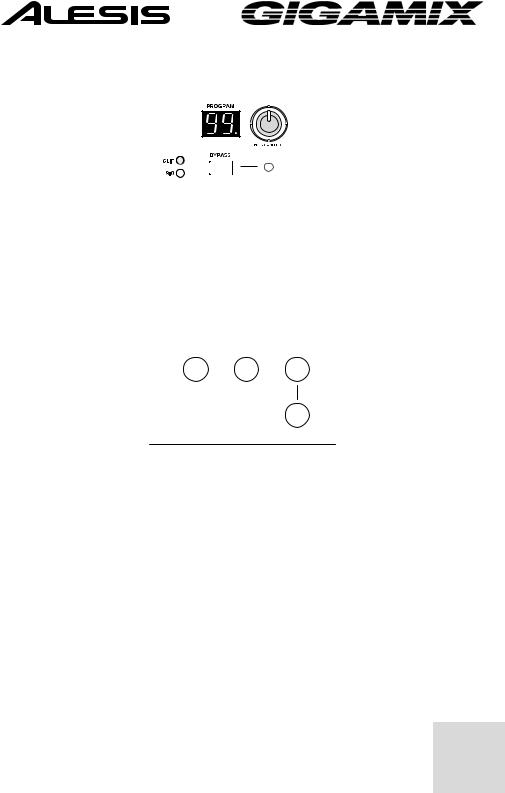
1.Use the Program Select knob to choose the desired effects program. Push it to call up a new program.
2.The Program Number LED displays the number of the selected effects program.
3.The SIG and CLIP LEDs indicate that audio is present and whether it is clipping or not.
4.The BYPASS button allows you to shut off the effects. The LED lets you know if the effects have been bypassed.
5.The names of all 100 programs are listed to make it easy to find the one you want.
6.The EFFECT BYPASS footswitch allows you to bypass the effects if your hands are not free to push the button.
7.The EFFECT SEND jack is for sending audio signals to an external effects device.
8.The EFFECT RETURN jacks bring the audio from an external effects device back into the GigaMix.
5
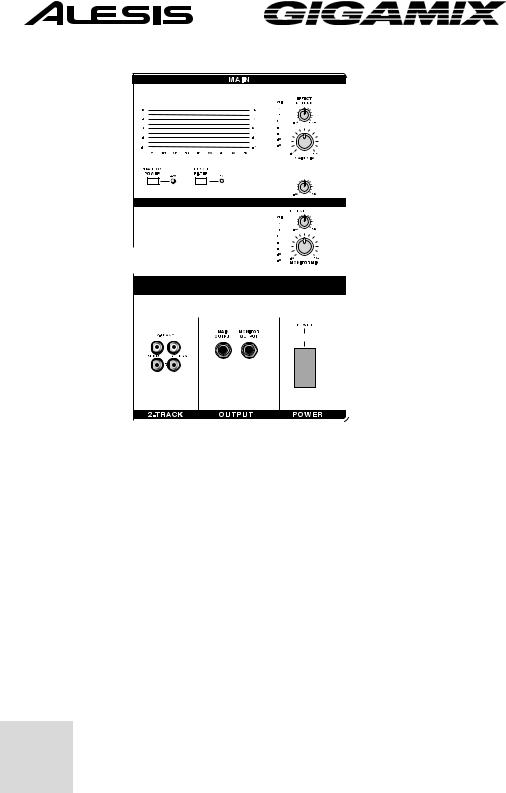
MAIN
1.The Graphic Equalizer shapes the sound of the Main mix before it is sent to the main speakers.
2.The PHANTOM POWER button provides a 48-volt source for microphones.
3.The RUMBLE FILTER helps filter out unwanted low-frequency noise.
4.The LEVEL/CLIP LEDs give visual feedback about the overall volume of the GigaMix.
5.The EFFECT RETURN knob controls the level of the effects for the Main mix.
6.The MAIN MIX knob boosts or reduces the level of the signal being sent to the Main outputs.
7.The 2-TRACK/CD LEVEL knob controls the Main level of the built-in CD player or of the incoming 2-track signal, if cables are plugged in to the 2-TRACK RETURN jacks.
CD PLAYER
8.The built-in CD PLAYER can be used to play pre-recorded music. It is disabled if cables are plugged in to the 2-TRACK RETURN jacks.
6

MONITOR
9.The EFFECT RETURN knob controls the level of the effects for the Monitor mix.
10.The MONITOR MIX knob boosts or reduces the level of the signal being sent to the monitors.
11.The 2-TRACK/CD LEVEL knob controls the Monitor level of the built-in CD player or of the incoming 2-track signal.
OUTPUT
12.The MAIN OUTPUT provides a non-powered version of the Main mix.
13.The MONITOR OUTPUT provides a non-powered version of the Monitor mix.
14.The 2-TRACK section provides inputs and outputs for connecting a CD player or tape deck.
15.The POWER switch turns the GigaMix on and off.
7

Specifications
Frequency response @ rated power: 10Hz – 50kHz (+0/-3dB) Signal to Noise Ratio @ rated power: >95dB (A-weighted) THD @ rated power: <0.04%
(All measurements taken from microphone input to speaker output.) Output Power (RMS) @ 1% THD (4 Ohm Load): 225 Watts
GigaMix 4CD Owner’s manual
Version 1.00 by Ben Ling, Randy Lee, and Fred Morgenstern
Copyright 2004, Alesis Distribution, LLC. All rights reserved.
Reproduction in whole or in part is prohibited.
Specifications subject to change without notice.
7-51-0185-A 2004/06/16
8
MANUAL DE USUARIO DE GIGAMIX
Antes de realizar cualquier conexión eléctrica, asegúrese de que el interruptor de alimentación del Gigaix está apagado.
•Enchufe el extremo hembra del cable de alimentación a la toma de corriente de GigaMix.
•Enchufe el extremo macho (del enchufe) a una toma de corriente conectada a tierra correctamente.
Conexiones de audio
Comience asegurándose de que el interruptor de alimentación del GigaMix está apagado. Y use cables de 1/4” ó XLR para conectar sus instrumentos y micrófonos al Gigamix. Una vez hecho esto, podrá conectar los altavoces al GigaMix. Existen varias maneras de hacer esto:
•Altavoces (para el hogar) principales. Conecte dos cables procedentes de las dos salidas traseras del GigaMix a un juego de altavoces iguales. Para una salida de potencia óptima, el total de la carga nominal de los altavoces conectados a estas salidas debe ser de 4 ohmios.
Nota: el/los conectores de la salida principal del panel frontal no reciben electricidad y pueden ser usados para conectar la mezcla principal a otro mezclador para propósitos de grabación.
Nota: Puede hacer una cadena tipo margarita con varios altavoces, si es necesario, siempre que la carga nominal total de los altavoces conectados a esta salida no sea menor de 4 ohmios.
• Monitores sin fuente eléctrica directa. Si desea utilizar un amplificador externo para suministrar energía eléctrica a sus monitores, conecte un cable desde el jack de salida del monitor del panel frontal de su GigaMix a un amplificador de alta calidad. Ahora conecte la salida de ese amplificador a uno o más altavoces del monitor según las instrucciones del manual del amplificador.
Conectando un reproductor de cinta
Para procesar música pregrabada a través del GigaMix hacia las salidas principales, enchufe las salidas izquierda y derecha de audio de su dispositivo fuente en los jacks de retorno de 2 pistas. Controle el nivel de la música con el botón de NIVEL DE RETORNO DE 2 PISTAS en la sección principal.
Para captar el funcionamiento de un dispositivo de grabación, conecte dos cables de los jacks de retorno de 2 pistas a las entradas de audio del dispositivo de destino. Ajuste el nivel de grabación usando los controles de entrada del dispositivo de destino.
9

Conexión de efectos externos
Para usar un dispositivo de efectos externos como una reverberación o un coro, conecte el cable de audio del jack de envío de efectos del GigaMix a la entrada del dispositivo de los efectos externos. Luego conecte un cable de audio desde la salida del dispositivo de efectos a uno de los jacks de entrada de Retorno de efectos en el GigaMix. Si su dispositivo de efectos externos cuenta con salidas de estéreo, use dos cables para conectar las salidas de derecha e izquierda de este dispositivo a los jacks de retorno de efectos del GigaMix.
El nivel enviado al dispositivo externo es controlado por el botón de EFECTOS [EFFECT] de cada canal. La cantidad de efectos externos que vuelven al GigaMix es controlada por una combinación de los controles en el dispositivo de efectos externos y en los controles de RETORNO DE EFECTO para las secciones principales y del monitor del GigaMix.
Nota: Si enchufa un cable en el jack de envío de efectos desactivará los efectos digitales que vienen integrados en el GigaMix.
Funcionamiento de canales
Establecimiento de niveles (canales de mic/línea). Enchufe el cable al jack de entrada correspondiente. Si está usando un micrófono o un instrumento con un nivel de salida bajo ——como una guitarra acústica—— pulsar el interruptor de +30dB le proporcionará una medida extra de pre-amplificación. Una vez que esto
haya sido ajustado correctamente, controle el volumen de la entrada con el botón de
NIVEL.
Establecimiento de niveles (canales de línea dual). Enchufe el(los) cable(s) al(los) jack(s) de entrada adecuado(s). Una vez que esto haya sido ajustado correctamente, controle el volumen de la entrada con el botón de NIVEL.
Nivel de efecto. Ajuste la cantidad deseada de efectos (reverberación, coro, etc.) usando el botón de efectos [EFFECT]. Los efectos son post-fader, lo cual significa que, a medida que se aumenta el nivel de entrada también aumentará la cantidad de señal enviada a los efectos. Si desea aumentar el nivel del instrumento, puede que tenga que bajar el botón de efectos [EFFECT].
Si desea usar un dispositivo de efectos externos, enchufe un cable en el jack de envío de efectos. (Esto desactivará los efectos digitales integrados del GigaMix.) Luego conecte las salidas del dispositivo externo a los jacks de retorno de efectos del GigaMix.
Nivel del monitor. Para controlar la cantidad de un canal determinado que está siendo enviada al jack de salida del monitor, use el botón MON. Si el botón de modo de amplificación de potencia está posicionado en monitor principal MAIN-MON (arriba), esta señal también será enviada al jack de la salida 2 (Output 2) del altavoz en el panel trasero.
Controles del ecualizador. Existen tres botones en la sección del ecualizador [EQ] para cada canal: HI (alto), MID (medio) y LO (bajo). Estos le dan la capacidad de dar forma al sonido de cada canal individualmente antes de
que sea enviado hacia las salidas.
10

Funcionamiento de la sección de efectos
Selección del programa de efectos. El GigaMix contiene 100 programas de efectos diferentes donde elegir. Están organizados en categorías para facilitar su ubicación. Para seleccionar un nuevo programa, gire el botón junto a programa [PROGRAM]. Cuando alcance el número que desea, pulse el botón para acceder al nuevo programa.
Desviación de los efectos. Para escuchar cómo sonará la mezcla sin efectos, pulse el botón de desviación [BYPASS]. El LED amarillo se iluminará para indicar que los efectos han sido desviados. Para hacer volver los efectos, pulse de nuevo el botón.
Nota: También puede usar un interruptor de pie (footswitch) para desviar los efectos. Para hacer esto, enchufe un interruptor de pie en el jack de desviación de efectos/interruptor de pie [EFFECT BYPASS/FOOTSWITCH] en la parte inferior central del panel frontal.
LED de Clip/Señal de efectos. Si está usando los efectos integrados, asegúrese de que los ajustes de efectos combinados de cada canal están encendiendo el LED verde (señal) pero no el LED rojo (Clip). Si la señal en los efectos está saturada o clipping, reduzca el ajuste de los botones de efecto [EFFECT] para uno o más canales.
La sección principal
Control del volumen principal. El botón de la mezcla principal [MAIN MIX] se usa para amplificar o reducir el nivel total enviado a las salidas principales del GigaMix.
El ecualizador gráfico. Además de las tres bandas de EQ de las que consta cada canal, la sección principal del GigaMix cuenta con un ecualizador gráfico de 9 bandas. Esto afecta a la totalidad del sonido de la mezcla antes de que sea enviada a las salidas principales.
Control del nivel principal (master) de los efectos. Use el botón del retorno de efectos [EFFECT RETURN] para ajustar el nivel de los efectos para toda la mezcla.
Ajuste del volumen del CD/Cinta. Para subir o bajar el volumen de la música pre-grabada de entrada, use el botón del nivel de retorno de 2 pistas [2-TRACK/CD LEVEL].
Potencia fantasma. Si está usando micrófonos que requieren potencia fantasma, pulse el botón de potencia fantasma [PHANTOM POWER]. Esto no afectará a los micrófonos que no usan potencia fantasma.
Filtro de ronroneo. Si experimenta un exceso de ruido en la manipulación del micrófono u otros ruidos de baja frecuencia colándose en sus micrófonos a través de los pies de micrófono, por ejemplo, pulse el botón de filtro de ronroneo [RUMBLE FILTER]. Este reducirá todas las frecuencias inferiores a los 75 Hz (que puede también reducir el zumbido de tierra).
La sección del monitor
Control del volumen del monitor. El botón de la mezcla del monitor [MONITOR MIX] se usa para aumentar o reducir el nivel total enviado a los monitores.
Control del nivel de los efectos del monitor. Use el botón del retorno de efectos [EFFECT RETURN] para ajustar el nivel de los efectos para la totalidad de la mezcla del monitor.
Ajuste del volumen del CD/Cinta. Para subir o bajar el volumen de la música pre-grabada de entrada, use el botón del nivel de retorno de 2 pistas [2-TRACK/CD LEVEL].
11

1.Los controles del ecualizador le permiten dar forma al sonido del canal antes que sea enviado hacia las salidas.
2.El botón MON controla la cantidad de un canal determinado que es enviada a la salida del monitor.
3.El botón de efecto [EFFECT] le ayuda a especificar la cantidad deseada de efectos para el canal.
4.El botón de nivel [LEVEL] controla el volumen del canal.
5.Este jack se usa para conectar un instrumento al GigaMix usando un cable de ¼ pulgadas de TS (Tip-Sleeve)
6.El botón de +30dB ayuda a aumentar el volumen de fuentes de alta impedancia/bajo nivel.
7.La entrada de MIC es un conector de XLR estándar para uso con micrófonos y otras fuentes.
8.Canales de líneas duales como éstos, permiten la utilización de dos conexiones de 1/4 de TS en un solo canal.
12

1.Use el botón de selección de programa para seleccionar el programa de efectos que desea. Púlselo para acceder a un nuevo programa.
2.El LED del número de programa muestra el número del programa de efectos que ha sido seleccionado.
3.Los LED de [SIG] y [CLIP] indican que hay audio presente además de si se está saturando o no.
4.El botón de desviación [BYPASS] le permite apagar los efectos. El LED le permite comprobar si los efectos han sido desviados.
5.Los nombres de los 100 programas están enumerados para facilitarle la ubicación del que está buscando.
6.El interruptor de pie para la desviación de efectos [EFFECT BYPASS] le permite desviar los efectos si sus manos están ocupadas para pulsar el botón.
7.El jack de envío de efectos [EFFECT SEND] se utiliza para enviar señales de audio a un dispositivo de efectos externo.
8.Los jacks de retorno de efectos [EFFECT RETURN] traen el audio de un dispositivo de efectos externo de vuelta al GigaMix.
13
 Loading...