


DM7
DRUM MODULE
MODULE OVERVIEW
::: ENGLISH ( 3 – 7 ) :::
VISTA DEL MÓDULO
::: ESPAÑOL ( 8 – 9 ) :::
CARACTERISTIQUES DU MODULE
::: FRANÇAIS ( 10 – 11 ) :::
PANORAMICA DI MODULO
::: ITALIANO ( 12 – 13 ) :::
OBERSEITE DER MODUL
::: DEUTSCH ( 14 – 15 ) :::

GETTING STARTED
1.Assemble your drum kit as described in its assembly guide.
2.Insert the included module cable connector into the TRIGGER connector on the module's rear panel.
3.Insert the connector's cables to the jacks of their respective drum pads, cymbal pads, and hi-hat control pedal. (Each cable is labeled with the name of its corresponding pad or pedal.)
4.Make sure all your devices' volumes are at "0" (DM7 module, external speakers or headphones, a device connected to the LINE IN, etc.).
5.If you connected a device to the module's LINE IN, turn it on.
6.Do not strike any pad or press the hi-hat control pedal. Turn on the module.
7.If you are using external speakers, turn them on.
8.Strike the pads and adjust the volume levels of your devices as needed. If you are using headphones, adjust the module's volume with the VOLUME knob on its rear panel. If you are using external speakers, adjust the module's volume by pushing the DATA dial, rotating it to select the volume level, and waiting for five seconds until it returns to the previous window.
9.To select a Kit to play, press one of the numbered buttons (1-9) or turn the DATA dial to access more Kits.
10.Play!
TOP PANEL FEATURES
1.DISPLAY – Displays module information such as the Kit number and name, Song name, pad selection, etc.
2.SONG Button – Enters Song Mode where you can play the Demo Song or a User Song.
3.KIT Button – Enters Kit Selection Mode.
4.CLICK Button – Activates/deactivates the Metronome. Press this twice quickly to edit the Metronome settings (and press EXIT to return to the normal screen).
5.TEMPO Button – Press this button then rotate the DATA dial to adjust the Metronome speed.
6.PLAY/STOP Button – When in Song Mode, this button starts/stops playback. When the module is recordarmed, this button starts/stops recording.
7.RECORD Button – Press this button to record-arm the module. Press PLAY/STOP to start/stop recording.
8.COUNT Button – Enters Count Mode, which lets you count how quickly you can strike the pads.
9.DATA Dial – Rotate this dial to adjust the currently selected setting shown in the DISPLAY. From the main screen (when the current Kit is displayed), press the dial then rotate it to adjust the master volume (and wait for the display to return to the previous screen).
10.ENTER Button – Confirms the setting or data entry shown in the DISPLAY.
11.EXIT Button – Cancels any data entry and returns to the previous screen of the DISPLAY.
12.SETUP Button – Enters Setup Mode, which allows you to edit the module's overall settings.
13.MODE Button – Changes how the Demo Song is played. You can select "Full" (all the song's parts will play), "Drum Only" (only the song's drum part will be heard), or "Drum Mute" (only the song's accompaniment will be heard).
14.EDIT Button – Enters Edit Mode, which allows you to edit various parameters for the Kits to customize your sound.
15.PAD SELECT Buttons – These buttons serve two functions. In Edit Mode, these buttons select which pad's parameters are being edited. When in Kit Selection Mode, pressing one of these buttons will select one of nine Preset Kits.
3
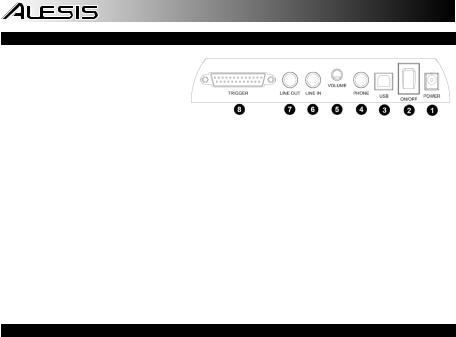
REAR PANEL FEATURES
1.POWER IN – Connect the included power adapter to this input, then plug the adapter into your power source.
2.POWER SWITCH – Turns the module on/off.
Note: If you want to turn the module on after turning it off, wait at least five seconds in between so the electronic circuits can properly reset.
3.USB Jack – You can use this USB jack to connect the drum module to an available USB port on your computer if your operating system is Windows XP, Windows Vista, or Mac OS X. The drivers will be installed automatically, and the module will appear as a USB audio device (e.g., "USB Audio CODEC"). When connected, the module can send MIDI data to your computer via the USB connection.
4.HEADPHONE Jack – You can connect standard 1/4" stereo headphones to this output to hear your drum performance. Adjust the volume with the HEADPHONE VOLUME knob.
5.HEADPHONE VOLUME Knob – Adjusts the volume of the HEADPHONE output.
6.LINE IN Jack – You can connect an audio device to this input using a standard stereo 1/4" cable. The sound from that device will be mixed with the sound from the drum module, which can allow you to play along to a connected CD player, MP3 player, iPod*, etc.
7.LINE OUT Jack – If you are not using headphones connected to the HEADPHONE output, connect a set of speakers or other amplification system to this output using a standard stereo 1/4" cable. You can adjust this volume with the DATA dial: from the main screen (when the current Kit is displayed), press the dial then rotate it to adjust the master volume (and wait for the display to return to the previous screen).
8.TRIGGER Connector – Connect the included module cable connector to this input, then connect the cables to the jacks of their respective drum pads, cymbal pads, and hi-hat control pedal. (Each cable is labeled with the name of its corresponding pad or pedal.)
*iTunes and iPod are trademarks of Apple, Inc., registered in the U.S.A. and other countries.
KITS
There are 50 Preset Kits and 30 User Kits to choose from. Each Kit is unique combination of different instrument voices assigned to your drum pads. See the back of this manual for a list of the available Kits.
To select a Kit:
1.Press the KIT button to enter Kit Selection Mode. (This is also the default main screen of the module.)
2.Rotate the DATA dial to select the Preset Kit you want to play. If you want to play a User Kit, press the KIT button again, then rotate the DATA dial to select one. (Preset Kits are 01-50; User Kits are U01-U30.) You may also press any one of the numbered PAD SELECT buttons on the module to select one of Kits 01-09.
3.Play!
To create/edit a User Kit:
1.Press the KIT button to enter Kit Selection Mode. (This is also the default main screen of the module.)
2.Press the KIT button again, then rotate the DATA dial to select a User Kit to edit (U01-U30).
3.Press the EDIT button to enter Edit Mode.
4.Do one of the following to select the pad you want to edit:
a.Press the PAD SELECT button that corresponds to the drum pad. (If the pad has multiple zones – such as a dual-zone snare drum pad or the hi-hat's "open" and "closed" sounds – press that PAD SELECT button multiple times to toggle between the available zones.)
b.Strike the pad (or the zone of a multi-zone pad) you want to edit.
5.Press ENTER to confirm your choice.
6.Rotate the DATA dial to select one of the following parameters to edit, then press ENTER to confirm your choice:
a.Voice: The drum sound assigned to that pad.
b.Volume: The volume of that pad. This volume is independent of the module's master volume.
c.Pan: The stereo (left-right) panning of that pad's sound.
d.Pitch: The pitch or tuning of that pad.
e.Reverb: The amount of reverb effect applied to that pad.
7.When the parameter value is flashing, rotate the DATA dial to change it. Press ENTER to confirm your choice. The next parameter will start flashing.
8.Optional: To edit another parameter, repeat Steps 6-7.
9.When you are finished editing the Kit, press EXIT.
10.You will be asked whether or not you want to save the Kit you just edited. To cancel saving, press EXIT. To save the Kit:
a.Press the ENTER button
b.Rotate the DATA dial to choose the User Kit where you want to save this edited Kit, then press ENTER.
c.You will be asked, "Replace It?" Press ENTER to confirm or EXIT to cancel. The module will automatically return to Kit Selection Mode.
11.Play!
Note: The User Kits you edited will retain the settings you saved even if you turn the module off.
Tip: You may reset the changes you made to the User Kits by returning the module to its factory settings. See the SETUP section for more information.
4

SONGS
There are two types of songs – 52 Demo Songs, to play back and or practice to, and 10 User Songs, which you can record yourself.
To play Demo/User Songs:
1.Press the SONG button to enter Song Mode – once to play Demo Songs, twice to play User Songs. (The button will illuminate.) Depending on whether you selected Demo Songs or User Songs, the DISPLAY will show "All Demo" or "All U-Song" indicating that the Songs will all play one after another.
2.Press PLAY to start playback of all songs, or rotate the DATA dial to select a specific Song then press PLAY. If no buttons are pressed within 3 seconds, playback will start automatically.
3.During playback you can do any of the following:
a.Adjust the speed of the Song by pressing the TEMPO button and rotating the DATA dial until the song is at the desired speed.
b.Change which parts of the Song you are hearing by pressing MODE to toggle through three different settings: "Full" (all the song's parts will play), "Drum Only" (only the song's drum part will be heard), or "Drum Mute" (only the song's accompaniment will be heard).
c.Turn the metronome on or off by pressing the CLICK button.
d.Adjust any settings in the Setup Menu by pressing the SETUP button. (See the SETUP section for more information.)
4.Press STOP to stop playback.
5.Optional: To play another Song, repeat Steps 2-4.
6.Press EXIT to exit Song Mode.
To record User Songs:
1.Make sure the module's settings are set to your preference – tempo, time signature, drum and accompaniment volumes, etc. (See the SETUP section for more information on these customizable settings.)
2.Press the RECORD button to start recording. The recording indicator will flash and the current tempo, time signature will be shown in the DISPLAY. You will hear a one-measure count-in before recording starts.
3.Play! The current measure of the Song you are recording will be shown in the left of the DISPLAY.
4.When you are done recording, press the RECORD button again.
5.Rotate the DATA dial to select where to save the Song. You can choose from User Songs 01-10. If you want, you can play the Song before saving it by pressing PLAY (and pressing STOP to stop playback).
6.Press ENTER to save the Song to the selected User Song number.
7.You will be asked if you want to replace the current User Song with your new recording. To save the Song, press ENTER. To cancel, press EXIT (and return to Step #5 or press EXIT to cancel saving entirely).
To delete User Songs:
1.When in Kit Selection Mode, press the SONG button twice to view User Songs in Song Mode.
2.Rotate the DATA dial to select the User Song you want to delete.
3.Press ENTER.
4.You will be asked if you want to erase the selected User Song. To erase it, press ENTER. To cancel, press EXIT. You will return to the list of User Songs.
METRONOME
The metronome helps you play at a steady speed. To activate/deactivate the Metronome, press the CLICK button. When activated, you will hear a counting sound at the current tempo.
You can adjust the following settings by pressing the CLICK button twice. (If you do not want to change the setting, simply press the ENTER button without adjusting the value to skip it.)
Time Signature ("Time-Sig") – The current time signature will flash in the second row of the DISPLAY (under "Click"). Rotate the DATA dial to change the time signature. Press the ENTER button to save the setting and move to the next metronome setting or press EXIT to cancel any changes.
Metronome Volume ("Metro Vol") – The current metronome volume will flash in the left of the DISPLAY. Rotate the DATA knob to adjust the volume. Press the ENTER button to save the setting and move to the next metronome setting or press EXIT to cancel any changes.
Metronome Sound ("MetroSound") – The current metronome sound will flash in the left of the DISPLAY. Rotate the DATA knob to select the sound: "Eng" (for a voice counting in English), "Chn" (for a voice counting in Chinese), or "Prc" (for a standard "click" sound). Press the ENTER button to save the setting and return to Kit Selection Mode or press EXIT to cancel any changes.
TEMPO
To adjust the speed of the Song and Metronome, press the TEMPO button. The button will flash, and the current tempo will flash in the second row of the DISPLAY. Rotate the DATA dial to select a new tempo (40 – 240 BPM).
Press the ENTER button to confirm you setting or press EXIT to cancel. (If no changes are made for 10 seconds, it will exit automatically.)
5
 Loading...