


O N E T O U C H
500
5 0 1
700
7 0 1

USER’S
GUIDE

CONTENTS
Safety and precautions |
4 |
|
1 Your telephone |
8 |
|
1 - 1 |
Keys |
9 |
1 - 2 |
Status icons |
10 |
1 - 3 |
Conventions used in this User’s Guide |
11 |
2 Getting started |
12 |
||
2 |
- 1 |
Initial operation |
12 |
2 - 2 |
Switching your phone on |
14 |
|
2 - 3 |
Switching your phone off |
15 |
|
2 - 4 |
Fitting the pocket clip |
15 |
|
3 First steps |
16 |
|
3 - 1 |
Making a call |
16 |
3 - 2 |
Receiving a call |
16 |
3 - 3 Accessing your voice mail |
17 |
|
3 - 4 |
Displaying your number |
17 |
3 - 5 Accessing the functions and scrolling |
18 |
|
3 - 6 |
Functions structure |
19 |
3 - 7 Creating a directory file |
21 |
|
3 - 8 Changing the ring tone |
22 |
|
3 - 9 Reading your new short messages |
23 |
|
4 Directory |
24 |
|
4 - 1 |
Accessing the directory |
24 |
4 - 2 |
Creating a file |
25 |
4 - 3 |
Options |
27 |
4 - 4 Creating a new directory |
28 |
|
4 - 5 |
Copying files |
29 |
5 |
Consult information |
30 |
|
6 |
Calls |
|
32 |
|
6 - 1 |
Making a call |
32 |
|
6 - 2 |
Receiving a call |
34 |
|
6 - 3 |
During a call |
35 |
7 |
Call memory |
38 |
|
|
7 - 1 |
Accessing the call memory and calling back |
38 |
|
7 - 2 |
Options |
39 |
8 |
Short messages |
40 |
|
|
8 - 1 |
Accessing short messages |
40 |
|
8 - 2 |
Reading your short messages |
41 |
2

8 - 3 |
Options |
8 - 4 |
Writing a short message |
8 - 5 |
Parameters |
9Scheduler
9 - 1 Accessing the scheduler
9 - 2 Consulting your scheduler
9 - 3 Creating an appointment
9 - 4 Scheduling an alarm
9 - 5 Creating a task
9 - 6 Options
9 - 7 Description of scheduler icons
9 - 8 Configuring the scheduler
9 - 9 Advanced scheduler functions
10Voice functions
10 - 1 Handsfree
10 - 2 Voice recognition
10 - 3 Voice memo
11Mobile Internet
11 - 1 Accessing Internet services
11 - 2 Options
12Calculator / Currency converter
12 - 1 Accessing the calculator and currency converter
12 - 2 Calculator
12 - 3 Currency converter
12 - 4 Currency selection
13Menu
13 - 1 Services
13 - 2 Settings
13 - 3 Billing
13 - 4 Available memory
13 - 5 Security
14Audios
14 - 1 Accessing the “Audios” function
14 - 2 Options
15Personal key
15 - 1 Features offered by personal key
15 - 2 Setting the personal key
16Warranty
16 - 1 Warranty
16 - 2 Information
17Accessories
42 |
|
43 |
|
48 |
CONTENTS |
54 |
|
50 |
|
50
50
51
52
53
54
55
56
58
58
58
60
62
62
64
66
66
66
67
68
70
70
75
80
82
83
84
84
84
86
86
86
88
88
90
92
3

SAFETY AND
PRECAUTIONS
We recommend that you read this chapter carefully before use.
CONDITIONS OF USE
Switch the phone off before boarding an aircraft. Use could lead to legal action against the user.
Switch the phone off when in health care facilities except in areas specified. Like many other types of equipment now in regular use, mobile telephones can interfere with other electric or electronic devices.
Persons with a medical device (such as a pacemaker, hearing aid, insulin pump) should not carry the phone in a place close to the device.
When placing or receiving a call, persons with a pacemaker or hearing aid should use the ear on the opposite side to the device.
Switch your phone off when near gas or flammable liquids.
Strictly obey all signs and instructions when in a fuel depot, service station, chemical plant or any potentially explosive atmosphere.
Do not let small children use the phone without supervision.
Do not attempt to open or repair it yourself.
Do not expose the phone to unfavourable environmental conditions (humidity, rain, ingress of liquid, dust, sea air, etc.)
Outside the manufacturer’s recommended operating temperature range (-20° C +55° C), the legibility of the phone’s display may be impaired and the battery may not work, though this is temporary.
4

CONDITIONS OF USE FOR BATTERIES:
Only use batteries, battery chargers and accessories approved by the manufacturer. The manufacturer disclaims any liability for damage caused by use of other batteries, chargers or accessories.
Before removing the battery from your phone, please make sure that the phone is switched off.
Do not attempt to open the battery because it contains chemical substances.
Do not dispose of used batteries in household waste.
Batteries must be disposed of in accordance with locally applicable environmental legislation.
Do not place battery in fire or in water.
Do not store above 60 ºC.
Do not allow + and - terminals to contact each other. Keep them away from metal objects as nickel or coins.
Charge the battery in an area where the temperature is from 0º C to 45º C.
The battery discharges below -20º C and above 60º C.
The battery may discharge if it is not used for a sufficiently long period of time.
Do not let small children handle batteries without supervision.
SAFETY AND PRECAUTIONS
5

TRAFFIC SAFETY:
Remember to always check whether local legislation allows operation of a mobile phone while driving a vehicle.
It is vital to connect the phone to an external antenna when it is used in a vehicle. Electromagnetic waves may otherwise interfere with the vehicle electronics.
Check that the antenna is mounted and located away from the driver and passengers or separated from them by a metal screen (e.g. car roof).
We recommend that you park your car before using the phone. However if you intend to use your phone while driving, you must use it connected to the “Fullduplex handsfree vehicle kit” (cf. chapter entitled “Accessories”, page 92).
Electromagnetic waves from the telephone may interfere with the operation of the car’s electronic systems such as anti-lock brakes (ABS), airbags, etc.
Check with your car dealer or car manufacturer that these systems are adequately shielded from mobile phone RF energy before using it in the vehicle. Always avoid placing the phone on the dashboard.
GENERAL INFORMATION:
As with all radio transceivers, your mobile phone emits electromagnetic waves. This phone conforms to international regulations when used under normal conditions and in accordance with the instructions contained herein.
There has been speculation about the safety of mobile phones.
6

Several expert groups belonging to or having been appointed by official national or international bodies have analysed all the existing publications and, to date, have concluded that there is a lack of evidence as to any credible or convincing hazardous effects of mobile phones on health.
These studies have, in particular, focused on the fact that mobile handsets receive and emit electromagnetic waves via their antenna.
Experts from such organizations as the European Commission and the International Commission on Non-Ionising Radiation Protection (ICNIRP) have established thresholds on a handset’s emissions to the human body. The main measurement standard is known as SAR (Specific Absorption Rate). ALCATEL can formally state that all its GSM mobile phones generate a SAR that is significantly below these thresholds.
Furthermore, ALCATEL actively supports national and international research into this issue carried out by authoritative and independent organizations.
If you still have concerns on this issue, you may use your mobile phone with a headset, or use the handsfree feature integrated in the phone and, while driving, use the full-duplex handsfree vehicle kit (cf. chapter entitled “Accessories”, page 92).
The part numbers of these accessories can be found in the “Accessories” chapter on page 92.)
The manufacturer disclaims any liability for damage which may result as a consequence of improper use or use contrary to the instructions contained herein.
Icons and other illustrations shown in this User’s Guide are for information only.
07/02/2000
SAFETY AND PRECAUTIONS
7
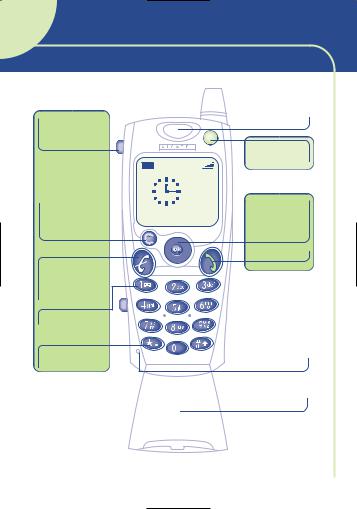
1 YOUR TELEPHONE
Activate voice functions

Delete
Lock keypad (long keypress)
Switch on
Switch off
Hang up
Voice mail |
(2) |
Your number
0 6 - 0 9
2 0 0 0
N e t w o r k n a m e
Loudspeaker
Personal
key
MENU
Scroll
Confirm
Off-hook
Microphone
Flap (1)
8
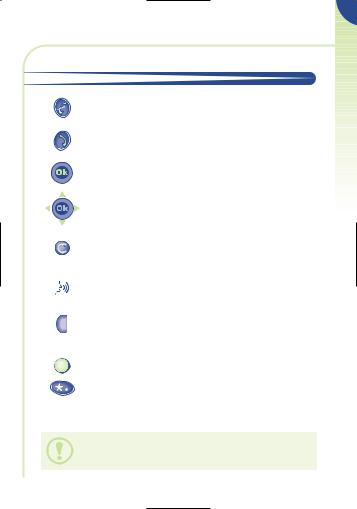
1 • 1 Keys
Switch on/switch off (long keypress)
Hang up (short keypress)
Off hook
Access call memory (Redial)
Access the MENU (directory, short messages, etc.) Confirm an option
Volume control
Scroll to select an option
Delete (short keypress)
Return to standby screen (long keypress)
Lock the keypad (long keypress)
Use voice functions:
• Activate built-in “handsfree” (short keypress during a call)
• Activate “voice recognition” (short keypress in standby mode)
•Record “voice memos”
(long keypress in standby mode)
Your personal key
Display your number (long keypress)
(1) Flap (depending on your model): to open flap, press button (2) on the left-hand side of the phone. You can also go off hook by opening the flap and hang up by closing it.
1
YOUR TELEPHONE
9
1 • 2 Status icons
Battery charge level.
Call forwarding activated: your calls are forwarded (see Chapter 13, page 70).
Consult information: Consult your voice mail, unanswered incoming calls, unread short messages and voice memos.
Short message list (SIM card) is full: your terminal cannot store any more messages. You must access the short message list and delete at least one message.
Appointment scheduled. (See Chapter 9, page 55).
Signal strength indicator.
Icons displayed at the bottom of the screen:
Keypad locked.
Vibrating system activated. (See Chapter 14, page 85).
Icons and other illustrations shown in this User’s Guide are for information only.
10
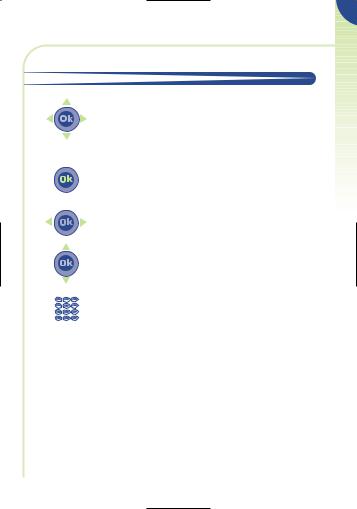
1 • 3 Conventions used in this User’s Guide
You can use the scroll key to move between your phone’s options in four directions: up, down, left, right.
The following symbols are used in the text which follows:
Briefly press the centre of the scroll key to confirm an option.
Move the scroll key left or right.
Move the scroll key up or down.
Use the keypad keys to enter digits and/or letters.
1
YOUR TELEPHONE
11
2 GETTING STARTED
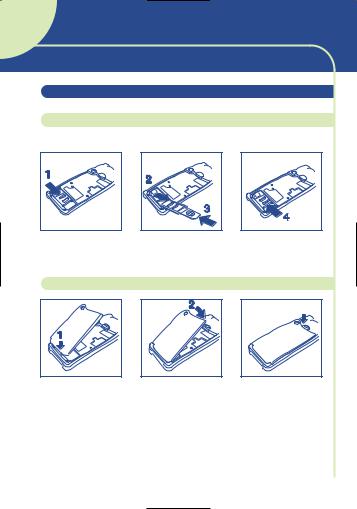
2 • 1 Initial operation
Insert the SIM card
You must insert your SIM card in order to use your phone.
Open the cover |
Slide the SIM card |
Close the cover |
|
into its compartment |
|
Fit the battery
CLICK
Insert the battery |
Close the battery |
Click into place |
12
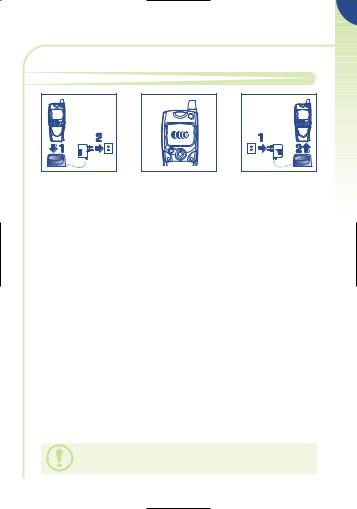
Charge the battery
Connect the battery |
Wait for the on- |
Disconnect the |
charger |
screen indicator to |
battery charger |
|
stop flashing |
once charging is |
|
|
complete |
A beep will sound when charging begins.
It takes a few seconds before the charging indicator icon starts to flash (charging time may be longer with a new battery, or when the battery level is very low).
The mains socket-outlet must be close to the phone and easily accessible.
When you first use your phone you must charge the battery for approximately 3 hours.
2
GETTING STARTED
13
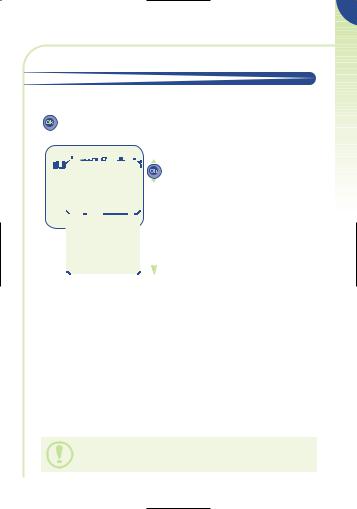
2 • 2 Switching your phone on
|
P I N c o d e ? |
|
0 6 - 0 9 |
|
_ _ _ _ |
|
2 0 0 0 |
|
|
|
N e t w o r k n a m e |
Switch your |
Enter your |
Confirm |
Standby screen |
phone on |
PIN code |
|
|
(long keypress) |
|
|
|
If you do not know your PIN code, please contact your network operator.
Do not leave your PIN code near your phone and keep your SIM card in a safe place when you are not using it.
You are prompted to enter the time and the date, enter new data if necessary, then confirm by  .
.
If cell broadcast messages are displayed, use the  key to browse through them in full or press the
  key to return to the standby screen.
While the phone is searching for a network, <<<–>>> is displayed (???-??? is displayed if your SIM card is rejected by the network, in this case please contact your operator).
14
2 |
2 |
• 3 |
Switching your phone off |
STARTED |
||
|
|||||
Press the |
key (long keypress). |
GETTING |
|||
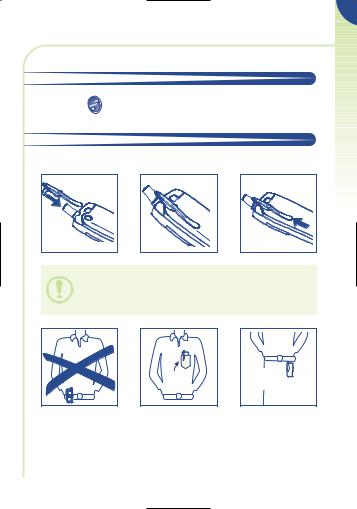
2 |
• 4 |
Fitting the pocket clip |
|||
|
|||||
This accessory is only available on certain models. |
|
||||
The pocket clip helps you keep your telephone in your shirt or jacket pocket.
The pocket clip is not designed to be worn on a belt.
OK OK

15
3 |
FIRST STEPS |
In order to make or receive a call, you must switch your phone on.
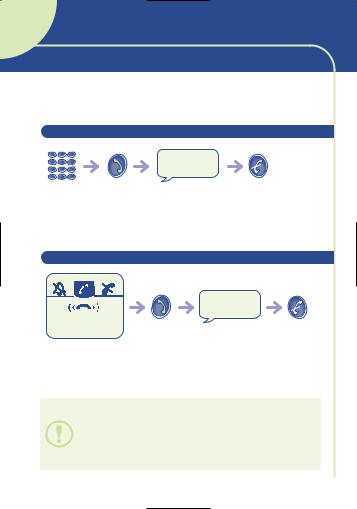
3 • 1 Making a call
|
|
Hello |
|
Dial the |
Make the |
Talk |
Hang up |
number |
call |
|
|
If you make a mistake, use the  key to delete digits.
3 • 2 Receiving a call
|
|
Hello |
|
K a r i n e |
|
|
|
Incoming call(1) |
Take |
Talk |
Hang up |
|
the call |
|
|
Flap (depending on your model): to open the flap, press the button on the left-hand side of the phone. You can also answer a call by opening the flap.
(1)The caller’s number or name is displayed if it is provided by the network (check the availability of this service with your operator).
16
3 • 3 Accessing your voice mail
The network provides a voice mail service to ensure that you do not miss any calls: it works like an answering machine which you can interrogate at any time.
V o i c e |
m a i l |
|
C a l l |
? |
|
(c) to |
cancel |
|
Access voice mail |
Make the call |
|
(long keypress) |
|
|
If your operator’s voice mail access number is not shown, dial the number that your operator supplied to you. To later modify this number see the “Voice Mail” option in the “Menu”, page 75.
To use your voice mail abroad, contact your operator before setting out on your trip.
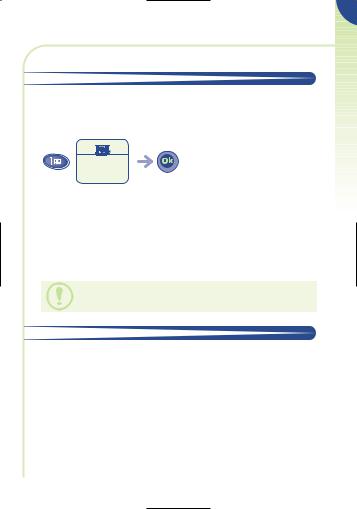
3 • 4 Displaying your number
You can display your own number by pressing the  key (long keypress).
If your number is not displayed, enter it and confirm by pressing the  key.
key.
To later modify it, see the “Your number” option in the “Menu”, page 75.
3
FIRST STEPS
17
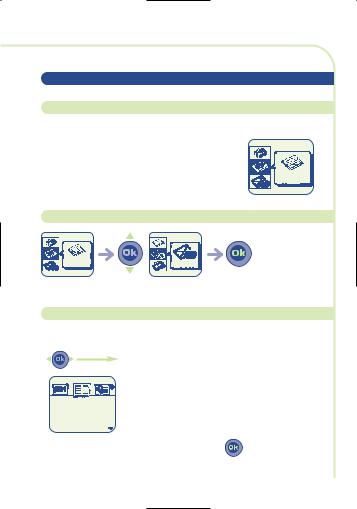
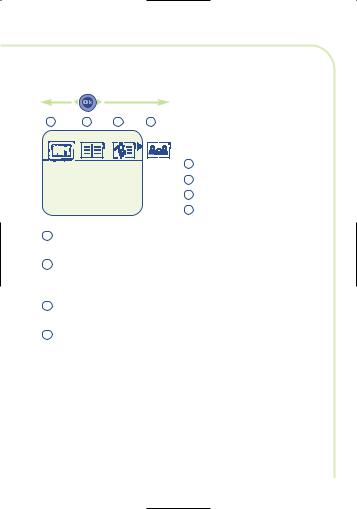
3 • 5 Accessing the functions and scrolling
Accessing the functions
The functions can be accessed from the standby screen by pressing the  key.
key.
This takes you to the following screen:
Directory
Choosing a function
Directory |
Events |
Select a function |
Confirm |
Scrolling within a function
You can scroll horizontally to the various icons:
|
F r |
d |
r i q u e |
|
|
|
H |
l |
n e |
|
|
|
S o p h i e |
|
|||
|
S t p h a n i e |
|
|||
To access all the proposed options, press |
. |
||||
18
Return to previous screen
Press  (short keypress).
Return to standby screen
Press  (long keypress).
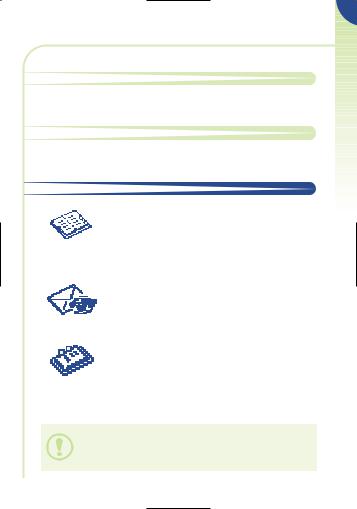
3 • 6 Functions structure
Directory:
Manage your phone numbers. For each name, you can enter several phone numbers (home, mobile, office, etc.).
You can create your own directories.
Consult information (Events):
Access your voice messages, unanswered incoming calls, unread short messages and voice memos.
Scheduler:
Manage your timetable by organizing all your appointments and important events.
The information in the directory and scheduler can be transferred to a computer by using the DATA/PC Sync kit (cf. “Accessories”, page 93). For more information, visit our website www.alcatel.com.
3
FIRST STEPS
19
Messages:
Access or write your short messages.
Menu:
Adjust and personalise your phone.
Voice memos:
Play back previously recorded conversations or voice messages.
Audios:
Personalise the sounds made by your phone (melody, key beep, etc.).
Calculator/Currency converter:
Perform basic operations (addition, etc.) and currency conversions (euros, etc.).
Internet(1): Access Internet services.
Services(1):
Use the functions provided by your operator.
(1)Access to this function depends on your operator and the SIM card that you use.
20
3 |
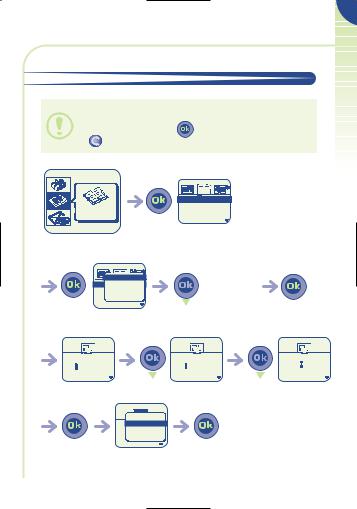
3 • 7 Creating a directory file |
|
STEPS |
If your directory is empty, you will see the prompt: |
FIRST |
|
|
||
“Directory empty, OK to create”. |
|
|
Create by pressing the |
key or decline by pressing the |
|
key. |
|
|
F r d r i q u e
Directory |
H l n e |
S o p h i e |
|
|
S t p h a n i e |
Select the |
Confirm |
“Directory” icon
View |
F r Create file
H |
Create |
dir. |
|
|
S o Classify |
|
|
||
S t p h a n i e |
|
|
||
Confirm |
|
Select “Create file” |
Confirm |
|
Last name: |
|
F i r s t |
n a m e : |
M o b i l e : |
Ceci |
|
A l i c |
|
0 6 1 4 2 5 |
Enter the surname(1) |
Enter the first name(1) |
Enter the number(1) |
||
|
|
Continue |
|
|
|
N u |
Save |
|
|
|
0 6 |
Prefixes |
|
|
|
|
Country list |
|
|
Confirm |
Select “Save” |
Confirm |
|
|
21

You can store entered information at any time by pressing  and selecting “Save”.
If you wish to use your telephone abroad, store numbers in the directory in international format with “+”.
(1)You do not have to fill in all the information but you must enter information in at least one field.
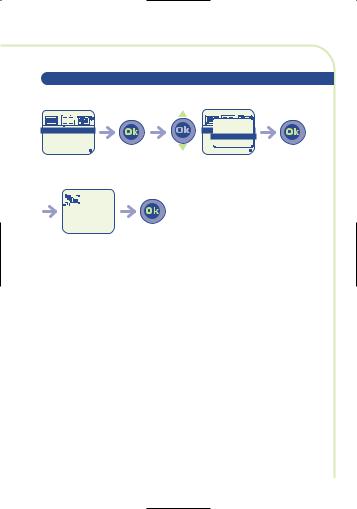
3 • 8 Changing the ring tone
A u d i o s
Select the
“Audios” icon
|
|
|
|
|
|
|
M e l o d y |
1 |
|
||
|
M e l o d y |
2 |
|
||
|
M e l o d y |
3 |
|
||
|
M e l o d y |
4 |
|
||
 Normal
Discreet
Vibrator
Vibrator&Melody
Confirm
M e l o d y |
1 |
M e l o d y |
2 |
M e l o d y |
3 |
M e l o d y |
4 |
Scroll to the |
Select the desired |
Confirm |
left-hand icon |
melody |
|
22
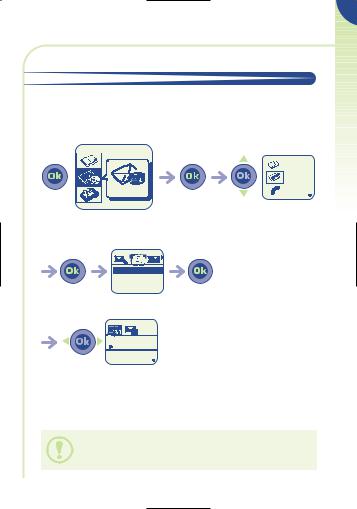
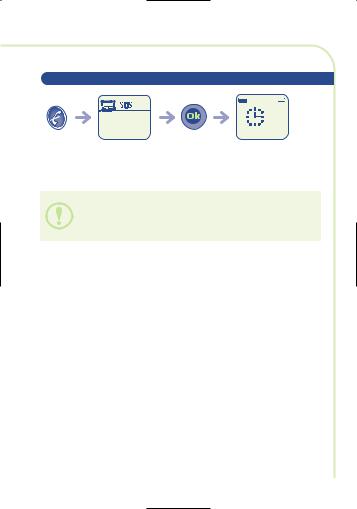
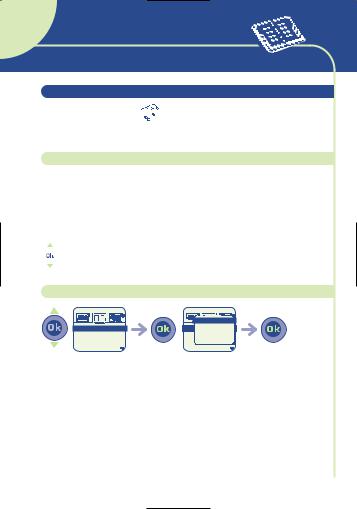
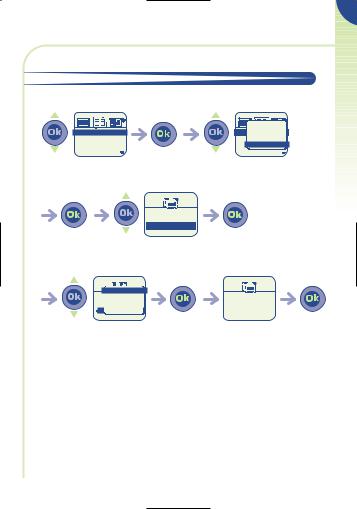
3 • 9 Reading your new short messages(1)
The  icon and a beep(2) indicate that a message has been received.
From the standby screen:
|
2 |
Voice |
|
3 |
Msg. |
Events |
1 |
Calls |
Access the |
Confirm |
Select the desired |
“Events” option |
|
message type |
U nread M sg . 2 |
|
|
R ead M s g . |
0 |
|
Confirm |
Confirm |
|
0 3 / 0 6 / 9 9
 F L O R E N C E Appointment with Paul about meet
Scroll to the desired message
(1)Check the availability of this service with your operator.
(2)To deactivate the beep, see the “Audios” icon, page 85.
3
FIRST STEPS
23
4 DIRECTORY
4 • 1 Accessing the directory
Select the Directory 


 icon to access the directory from the standby screen.
Searching for a name by its first letter
You can search for the name of the person you wish to contact by pressing the key associated with the first letter of his/her name.
Example: press  twice to find the first name beginning with “N”. Then scroll the list to the name you want by using the
  key.
key.
Displaying a phone number
A l e x
A l f r e d R o b e r t S m i t h


 V i e
V i e

 w
w


 A l C r e a t e f i l e A l C r e a t e d i r . R o C l a s s i f y
S m i t h
Select a name |
Confirm |
Select |
Confirm |
“View”
24

Calling the person
Press the  key while the name is selected.
If several numbers are assigned to the name of the person to be called, you must first use the  key to make a selection from the number list (GSM, office, home, etc.).
Press  to make the call.
The information in the directory and scheduler can be transferred to a computer by using the DATA/PC Sync kit (cf. “Accessories”, page 93). For more information, visit our website www.alcatel.com.
4 • 2 Creating a file
See the chapter entitled “Creating a file” in the “First steps” chapter, page 21.
4
DIRECTORY
25
There are 4 directories:
1 |
2 |
3 |
4 |
1 SIM
2 General directory
3 Work directory
4 Personal directory
1SIM directory: The capacity of your SIM card depends on your operator. Only one number can be assigned to a name.
2GENERAL directory: This contains all the files created. SIM card files are not automatically created in the general directory but you can copy them.
3WORK directory: You can place your work numbers (companies, etc.) in this directory.
4PERSONAL directory: You can place your personal numbers in this directory (family, friends, etc.).
First select the icon you want.
In addition to the directories that come with your phone, you can also create directories yourself (see the section entitled “Creating a new directory”, page 28).
26
4 • 3 Options
From the list of names in your general, work and personal
directories, |
|
|
|
|
|
|
|
access the following options by using the |
||||||||||||||||
|
|
|
|
|
|
|
|
|
|
|
|
|
|
|
|
|
|
|
|
|
|
|
|
|
|
|
|
|
|
|
|
|
|
|
|
|
|
|
|
|
|
|
|
|
|
|
|
View: display a complete file: name, |
|
|
|
|
|
|
|
|
|
|
|
|
|
|
|
|
|
|
|
|
|
|
|
|
numbers, address, voice mail, etc. |
|
|
|
|
|
|
|
|
View |
|
|
|
|
|
|
|
|
|
|
|
|
|
|
Create file: create a file (name, numbers, |
|
|
|
|
|
|
|
|
|
Create |
|
file |
|
|
|
|
|
|
|
address, voice mails, etc.). You can save this |
|
||||||
|
|
|
|
|
|
|
|
|||||||||||||||||
|
|
|
|
|
|
|
Create |
|
dir. |
|
|
|
|
|
|
|
file in one of your directories. |
|
||||||
|
|
|
|
|
|
|
|
|
|
|
|
|
|
|
Create dir.: create your own directories |
|
||||||||
|
|
|
|
|
|
|
Classify |
|
|
|
|
|
|
|
|
|
||||||||
|
|
|
|
|
|
|
|
|
|
|
|
|
|
for files apart from the SIM directory. |
|
|||||||||
|
|
|
|
|
|
|
Voice |
recog. |
|
|
|
|
|
|
|
|
||||||||
|
|
|
|
|
|
|
|
|
|
|
|
|
|
Classify: move a file from one directory to |
|
|||||||||
|
|
|
|
|
|
|
Delete |
|
|
|
|
|
|
|
|
|
|
|
|
|
another. |
|
||
|
|
|
|
|
|
|
Back |
|
|
|
|
|
|
|
|
|
|
|
|
|
Voice recog.: record a voice recognition |
|
||
|
|
|
|
|
|
|
Exit |
|
|
|
|
|
|
|
|
|
|
|
|
|
command. |
|
||
|
|
|
|
|
|
|
|
|
|
|
|
|
|
|
|
|
|
|
|
|
|
|
Delete: delete the selected file. |
|
|
|
|
|
|
|
|
|
|
|
|
|
|
|
|
|
|
|
|
|
|
|
|
|
|
|
|
|
|
|
|
|
|
|
|
|
|
|
|
|
|
|
|
|
|
|
|
|
Back: return to the list of names in your |
|
|
|
|
|
|
|
|
|
|
|
|
|
|
|
|
|
|
|
|
|
|
|
|
directory |
|
|
|
|
|
|
|
|
|
|
|
|
|
|
|
|
|
|
|
|
|
|
|
|
Exit: return to the standby screen. |
|
|
|
|
|
|
|
|
|
|
|
|
|
|
|
|
|
|
|
|
|
|
|
|
|
|
4
DIRECTORY
To return to the standby screen, press the  key (long keypress).
27
4 • 4 Creating a new directory
This option lets you create your own directories.
F r |
d r i q u e |
H |
l n e |
S o p h i e
S t p h a n i e
|
V i e w |
F r C r e a t e f i l e |
|
H C r e a t e d i r . |
|
S o |
C l a s s i f y |
S t |
p h a n i e |
Select a name |
|
|
Confirm |
|
|
Select “Create dir.” |
|
Confirm |
|||||||
|
|
|
|
|
|
|
|
|
|
|
|
|
|
||
|
|
|
D i r . n a m e |
|
|
|
|
|
|
|
|
||||
|
|
|
|
|
|
|
|
|
|
|
|||||
|
|
|
|
|
|
|
|
|
|
|
|||||
|
|
|
|
|
|
|
|
|
|
|
|||||
|
R e s t a u r a n t |
|
s |
|
|
|
|
|
|
|
|
||||
|
|
|
|
|
|
|
|
|
|
||||||
|
|
|
|
|
|
|
|
|
|
|
|
|
|
|
|
Enter the name |
|
|
Confirm |
|
|
|
|||||||||
|
of the directory |
|
|
|
|
|
|
|
|
||||||
|
to be created |
|
|
|
|
|
|
|
|
||||||
|
|
|
|
|
|
|
|
|
|
|
|
|
|
|
|
28
4 |
4 • 5 Copying files |
|
DIRECTORY |
|
|
|
You can copy files from one directory to another. |
|
|
|
V i e w |
|
F r d r i q u e |
F r C r e a t e f i l e |
|
H l n e |
H C r e a t e d i r . |
|
S o p h i e |
S o C l a s s i f y |
|
S t p h a n i e |
S t p h a n i e |
|
Select the file to be |
Confirm |
Select “Classify” |
|
copied |
|
|
|
|
|
W o r k |
|
|
|
P e r s o n a l |
|
|
|
R e s t a u r a n t s |
|
Confirm |
Choose the destination |
Confirm |
|
|
|
directory |
|
V a l i d a t e |
P Create dir. P B a c k
R E x i t |
s |
Move Fr d riqu to Restaurants directory?
(c) to exit
Select “Validate” |
Confirm |
Confirm |
29
 Loading...