Aiwa XC-RW700 User Manual
COMPACT DISC RECORDER GRABADORA DE DISCOS COMPACTOS ENREGISTREUR DE DISQUE COMPACT
XC-RW700
OPERATING INSTRUCTIONS MANUAL DE INSTRUCCIONES MODE D’EMPLOI
En (English)
E (Español)
F (Français)
For assistance and information, call toll free 1-800-BUY-AIWA.
(United States and Puerto Rico)
8A-AJ2-901-21 001101CMK-H-L
U
WARNING
TO REDUCE THE RISK OF FIRE OR ELECTRIC SHOCK, DO NOT EXPOSE THIS APPLIANCE TO RAIN OR
MOISTURE.
CAUTION |
RISK OF ELECTRIC SHOCK |
DO NOT OPEN |
“CAUTION:TO REDUCE THE RISK OF |
ELECTRIC SHOCK, |
DO NOT REMOVE COVER (OR BACK). |
NO USER-SERVICEABLE PARTS INSIDE. |
REFER SERVICING TO QUALIFIED |
SERVICE PERSONNEL.” |
Explanation of Graphical Symbols:
The lightning flash with arrowhead symbol, within an equilateral triangle, is intended to alert the user to the presence of uninsulated "dangerous voltage" within the product's enclosure that may be of sufficient magnitude to constitute a risk of electric shock to persons.
The exclamation point within an equilateral triangle is intended to alert the user to the presence of important operating and maintenance (servicing) instructions in the literature accompanying the appliance.
PRECAUTIONS
Read the Operating Instructions carefully and completely before operating the unit. Be sure to keep the Operating
Instructions for future reference. All warnings and cautions in the Operating Instructions and on the unit should be strictly followed, as well as the safety suggestions below.
Installation
1Water and Moisture - Do not use this unit near water, such as near a bathtub, washbowl, swimming pool, or the like.
2Heat - Do not use this unit near sources of heat, including heating vents, stoves, or other appliances that generate heat. It also should not be placed in temperatures less than 5°C (41°F) or greater then 35°C
(95°F).
3Mounting surface - Place the unit on a flat, even surface.
4Ventilation - The unit should be situated with adequate space around it so that proper heat ventilation is assured. Allow 10 cm (4 in.) clearance from the rear and the top of the unit, and 5 cm (2 in.) from each side.
-Do not place the unit on a bed, rug, or similar surface that may block the ventilation openings.
-Do not install the unit in a bookcase, cabinet, or airtight rack where ventilation may be impeded.
5Objects and liquid entry - Take care that objects or liquids do not get inside the unit through the ventilation openings.
6Carts and stands - When placed or
mounted on a stand or cart, the unit should be moved with care.
Quick stops, excessive force, and uneven surfaces may cause the unit and cart to overturn or fall.
7Condensation - Moisture may form on the CD pickup lens when:
-The unit is moved from a cold spot to a warm spot
-The heating system has just been turned on
-The unit is used in a very humid room
-The unit is cooled by an air conditioner
When this unit has condensation inside, it may not function normally. Should this occur, leave the unit for a few hours, then try to operate again.
8Wall or ceiling mounting - The unit should not be mounted on a wall or ceiling, unless specified in the
Operating Instructions.
Electric Power
1Power Sources - Connect this unit only to power sources specified in the Operating Instructions, and as marked on the unit.
2Polarization - As a safety feature, some units are equipped with polarized AC power plugs which can only be inserted one way into a power outlet. If it is difficult or impossible to insert the AC power plug into an outlet, turn the plug over and try again. If it still does not easily insert into the outlet, please call a qualified service technician to service or replace the outlet. To avoid defeating the safety feature of the polarized plug, do not force it into a power outlet.
3AC power cord
-When disconnecting the AC power cord, pull it out by the AC power plug. Do not pull the cord itself.
-Never handle the AC power plug with wet hands, as this could result in fire or shock.
-Power cords should be routed to avoid being severely bent, pinched, or walked upon. Pay particular attention to the cord from the unit to the power socket.
-Avoid overloading AC outlets and extension cords beyond their capacity, as this could result in fire or shock.
4Extension cord - To help prevent electric shock, do not use a polarized AC power plug with an extension cord, receptacle, or other outlet unless the polarized plug can be completely inserted to prevent exposure of the blades of the plug.
5When not in use - Unplug the AC power cord from the AC outlet if the unit will not be used for several months or more. When the cord is plugged in, a small amount of current continues to flow to the unit, even when the power is turned off.
2 ENGLISH

Maintenance
Clean the unit only as recommended in the Operating Instructions.
Damage Requiring Service
Have the unit serviced by a qualified service technician if:
-The AC power cord or plug has been damaged
-Foreign objects or liquid have gotten inside the unit
-The unit has been exposed to rain or water
-The unit does not seem to operate normally
-The unit exhibits a marked change in performance
-The unit has been dropped, or the cabinet has been
damaged
DO NOT ATTEMPT TO SERVICE THE UNIT YOURSELF.
FCC Part 15B, ClassB
FCC NOTICE
NOTE
This equipment has been tested and found to comply with the limits for a Class B digital device, pursuant to Part 15 of the FCC Rules. These limits are designed to provide reasonable protection against harmful interference in a residential installation.
This equipment generates, uses, and can radiate radio frequency energy and, if not installed and used in accordance with the instructions, may cause harmful interference to radio communications. However, there is no guarantee that interference will not occur in a particular installation. If this equipment does cause harmful interference to radio or television reception, which can be determined by turning the equipment off and on, the user is encouraged to try to correct the interference by one or more of the following measures:
-Reorient or relocate the receiving antenna.
-Increase the separation between the equipment and receiver.
-Connect the equipment into an outlet on circuit different from that to which the receiver is connected.
-Consult the dealer or an experienced radio/TV technician for help.
CAUTION
Modifications or adjustments to this product, which are not expressly approved by the manufacturer, may void the user's right or authority to operate this product.
Owner's record
For your convenience, record the model number and serial number (you will find them on the rear of your set) in the space provided below. Please refer to them when you contact your Aiwa dealer in case of difficulty.
Model No. |
Serial No. (Lot No.) |
|
|
XC-RW700
TABLE OF CONTENTS
PRECAUTIONS ................................................... |
2 |
|
FEATURES .......................................................... |
4 |
|
BEFORE OPERATION ........................................ |
4 |
|
TYPES OF DISCS .................................................... |
4 |
|
ACCESSORIES ........................................................ |
4 |
|
CLEANING THE CABINET ...................................... |
5 |
|
STORING DISCS ...................................................... |
5 |
|
CARE OF DISCS ...................................................... |
5 |
|
REMOTE CONTROL ................................................ |
5 |
|
GENERAL GUIDE ............................................... |
6 |
|
FRONT PANEL CONTROLS .................................... |
6 |
|
INFORMATION DISPLAY ......................................... |
7 |
|
REAR PANEL CONNECTIONS ............................... |
8 |
|
BUTTONS ON THE REMOTE CONTROL ................ |
9 |
|
CONNECTIONS ................................................. |
10 |
|
PLAY DECK CONNECTIONS ................................ |
11 |
|
RECORD DECK CONNECTIONS .......................... |
11 |
|
POWER CONNECTIONS ....................................... |
11 |
|
USING HEADPHONES .......................................... |
11 |
|
LOADING DISCS ............................................... |
12 |
|
INFORMATION DISPLAY ....................................... |
12 |
|
......NOTES ON THE OPC LIMIT OF CD-R DISCS |
13 |
En |
RECORDING |
13 |
|
|
||
PRECAUTIONS ...................................................... |
13 |
|
DISC DUBBING ...................................................... |
14 |
|
CD SYNC RECORDING ......................................... |
15 |
|
MANUAL RECORDING .......................................... |
16 |
|
NUMBERING TRACKS .......................................... |
17 |
|
FINALIZATION .................................................. |
18 |
|
UNFINALIZATION .................................................. |
18 |
|
ERASING AN ENTIRE CD-RW DISC .................... |
19 |
|
ERASING INDIVIDUAL TRACKS ........................... |
19 |
|
PLAYBACK ........................................................ |
20 |
|
BASIC OPERATION ............................................... |
20 |
|
RANDOM PLAYBACK ........................................... |
20 |
|
REPEAT PLAYBACK ............................................. |
21 |
|
PROGRAMMED PLAYBACK ................................. |
22 |
|
DUAL PLAY MODE ........................................... |
23 |
|
CHANGING THE TIME |
|
|
DISPLAY MODE ........................................... |
23 |
|
TROUBLESHOOTING ....................................... |
24 |
|
ALERT MESSAGES .......................................... |
25 |
|
RESTRICTIONS ON DIGITAL RECORDING .... |
26 |
|
SPECIFICATIONS ............................................. |
26 |
|
ENGLISH 3
FEATURES
•Dual deck CD player and CD-R/CD-RW recorder
•Dual play capability
•4× dubbing speed for both CD-R and CD-RW discs
•Digital to analog converters for highest audio quality
•Built in 32 to 96 kHz sampling converter
•Optical and coaxial digital inputs and outputs
•Front panel digital input for use with portable devices
•Extensive playback programming capabilities
BEFORE OPERATION
TYPES OF DISCS
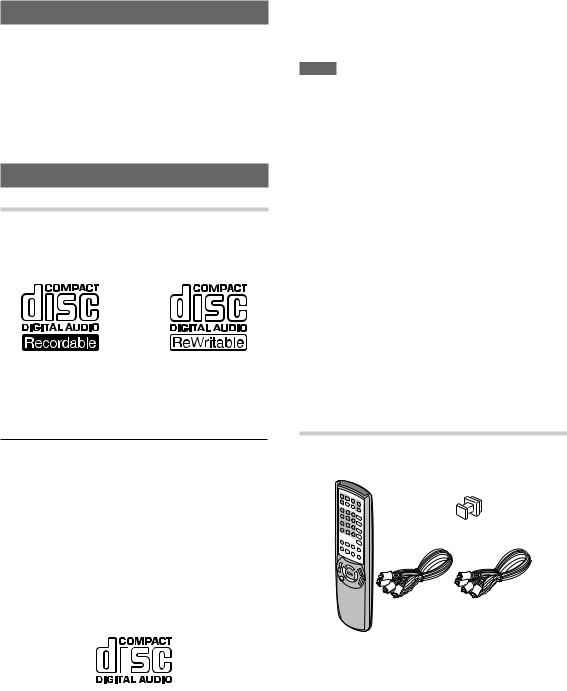
CD-R and CD-RW Discs
For recording and playback you can use the CD-R and
CD-RW discs with the following logos:
With a CD-R disc, you can add recordings until the disc is full, but you cannot erase any of them.
With a CD-RW disc, you can add and erase recordings as needed.
DISC |
RECORDING |
PLAYBACK |
|
|
|
CD-R |
Can be recorded only |
When finalized, can |
|
incrementally. |
be played on |
|
|
conventional CD |
|
|
players. |
|
|
|
CD-RW Can be recorded and |
Even when finalized, |
|
|
erased as needed. |
can be played only on |
|
|
CD-RW compatible |
|
|
CD players. |
|
|
|
Conventional audio CDs
Discs with the following logo can be played back on this unit, but no recordings can be made on them.
When you load a CD-R, CD-RW or any other disc that is not compatible with this unit, "DISC ERROR" may appear on the display to warn you that the disc cannot be used with this unit.
NOTE
•Do not use irregular shape CDs (example: heart-shaped, octagonal ones). It may result in malfunction.
•Do not attach any seal or label to either side (the recordable side or the labeled side) of a CD-R/RW disc. It may cause malfunction.
•The unit may not play a CD-R/RW disc that is recorded on personal computers or some kinds of CD-R/RW recorders because of differences in recording platforms.
•Do not use a CD-R/RW disc which contains non-audio data, such as MP 3 or other computer files.
•Trouble may occur in this unit if a CD-R/RW disc with dirt or scratches is used. In such case, refer to "ALERT
MESSAGES" on page 25.
•Depending on the conditions of the surface of CD-R/RW disc (e.g. dirt, scratch, fingerprint, etc.), the head part of the first recorded track may be cut off.
CAUTION
Do not open and close the disc tray of the record deck unnecessarily with a non-finalized CD-R disc inside. See page 13 for details.
WARNING
Digital recording capabilities this unit provides you with are only for personal use.
Dubbing copyrighted material without permission of the copyright owner is a violation of the copyright laws.
ACCESSORIES
The package contains the following items.
• Dust cap (1)
• Audio cords (2)
•Remote control (1)
•Operating instructions (1)
Insert the supplied dust cap in the DIGITAL IN (OPTICAL) jack on the front panel when not using the jack.
4 ENGLISH
CLEANING THE CABINET
Use a soft, dry cloth. If the surfaces are extremely dirty, use a soft cloth lightly moistened with a mild detergent solution. Do not use strong solvents, such as alcohol, benzine or thinner, as these might damage the surface of the unit.
STORING DISCS
After recording or playing, store the disc in its case.
Do not expose the disc to direct sunlight or sources of heat, or leave it in a parked car exposed to direct sunlight, as temperature may rise considerably inside the car.
CARE OF DISCS
•Discs can be scratched. Handle them carefully.
•When a disc becomes dirty, wipe it from the center out with a soft cleaning cloth.
Do not use strong solvents such as alcohol, benzine, thinner, commercially available cleaners or anti-static spray intended for analog records.
REMOTE CONTROL
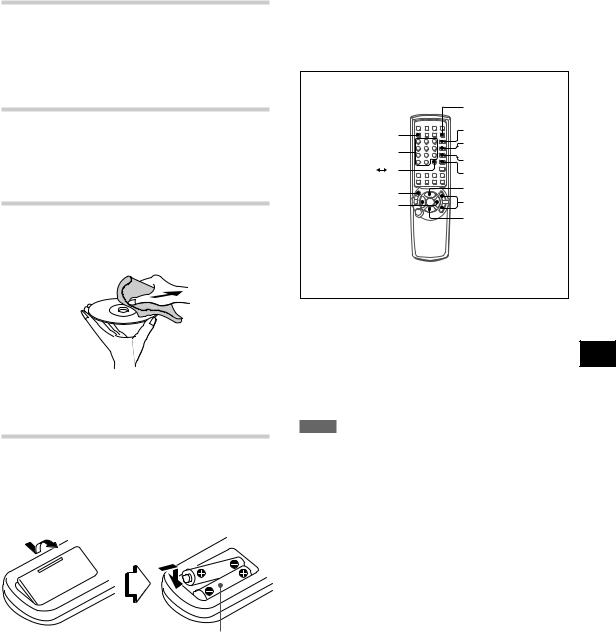
Inserting batteries
Detach the battery cover on the rear of the remote control and insert two R6 (size AA) batteries.
Load the batteries as illustrated.
R6(size AA)
When to replace the batteries
The maximum operational distance between the remote control and the sensor on the main unit should be approximately 7 meters (23 feet). When this distance decreases, replace the batteries with new ones.
Using the shared buttons
The remote control is designed to operate both of the CD decks of the unit. Some buttons are dedicated to one specific CD deck, while others are shared between the two decks.
|
CD-R/RW/SEL |
|
CD/SEL |
PRGM |
|
RANDOM |
||
0-9,+10 |
||
PRGM CHECK |
||
A B |
||
REPEAT |
||
a |
c |
|
f,g |
||
r,t |
||
|
||
|
s |
To use shared buttons, such as c, s, a, f, g, r, t, PRGM, PRGM CHECK, RANDOM, REPEAT, A B
B
and numbered, first press either CD/SEL to control the En play deck or CD-R/RW/SEL to control the record deck. When CD/SEL or CD-R/RW/SEL is pressed, "CDP" or
"CDR" will appear on the appropriate information display to confirm the selection.
NOTE
•If the remote control is not going to be used for an extended period of time, remove the batteries to prevent possible electrolyte leakage.
•The remote control may not operate correctly when:
-The line of sight between the remote control and the remote sensor (located on the front panel) is exposed to intense light, such as direct sunlight
-Other remote controls are used nearby (television, etc.)
ENGLISH 5
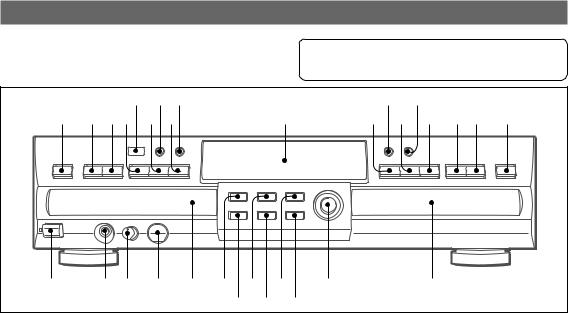
GENERAL GUIDE
FRONT PANEL CONTROLS
123... : For CD Play Deck (CD)
123... : For CD Record Deck (CD-R/RW) 123... : For both Decks (CD and CD-R/RW)
|
' \ [ |
|
|
) |
* |
|
_ / ., ; ] |
|
= |
- ( & ^ % $ |
|||
1 |
2 3 4 |
5 |
6 8 0 |
@ |
|
# |
|
|
|
7 9 |
! |
|
|
1POWER
Press to turn on the power.
2PHONES
Connect headphones with a standard stereo type plug.
3PHONE LEVEL
Turn to adjust the headphones volume level.
4DIGITAL IN (OPTICAL)
Use to connect a portable digital audio player to this unit for digital recording.
5Play deck
Use to play CD, CD-R or CD-RW discs that have been finalized.
6wRECORD
Press to begin recording.
7ERASE
Press to erase one or more tracks of an unfinalized CD-RW disc.
8CD SYNC
Press to begin sync recording of a single track or an entire disc from an external CD, MD, DAT player.
9FINALIZE
Press to finalize the recording process.
0DUBBING
Press to make a complete copy of the disc to a CD- R or CD-RW.
!SPEED
Press to select the recording speed for internal dubbings.
@REC LEVEL
Use to control input level when making recordings in analog mode.
#Record deck
Use to playback CD and record CD-R and CD-RW discs.
$zOPEN/CLOSE
Press to open the record deck. Press again to close the deck.
%t/gSKIP/SEARCH
Press and hold to play the disc in fast-forward mode. Press to move to the next track.
^f/rSKIP/SEARCH
Press and hold to play in fast-reverse mode. Press to move to the previous track.
&aPAUSE
Press to pause or restart the disc.
*INPUT
Press to select the input source for recording.
(sSTOP
Press to stop the CD in the record deck.
)DISPLAY
Press to cycle through the time display options for the record deck.
-cPLAY/SELECT
Press to play a CD or to set a selection in the record deck.
=Information display
Displays the status of this unit.
[DISPLAY
Press to cycle through the time display options for the play deck.
]aPAUSE
Press to pause or restart the disc.
\DUAL
Press to enable both CD decks to playback at the same time and function separately.
;sSTOP
Press to stop the CD in the play deck.
'REMOTE SENSOR
Receives commands from the remote control.
6 ENGLISH

,cPLAY
Press to play a CD in the play deck.
.t/gSKIP/SEARCH
Press and hold to play the disc in fast-forward mode. Press to move to the next track.
/f/rSKIP/SEARCH
Press and hold to play in fast-reverse mode. Press to move to the previous track.
_zOPEN/CLOSE
Press to open the play deck. Press again to close the deck.
INFORMATION DISPLAY
|
|
|
|
[ = |
; |
[ - |
) ( * & \ |
\ ] ; - ) ( * & |
|
1 |
|
2 3 4 |
5 6 7 8 9 |
0 1 ! @ 3 # 6$ 8 % ^ |
11 RANDOM |
|
|
% DUBBING |
|
Lights when random playback has been programmed for one of the CD decks.
2 COAXIAL
Lights when signal from coaxial jacks is selected as the source.
33 PROG
Lights when one of the CD decks is being programmed for playback options.
4 OPTICAL
Lights when signal from optical jack (on the front panel or rear panel) is selected as the source.
5 ANALOG
Lights when signal from analog jacks is selected as source.
66 REPEAT
Lights when a repeat function is being used.
7COPY PROHIBIT
Lights when a recording is not possible due to the Serial Copy Management System (SCMS).
88 1 A-B ALL
Displays the type of repeat function being used.
9AUTO
Lights when the automatic method of incrementing
tracks is selected for a recording session.
0 DUAL
Lights when the unit is playing in dual mode.
! ERASE
Lights when a CD-RW disc is being erased.
@ FINALIZE
Lights when the unit is in the Finalization process.
# RECORD
Lights when making a recording and flashes while preparing to make a recording.
$SYNC
Lights when the unit has been programmed for a CD sync recording.
Lights when a dubbing is in progress between the |
|
two CD decks. |
|
|
|
^ X2 X4 |
En |
Indicates which speed has been selected for |
|
|
|
dubbing recordings. |
|
&&TIME |
|
Lights in conjunction with one of the time indicators |
|
TRACK, TOTAL, REMAIN, to show which of the time |
|
status mode is active. |
|
** REMAIN |
|
Lights when the information display shows the time |
|
remaining on a disc. |
|
(( Status display |
|
Displays the disc playing time and messages about |
|
the discs recordings. |
|
))TOTAL |
|
Lights when the information display shows the total |
|
time of all tracks on a disc. |
|
--TRACK |
|
Lights when the information display shows the |
|
running time of the individual track being played. |
|
=-RW
Indicates the type of disc in the record deck. When a CD-R disc is in use, only "-R" is lit. When a CDRW disc is in use, "-RW" is lit.
[[ CD
Lights when a conventional audio CD is playing in the CD deck.
]SRC
Lights when the Sample-Rate Converter is in use.
\\ Level indicators
Displays the input/output level during an analog recording.
;; Play/Pause indicator
Indicates the status of the individual CD decks.
ENGLISH 7
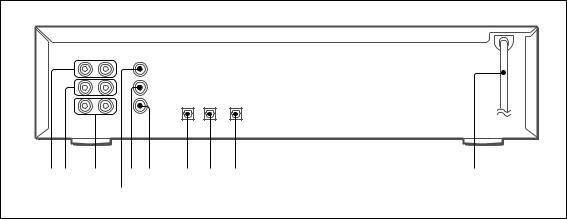
REAR PANEL CONNECTIONS
12 |
3 |
5 6 |
7 8 9 |
0 |
|
|
4 |
|
|
1 ANALOG CD OUT |
|
|
6 COAXIAL CD-R/RW IN |
|
These jacks carry the analog audio output signal from the play deck.
This jack accepts the digital audio input signal from a compatible digital audio product.
2 ANALOG CD-R/RW OUT |
7 OPTICAL CD-R/RW DIGITAL IN |
These jacks carry the analog audio output signal from the record deck.
This jack accepts the digital audio input signal from a compatible digital audio product.
3 ANALOG CD-R/RW IN |
8 OPTICAL CD-R/RW DIGITAL OUT |
These jacks accept the analog signals that are used for CD recordings.
This jack carries the digital audio output signal from the record deck.
4 COAXIAL CD OUT |
9 OPTICAL CD DIGITAL OUT |
This jack carries the digital audio output signal from the play deck.
5COAXIAL CD-R/RW OUT
This jack carries the digital audio output signal from the record deck.
This jack carries the digital audio output signal from the play deck.
0AC power cord
Connect this plug to an AC outlet.
8 ENGLISH
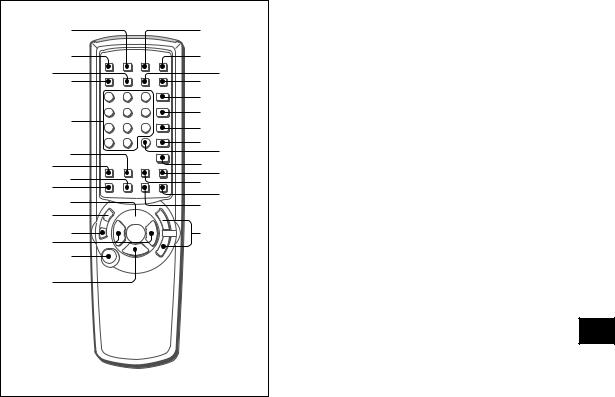
BUTTONS ON THE REMOTE CONTROL
1^
2&
3 4 |
( * |
|
|
) |
|
5 |
- |
|
= |
|
|
|
|
|
6 |
[ ] |
|
7 |
\ |
; |
9 8 |
' |
|
0. ,
!


# @ |
/ |
$ |
|
% |
|
1CD/DISP
Press to cycle through the various time display options for the disc in the play deck.
2CD/z
Press to open the play deck.
3SINGLE
Press to control the unit as a two-disc CD player/ changer.
4CD/SEL
Press to control or program the functions of the disc in the play deck.
5Numbered buttons
Press to access a specific track for playback or during the programming process.
6CD SYNC
Press to begin sync recording from an external CD player when a digital connection is used.
7AUTO/MANUAL
Press to select automatic or manual track increments during a recording session.
8INPUT SEL
Press to select the input source (analog, digitalcoaxial, or digital-optical) for recording.
9TRACK INCR
Press to increase the track number.
0c
Use as a play and enter button.
!a
Press to pause and resume playback.
@wREC
Press to begin a manual recording.
#r,t
Press to skip to the next/previous track.
$POWER
Press to turn the unit on/off.
%s
Press to stop playback or recording.
^CD-R/RW/DISP
Press to cycle through time-display options for the disc in the record deck.
&CD-R/RW/z
Press to open the record deck.
*DUAL
Press to enable both CD decks to play back at the same time and function as independent CD units.
(CD-R/RW/SEL
Press to control or program the functions of the disc in the record deck.
)PRGM
Press to begin the programming sequence for one of the CD decks.
- RANDOM |
En |
|
Press to begin random play of all tracks on a disc.
=PRGM CHECK
Press to check or edit a programmed playback sequence.
[REPEAT
Press to repeat a current track or an entire disc.
]A  B
B
Press to specify a segment of a disc for repeat play.
\CLEAR
Press to clear an item in a program sequence.
;SPEED
Press to select the recording speed for internal dubbings.
'DUBBING
Press to begin a dubbing.
,ERASE
Press to erase a track or an entire CD-RW disc or to unfinalize a disc.
.FINALIZE
Press when a recording is complete to initiate the finalization process.
/f,g
Press and hold to play the selected disc in reverse or fast forward mode to locate a desired passage.
ENGLISH 9
 Loading...