


OPERATING INSTRUCTIONS INSTRUCCIONES DE MANEJO MODE D’EMPLOI
MM-VX200
MP3 PLAYER REPRODUCTOR MP3
|
ENGLISH |
|
OWNER’S RECORD |
|
|
ESPAÑOL |
||
For your convenience, record the |
|
|
model number (you will find it on |
|
|
FRANÇAIS |
||
the rear of your set) and the serial |
||
|
|
number (you will find it in the cassette holder of your set) in the space provided below.
Please refer them when you contact your Aiwa dealer in case of difficulty.
Model No.
Serial No.
For assistance and information,
call toll free 1-800-BUY-AIWA.
(United States and Puerto Rico)
8A-HZ1-911-01
000721AYO-O-K
Printed in Korea
WARNING
TO REDUCE THE RISK OF FIRE OR ELECTRIC SHOCK, DO NOT EXPOSE THIS APPLIANCE TO RAIN OR MOISTURE.
Copyright Notices
Under the copyright laws, neither the documentation nor the software for this product may be copied, photocopied, reproduced, translated, or reduced to any electronic medium or machine-readable form, in whole or in part, without the prior written consent of AIWA Co., Ltd.
Copyright © 2000 AIWA Co., Ltd. All rights reserved.
Microsoft and Windows are registered trademarks of Microsoft Corporation.
Pentium and MMX are registered trademarks of Intel Corporation.
SmartMedia is a registered trademark of
TOSHIBA Corporation.
Portions of this product are protected under copyright law and provided by Airs/Solana/4C.
RealPlayer and RealJukebox are trademarks of RealNetworks Inc.
Warning
You must be aware that distributing copies of MP3 files without permission is against the copyright laws. You must use the MP3 encoding software included on the supplied installation CD only for personal use.
MM-VX200 player is designed to be ready for the SDMI (Secure Digital Music
Initiative).
2 ENGLISH
TABLE OF CONTENTS |
|
|
Chapter 1 |
|
|
PREPARATION BEFORE USE |
|
|
1 |
SYSTEM REQUIREMENTS . . . . . |
3 |
2 |
CONTENTS . . . . . . . . . . . . . . . . . |
3 |
3 |
PRECAUTIONS . . . . . . . . . . . . . . |
4 |
4 |
INSERTING A BATTERY . . . . . . . |
5 |
5 |
CONNECTING THE PLAYER TO |
|
|
YOUR PC . . . . . . . . . . . . . . . . . . . |
6 |
6 |
SmartMedia-ID INSTALLATION . . . . |
6 |
Chapter 2 |
|
|
SOFTWARE INSTALLATION |
|
|
1 |
INSTALLING THE VX200 |
|
|
MANAGER SOFTWARE . . . . . . . . |
8 |
2 |
INSTALLING THE USB |
|
|
DRIVER . . . . . . . . . . . . . . . . . . . . |
10 |
3 |
INSTALLING THE WAVE DRIVER |
|
|
(ADPCM Driver) . . . . . . . . . . . . . |
10 |
4 |
UNINSTALLING THE VX200 |
|
|
MANAGER SOFTWARE . . . . . . . |
11 |
5 |
UNINSTALLING THE WAVE |
|
|
DRIVER (ADPCM Driver) . . . . . . |
11 |
Chapter 3
SOFTWARE OPERATION
1 OPENING VX200 MANAGER . . . 12
2 PREPARING MP3 FILES . . . . . . 12 3 OPERATING VX200 MANAGER . . 14
Chapter 4
PLAYER OPERATION
1 PLAYER OVERVIEW . . . . . . . . . 18 2 DISPLAY OVERVIEW . . . . . . . . . 20
3 PLAYER OPERATION . . . . . . . . 21
Chapter 5
APPENDIX
1 SPECIFICATIONS . . . . . . . . . . . 24
2 FAQ AND TROUBLESHOOTING GUIDE . . . . . . . . . . . . . . . . . . . . . 24
Chapter 1
PREPARATION BEFORE USE
1 SYSTEM REQUIREMENTS . . . . . 3
2 CONTENTS . . . . . . . . . . . . . . . . . 3
3 PRECAUTIONS . . . . . . . . . . . . . . 4 4 INSERTING A BATTERY . . . . . . . 5
5CONNECTING THE PLAYER TO
YOUR PC . . . . . . . . . . . . . . . . . . . 6
6 SmartMedia-ID INSTALLATION . . . . 6
1 SYSTEM REQUIREMENTS
The VX200 manager software requires the following system:
•Windows 98, Windows 98 second edition*
•Pentium 200 MHz MMX or faster
•1 available USB Port
•CD-ROM drive supporting digital audio extraction
•15MB free hard-disk space (may vary depending on the size of the MP3 files you wish to use)
•32MB RAM
•Full duplex Sound card and speakers
•16-bit color video card
*For use only PC systems in which
Microsoft Windows 98 or Windows 98
Second Edition has been preinstalled by the manufacturer.
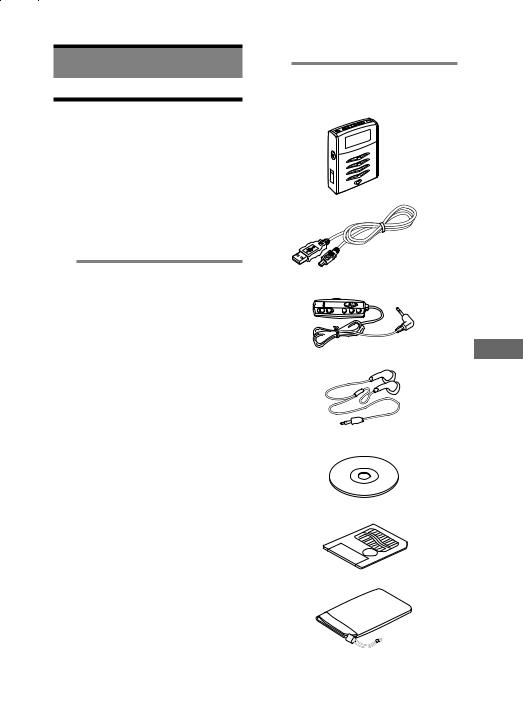
2 CONTENTS
The following are supplied with this player.
Check to be sure all the items are in the package.
• Player
• USB cable |
|
• Remote control |
|
• Stereo headphones |
ENGLISH |
|
|
• Installation CD-ROM |
|
• 32 MB SmartMedia-ID |
|
• Carrying case |
|
• Operating instructions, etc. |
|
|
ENGLISH 3 |

3 PRECAUTIONS
The following are precautions that you should always keep in mind. Any violation of one or more of the following precautions may cause damage and will void the
4 ENGLISH

4 INSERTING A BATTERY
An alkaline battery is recommended for use with this player.
1Open the cover of the battery compartment.
2Insert a size AA (LR6) alkaline battery with the 0and 9marks correctly aligned, then close the cover.
Battery indicator
The battery indicator on the display changes depending on the remaining power of the battery.
→ |
→ |
→ |
→ |
|
Full |
|
→ |
Empty |
|
Battery replacement |
|
|
||
Replace the battery when |
of the |
|||
battery indicator lights. |
|
|
||
Note on dry cell battery
•Make sure that 0 and 9 marks are correctly aligned.
•To prevent the risk of electrolyte leakage or explosions, never recharge the battery, apply heat to it, or take it apart.
•When not using the battery, remove it to prevent needless battery wear.
•If the liquid leaks out from the battery, wipe thoroughly to remove.
ENGLISH
ENGLISH 5

5 CONNECTING THE PLAYER TO YOUR PC
Use the supplied USB cable to connect this player to your PC, as follows:
Connect the series B connector to the
USB port connector of the player and the other plug to the USB port connector of your PC.
Series B
connector
USB port connector
 Supplied USB cable
 Series A connector
USB port
If a plug is already connected to the USB port connector of your PC, disconnect it before connecting this player.
Do not disconnect the USB plug during downloading or uploading the files to prevent the error of your PC.
6 ENGLISH
Connecting an AC adaptor
To use on AC house current, contact your nearest Aiwa service personnel and purchase an AC adaptor Aiwa AC-D302. Connect the AC adaptor:
1 to the DC 3 V jack of the player 2 to a wall outlet
A C - D 3 0 2
D C 3 V
6 SmartMedia-ID
INSTALLATION
Before inserting a SmartMedia-ID, be sure to turn off the power of the player and disconnect the USB plug from the USB port connector.
Insert the SmartMedia-ID into the slot in the correct direction as follows.
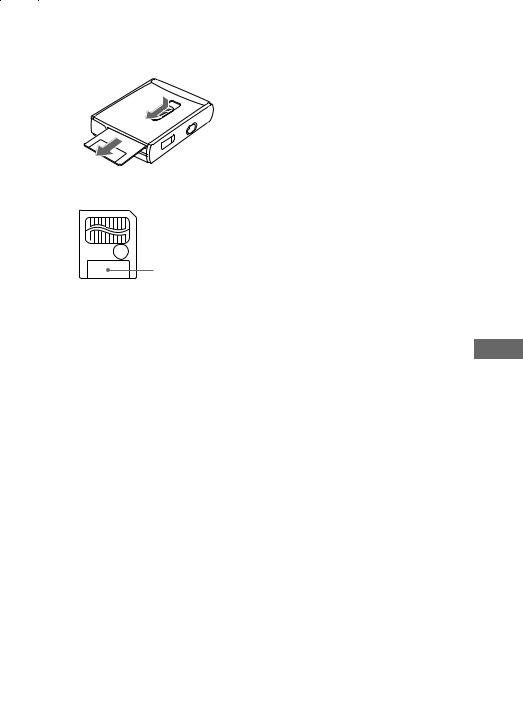
To eject the SmartMedia-ID
Slide the EJECT switch as follows.
Supplied label for SmartMedia-ID
 contact area
 write protect area
index area
You can paste the supplied protecting label on the write protect area on the
SmartMedia-ID.
Do not paste any label on the contact area on the SmartMedia-ID.
Note
•Insert the SmartMedia-ID completely into the slot. If it is not inserted completely, VX200 Manager will not recognize the data in the SmartMedia-ID.
•When using a SmartMedia-ID for the first time, initialize the SmartMedia-ID using the VX200 Manager software.
•The MP3 files in the SmartMedia-ID cannot be played back with other player by the security of copyright consideration.
To use a SmartMedia-ID with other player, you need to initialize the
SmartMedia-ID (See page 16).
Use for data storage
With up to 64MB memory, including 32MB in the SmartMedia-ID, you can store not only MP3 files but also any data files such as doc, gif, txt, bmp, wav, etc. files, as long as no file is larger than 32MB.
ENGLISH
ENGLISH 7
Chapter 2
SOFTWARE INSTALLATION
VX200 Manager is communication software that allows your computer to share information with the player. In order for the player to work properly, the VX200
Manager software must be installed correctly under Windows 98.
1 |
INSTALLING THE VX200 |
|
|
MANAGER SOFTWARE . . . . . . . . |
8 |
2 |
INSTALLING THE USB |
|
|
DRIVER . . . . . . . . . . . . . . . . . . . . |
10 |
3INSTALLING THE WAVE DRIVER
(ADPCM Driver) . . . . . . . . . . . . . 10
4UNINSTALLING THE VX200 MANAGER SOFTWARE . . . . . . . 11
5UNINSTALLING THE WAVE
DRIVER (ADPCM Driver) . . . . . . 11
8 ENGLISH
1 INSTALLING THE VX200 MANAGER SOFTWARE
Before installation, check your system matching to the system that you need again (see SYSTEM REQUIREMENTS in Chapter 1) and quit all application software in use.
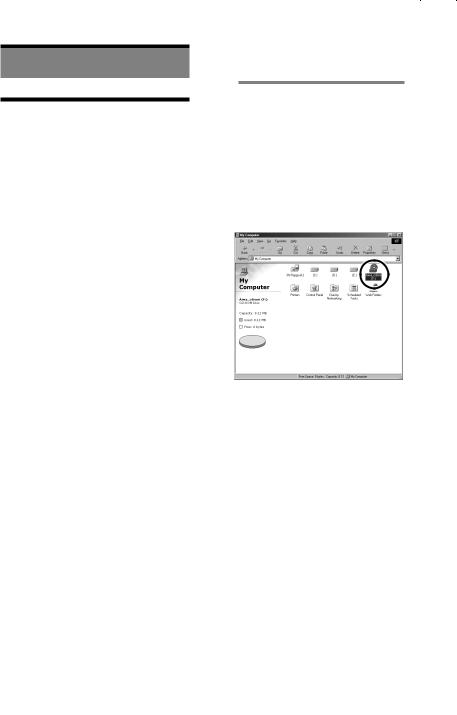
1Insert the installation CD into your CD-ROM drive.
2Double-click on the CD-ROM drive icon to open it.
 Loading...