


1a
2
3
4
8
5
9
6a
1b
7
10
11 |
6b |
12
13
14
15
16

1 |
2 |
3 |
4 |
8
5 |
6 |
7 |
9 |
10 |
11 |
12 |
13 |
14 |
15 |
16 |
17 |
18 |
4
Svenska 4
Tack för att du valt en Electrolux Ergorapido dammsugare. För att du ska kunna utnyttja den på bästa möjliga sätt, rekommenderar vi att du börjar med att läsa igenom instruktionerna, samt spara instruktionsboken.
English 5
Thank you for choosing an Electrolux Ergorapido vacuum cleaner. In order to be able to make the best possible use of your Ergorapido, we recommend that you begin by reading through the instructions, and that you keep the instruction manual for future reference.
Français 6
Nous vous remercions d’avoir choisi l’aspirateur Electrolux Ergorapido. Afin de pouvoir utiliser votre Ergorapido de façon optimale, nous vous recommandons de commencer par lire les instructions et de conserver le manuel d’utilisation pour toute référence ultérieure.
Deutsch 7
Vielen Dank, dass Sie sich für einen Electrolux ErgorapidoStaubsauger entschieden haben. Um Ihren Ergorapido optimal einsetzen zu können, sollten Sie sich zunächst
mit dieser Anleitung vertraut machen und diese jederzeit griffbereit aufbewahren.
Nederlands 8 |
Italiano 9 |
Español 10 |
Gefeliciteerd met uw keuze |
Grazie per avere scelto un |
Gracias por elegir una |
van een Electrolux Ergorapido- |
aspirapolvere Electrolux |
aspiradora Electrolux |
stofzuiger. Als u optimaal |
Ergorapido. Per poter |
Ergorapido. Con el fin de poder |
wilt gebruikmaken van uw |
utilizzare nel modo migliore |
sacar el máximo partido de |
Ergorapido, kunt u het beste |
l’aspirapolvere Ergorapido, si |
su aspiradora Ergorapido, le |
eerst de gebruiksaanwijzing |
consiglia di leggere per prima |
recomendamos que comience |
grondig doorlezen en deze goed |
cosa le istruzioni per l’uso e di |
leyendo las instrucciones, y |
bewaren. |
conservare il presente manuale |
que conserve el manual de |
|
per consultazione futura. |
instrucciones para futuras |
|
|
consultas. |
Português 11
Obrigado por ter escolhido um aspirador Electrolux Ergorapido. De modo a utilizar o seu Ergorapido da melhor forma possível, recomendamos que comece por ler as instruções
e que guarde o manual de instruções para referência futura.
Dansk 12 |
Norsk 13 |
Suomi 14 |
Pусский 15 |
Tak fordi du valgte en Electrolux |
Takk for at du valgte en |
Kiitos, kun valitsit Electrolux |
Благодарим за покупку |
Ergorapido-støvsuger. Vi |
Electrolux Ergorapido-støvsuger. |
Ergorapido -imurin. Voit |
пылесоса Electrolux |
anbefaler, at du starter med at |
For å få størst mulig utbytte |
hyödyntää Ergorapidoa |
Ergorapido. С целью наиболее |
læse vejledningen og opbevarer |
av Ergorapido anbefaler vi |
parhaalla mahdollisella tavalla |
эффективного использования |
den til fremtidig brug, for at |
at du begynner med å lese |
lukemalla käyttöohjeet ja |
пылесоса рекомендуем |
du kan opnå de bedst mulige |
bruksanvisningen, og at du tar |
säilyttämällä ne tulevaa käyttöä |
прежде всего ознакомиться с |
resultater med Ergorapido. |
vare på bruksanvisningen for |
varten. |
инструкцией и сохранить ее |
|
senere referanse. |
|
для справок. |
Türkçe 16 |
Česky 17 |
Magyar 18 |
||
Electrolux Ergorapido elektrikli |
Děkujeme, že jste si |
Köszönjük, hogy az Electrolux |
||
süpürgeyi tercih ettiğiniz için |
zvolili vysavač Electrolux |
Ergorapido porszívót választotta. |
||
teșekkür ederiz. Ergorapido’dan |
Ergorapido. Chcete-li přístroj |
Annak érdekében, hogy a lehető |
||
en yüksek verimi alabilmek için |
Ergorapido využít co nejlépe, |
legjobban kihasználhassa |
||
öncelikle kullanma talimatlarını |
doporučujeme, abyste si nejprve |
az Ergorapido készülék |
||
okumanızı ve gerektiğinde |
přečetli pokyny a uložili příručku |
szolgáltatásait, először olvassa |
||
bașvurmak üzere kullanma |
pro další použití. |
el a használati utasítást, és a |
||
kılavuzunu güvenli bir yerde |
|
későbbi tájékozódás érdekében |
||
saklamanızı tavsiye ederiz. |
|
tartsa meg a kézikönyvet. |
||
|
|
|
|
|
Polski 19
Dziękujemy za wybranie odkurzacza Ergorapido firmy Electrolux. Aby w jak najlepszy sposób używać odkurzacza Ergorapido, zalecane jest przeczytanie wszystkich instrukcji i zachowanie podręcznika z instrukcjami w celu przyszłego użycia.
19
25

Svenska |
English |
Français |
Deutsch |
Nederlands |
|||||
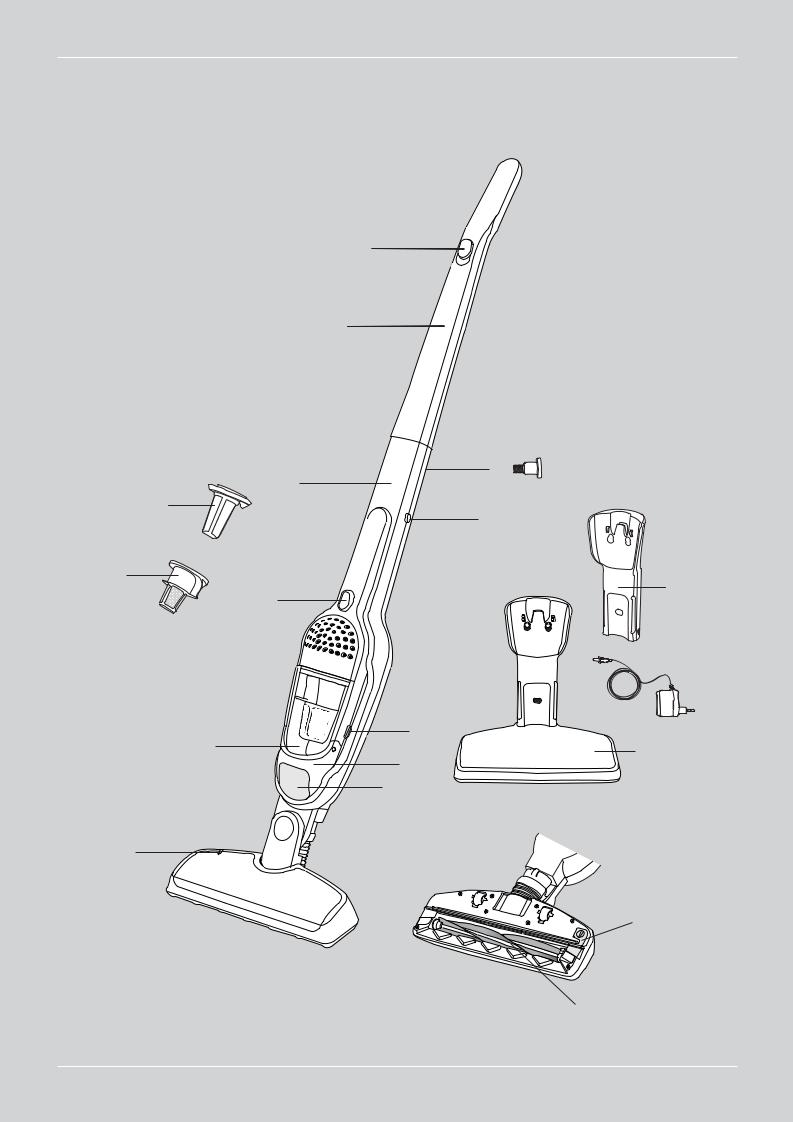
1a. |
Knapp för på/av |
1a. |
On/off button |
1a. |
Bouton marche/arrêt |
1a. |
Ein/Aus-Schalter |
1a. |
Aan/Uit-knop |
1b. Knapp för på/av |
1b. On/off button |
1b. Bouton marche/arrêt |
1b. Ein/Aus-Schalter |
1b. Aan/Uit-knop |
|||||
2. |
Skaft |
2. |
Handle |
2. |
Poignée |
2. |
Griff |
2. |
Greep |
3. |
Låsskruv |
3. |
Locking screw |
3. |
Vis de blocage |
3. |
Feststellschraube |
3. |
Borgschroef |
4. |
Dammsugardel |
4. |
Vacuum compartment |
4. |
Compartiment d’aspiration |
4. |
Unterteil |
4. |
Zuigruimte |
5. |
Frigörningsknapp |
5. |
Release button |
5. |
Bouton de déverrouillage |
5. |
Freigabeknopf |
5. |
Ontgrendelingsknop |
6a. |
Laddstation väggenhet |
6a. |
Charging station wall unit |
6a. |
Station de charge murale |
6a. |
Ladestation für |
6a. |
Hangend oplaadstation |
6b. Laddstation golvenhet |
6b. Charging station floor unit |
6b. Station de charge de sol |
|
Wandmontage |
6b. Staand oplaadstation |
||||
7. |
Adapter |
7. |
Adaptor |
7. |
Adaptateur |
6b. Ladestation als |
7. |
Adapter |
|
8. |
Finfilter |
8. |
Fine filter |
8. |
Filtre fin |
|
Bodenaufsteller |
8. |
Fijn filter |
9. |
Förfilter |
9. |
Prefilter |
9. |
Préfiltre |
7. |
Steckernetzteil |
9. |
Voorfilter |
10. |
Frigörningsknapp |
10. |
Release button |
10. |
Bouton de déverrouillage |
8. |
Feinfilter |
10. |
Ontgrendelingsknop |
11. |
Dammbehållare |
11. |
Dust container |
11. |
Réceptacle à poussière |
9. |
Vorfilter |
11. |
Stofreservoir |
12. |
Snabbtömningslucka |
12. |
Quick emptying cover |
12. |
Capot de vidage rapide |
10. |
Freigabeknopf |
12. |
Leegmaakklep |
13. |
Rensugningslucka |
13. |
Vacuum cleaning cover |
13. |
Capot d’accès pour |
11. |
Staubbehälter |
13. |
Stofzuigklep |
14. |
Indikeringslampa |
14. |
Indicator light |
|
l’aspiration du contenu du |
12. |
Schnellentleerklappe |
14. |
Indicatorlampje |
15. |
Täcklock för borstvals |
15. |
Hatch cover for brush roller |
|
réceptacle à poussière |
13. |
Absaugklappe |
15. |
Borstelkap voor rolborstel |
16. |
Borstvals |
16. |
Brush roller |
14. |
Voyant |
14. |
Anzeigeleuchte |
16. |
Rolborstel |
|
|
|
|
15. |
Trappe d’accès à la brosse |
15. |
Lagerabdeckung für |
|
|
|
|
|
|
|
rotative |
|
Bürstenrolle |
|
|
|
|
|
|
16. |
Brosse rotative |
16. |
Bürstenrolle |
|
|
Italiano |
Español |
Português |
Dansk |
Norsk |
|||||
1a. |
Pulsante On/Off |
1a. |
Botón de encendido y |
1a. |
Botão Ligar/Desligar |
1a. |
Tænd-/slukknap |
1a. |
Av/på-knapp |
1b. Pulsante On/Off |
|
apagado (on/off) |
1b. Botão Ligar/Desligar |
1b. Tænd-/slukknap |
1b. Av/på-knapp |
||||
2. |
Impugnatura |
1b. Botón de encendido y |
2. |
Pega |
2. |
Håndtag |
2. |
Håndtak |
|
3. |
Vite di bloccaggio |
|
apagado (on/off) |
3. |
Parafuso de bloqueio |
3. |
Låseskrue |
3. |
Låseskrue |
4. |
Sezione aspirante |
2. |
Asa |
4. |
Compartimento de vácuo |
4. |
Vakuumrum |
4. |
Vakuumkammer |
5. |
Pulsante di rilascio |
3. |
Tornillo de cierre |
5. |
Botão Libertar |
5. |
Udløserknap |
5. |
Utløserknapp |
6a. Unità da muro del |
4. |
Compartimento de |
6a. Unidade de parede da |
6a. Vægenhed til ladestationen |
6a. Ladestasjon for vegg |
||||
|
caricabatterie |
|
aspiración |
|
estação de carregamento |
6b. Gulvenhed til ladestationen |
6b. Ladestasjon for gulv |
||
6b. Unità da pavimento del |
5. |
Botón de liberación |
6b. Unidade de chão da |
7. |
Adapter |
7. |
Adapter |
||
|
caricabatterie |
6a. |
Unidad de pared de la |
|
estação de carregamento |
8. |
Fint filter |
8. |
Finfilter |
7. |
Adattatore |
|
base de carga |
7. |
Adaptador |
9. |
Forfilter |
9. |
Forfilter |
8. |
Filtro fine |
6b. Unidad de suelo de la |
8. |
Filtro fino |
10. |
Udløserknap |
10. |
Utløserknapp |
|
9. |
Pre-filtro |
|
base de carga |
9. |
Pré-filtro |
11. |
Støvbeholder |
11. |
Støvbeholder |
10. |
Pulsante di rilascio |
7. |
Adaptador |
10. |
Botão Libertar |
12. |
Lyntømningsdæksel |
12. |
Hurtigtømmingsdeksel |
11. |
Contenitore della polvere |
8. |
Filtro fino |
11. |
Compartimento de pó |
13. |
Støvsugningsrensedæksel |
13. |
Støvdugerdeksel |
12. |
Coperchio per |
9. |
Filtro previo |
12. |
Tampa de esvaziamento |
14. |
Indikator |
14. |
Indikatorlampe |
|
svuotamento rapido |
10. |
Botón de liberación |
|
rápido |
15. |
Hængslet dæksel til |
15. |
Deksel for børstevalse |
13. |
Coperchio per pulizia |
11. |
Contenedor para polvo |
13. |
Tampa de aspiração |
|
rullebørste |
16. |
Børstevalse |
|
aspiratore |
12. |
Cubierta de vaciado rápido |
14. |
Luz indicadora |
16. |
Rullebørste |
|
|
14. |
Spia |
13. |
Cubierta de aspiración |
15. |
Tampa de escotilha para |
|
|
|
|
15. |
Copertura della bocca per |
14. |
Piloto indicador |
|
rolo-escova |
|
|
|
|
|
il rullo delle spazzole |
15. |
Cubierta con cierre del |
16. |
Rolo-escova |
|
|
|
|
16. |
Rullo delle spazzole |
|
cepillo de rodillo |
|
|
|
|
|
|
|
|
16. |
Cepillo de rodillo |
|
|
|
|
|
|
|
|
|
|
|
|
|
|
|
|
Suomi |
Pусский |
Türkçe |
Česky |
Magyar |
|||||
1a. Käynnistyspainike |
1a. |
Кнопка On/Off (Вкл/Выкл) |
1a. Açma/Kapama düğmesi |
1a. Vypínač |
1a. Be-/kikapcsoló gomb |
||||
1b. Käynnistyspainike |
1b. |
Кнопка On/Off (Вкл/Выкл) |
1b. Açma/Kapama düğmesi |
1b. Vypínač |
1b. Be-/kikapcsoló gomb |
||||
2. |
Kahva |
2. |
Ручка |
2. |
Sap |
2. |
Rukojeť |
2. |
Fogantyú |
3. |
Lukitusruuvi |
3. |
Крепежный винт |
3. |
Kilitleme vidası |
3. |
Upevňovací šroub |
3. |
Zárócsavar |
4. |
Imurin lokero |
4. |
Отделение пылесоса |
4. |
Vakum bölmesi |
4. |
Přihrádka vysavače |
4. |
Szívóegység |
5. |
Vapautuspainike |
5. |
Кнопка фиксатора |
5. |
Serbest bırakma düğmesi |
5. |
Uvolňovací tlačítko |
5. |
Kioldógomb |
6a. |
Latausaseman |
6a. |
Приспособление для |
6a. |
Șarj istasyonu duvar birimi |
6a. |
Část nabíjecí stanice k |
6a. |
Fali töltőállomás-egység |
|
seinäyksikkö |
|
настенного крепления |
6b. |
Șarj istasyonu yer birimi |
|
montáži na zeď |
6b. Padlóra helyezendő |
|
6b. Latausaseman |
|
зарядного устройства |
7. |
Adaptör |
6b. Zemní část nabíjecí stanice |
|
töltőállomás-egység |
||
|
lattiayksikkö |
6b. |
Приспособление для |
8. |
İnce filtre |
7. |
Adaptér |
7. |
Adapter |
7. |
Muuntaja |
|
напольного крепления |
9. |
Önfiltre |
8. |
Jemný filtr |
8. |
Finom szűrő |
8. |
Hienosuodatin |
|
зарядного устройства |
10. |
Serbest bırakma düğmesi |
9. |
Vstupní filtr |
9. |
Előszűrő |
9. |
Esisuodatin |
7. |
Переходник |
11. |
Toz haznesi |
10. |
Uvolňovací tlačítko |
10. |
Kioldógomb |
10. |
Vapautuspainike |
8. |
Фильтр полной очистки |
12. |
Çabuk boșaltma kapağı |
11. |
Prachový kontejner |
11. |
Portartály |
11. |
Pölysäiliö |
9. |
Фильтр предварительной |
13. |
Gövdedeki temizleme |
12. |
Kryt pro rychlé čištění |
12. |
Gyorsürítési fedél |
12. |
Pikatyhjennyskansi |
|
очистки |
|
kapağı |
13. |
Kryt pro čištění vysavačem |
13. |
Porszívófedél |
13. |
Imurin tyhjennyskansi |
10. |
Кнопка фиксатора |
14. |
Gösterge ıșığı |
14. |
Kontrolka |
14. |
Jelzőfény |
14. |
Merkkivalo |
11. |
Пылесборник |
15. |
Merdaneli fırça için özel |
15. |
Kryt válcového kartáče |
15. |
A forgókefe fedele |
15. |
Pyörivän rullan kansi |
12. |
Крышка для быстрого |
|
kapak |
16. |
Válcový kartáč |
16. |
Forgókefe |
16. |
Pyörivä rulla |
|
опорожнения |
16. |
Merdaneli fırça |
|
|
|
|
|
|
|
пылесборника |
|
|
|
|
|
|
|
|
13. |
Крышка пылесоса |
|
|
|
|
|
|
|
|
14. |
Световой индикатор |
|
|
|
|
|
|
|
|
15. |
Крышка отделения для |
|
|
|
|
|
|
|
|
|
вращающейся щетки |
|
|
|
|
|
|
|
|
16. |
Вращающаяся щетка |
|
|
|
|
|
|
3

Svenska
Uppackning och montering
Kontrollera att samtliga delar finns i kartongen.
1.Montera skaftet genom att försiktigt föra in det i dammsugardelen. Var noga med att kabeln inte kommer i kläm.
2.Säkra skaftet genom att skruva i den medföljande låsskruven. Använd en stjärnskruvmejsel eller ett mynt.
3.Placera laddstationen nära ett eluttag (ej nära värmekälla eller i våta utrymmen). Sätt adaptern i eluttaget och anslut laddningsstationen.
4.Alternativt kan väggenheten monteras på vägg el.dyl. Kontrollera att väggen tål tyngden från Ergorapido.
Laddning
5.Häng Ergorapido på laddstationen (OBS – se alltid till att Ergorapido är avstängd). När Ergorapido har kontakt med laddstationen lyser indikeringslamporna. Före första användningen krävs 8-10 timmar innan batterierna är fulladdade. När Ergorapido är helt urladdad, krävs ca 12-16 timmars laddning för att återfå full kapacitet. För att Ergorapido alltid ska var klar att tas i bruk, bör den stå på laddning när den inte används. Adaptern kan bli varm vid laddning – detta är normalt.
Dammsugning av golv och mattor
Tag för vana att kontrollera att munstyckets plyschkuddar liksom borstvalsen är rena, för att undvika repor på känsliga golv
6.Starta Ergorapido genom att skjuta på-/avknappen från dig.
–första läget = mellaneffekt för längre gångtid
–andra läget = full effekt
Dammsugning av till exempel bord, möbler, bilsäten m.m.
7.Lossa handenheten genom att trycka in de båda frigörningsknapparna samtidigt. Handenheten fjädrar nu ut och kan enkelt tas bort.
8.För svåråtkomliga ställen kan det inbyggda fogmunstycket dras ut.
9.Om något fastnar i fogmunstycket kan det lossas helt från handenheten. Tryck in frigörningsknappen och dra ut fogmunstycket. Gör rent det samt ta bort det som fastnat i luftkanalen.
Tömning/rengöring
A. Snabbtömning av dammbehållare
10.Öppna snabbtömningsluckan och töm ur innehållet i lämpligt kärl eller påse. Tryck tillbaka snabbtömningsluckan tills den knäpper fast.
B. Snabbrengöring genom rensugningsluckan
11.Fäll upp rensugningsluckan. Sug rent dammbehållare och filter genom att sätta slanghandtaget från en annan dammsugare mot rensugningshålet.
C. Noggrann rengöring av dammbehållare och filter
12.Lossa hela dammbehållaren genom att trycka in frigörningsknapparna på båda sidor om behållaren.Ta ur dammbehållaren, separera de båda filtren och töm ur innehållet från dammbehållaren i lämpligt kärl eller påse.
13.Dammbehållaren, förfiltret och finfiltret kan skakas rena, alternativt rengöras och sköljas under ljummet vatten. Se till att delarna är torra innan de återmonteras.
Återmontera i omvänd ordning.
Rensning av borstvals
Om borstvalsen av någon anledning blockeras och stannar, slocknar indikeringslampan på golvmunstycket. Borstvalsen kan då behöva rensas. Stäng först av Ergorapido, använd sedan med försiktighet en sax eller en vass kniv för att ta bort till exempel trådar som fastnat.
14.Om borstvalsen behöver lyftas ur – öppna täcklocket genom att vrida låsskruven moturs, till exempel med ett mynt. Täcklocket fjädrar ut en aning och kan nu tas bort.
15.Lyft ur borstvalsen och rensa den. Sätt tillbaka borstvalsen och var noga att den passar in i sina styrspår, och se till att den kan snurra fritt.
16.Återmontera täcklocket och lås genom att vrida medurs till stopp.
Rengöring av bälg
Ibland kan saker fastna i bälgen, vilket kan påverka sugförmågan.
17.Lossa bälgen genom lossa den lilla skruven, och dra sedan bort bälgen från anslutningen. Rensa bälgen med hjälp av en sticka el dyl. Sätt tillbaka bälgen över anslutningen och lås med låsskruven.
Rengöring av hjulaxlar
Om något hjul blockeras av trådar eller smuts:
18.Ta bort hjulen genom att försiktigt bända loss dem, med en skruvmejsel som förs in i fördjupningen. Ta bort trådar eller andra föremål som fastnat på hjulaxlarna. Återmontera hjulen genom att trycka fast dem.
Att tänka på
•Dammsug aldrig i våta utrymmen.
•Dammsug aldrig i närheten av brandfarliga gaser, vätskor eller liknande.
•Sug aldrig upp vassa föremål, såsom glassplitter el dyl.
•Sug aldrig upp vätskor, dessa kan allvarligt skada maskinen.
•Sug aldrig upp aska, glödande cigarettfimpar eller liknande.
•Sug aldrig upp fint damm från till exempel gips, betong, mjöl, aska.
•Lämna inte dammsugaren i direkt solljus.
•Undvik att utsätta dammsugare eller batteri för stark värme.
•Batteriet får inte tas isär, kortslutas läggas mot en metallyta eller utsättas för stark värme.
Vid skrotning
Om Ergorapido ska skrotas, ska batterierna monteras ur. Batterierna får ej kastas tillsammans med hushållssopor, utan ska lämnas till återvinningsstation.
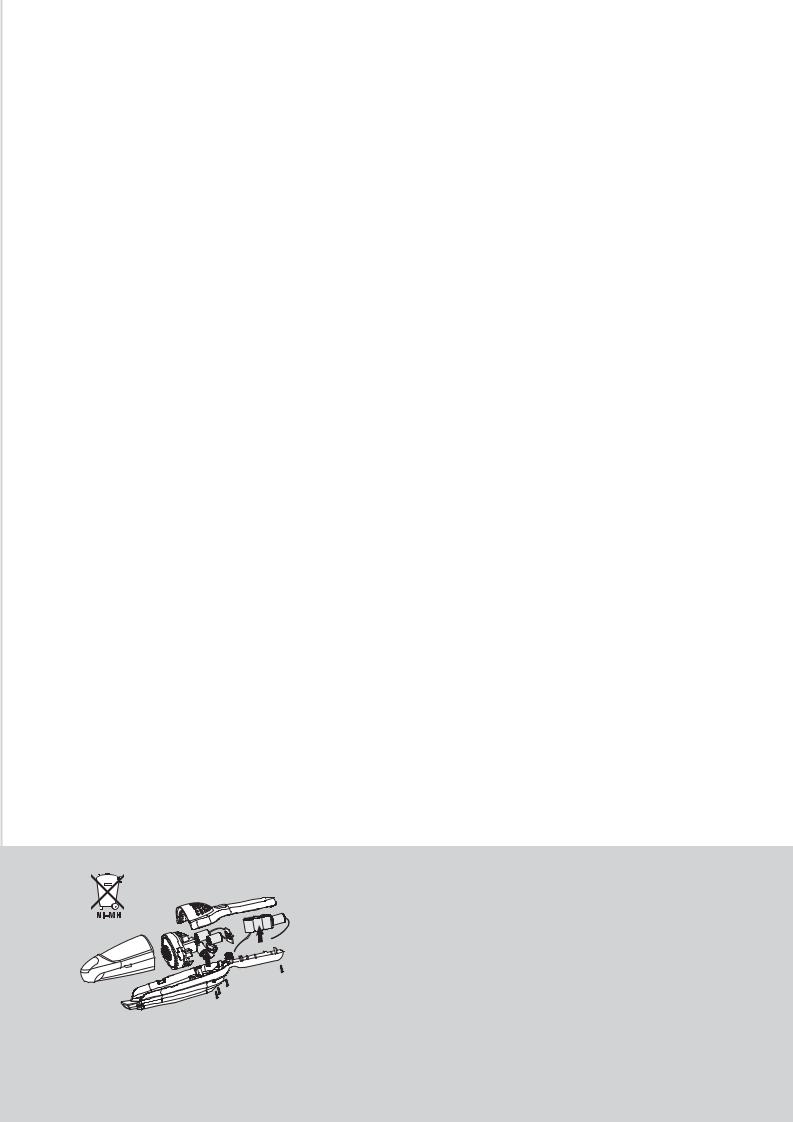
Urmontering av batterier (se illustration sid 2)
19.OBS – Vid urmontering av batterier, får Ergorapido inte vara ansluten till laddstationen.
•Lossa de fyra skruvarna.
•Lyft försiktigt av kåpan.
•Klipp av anslutningssladdarna och lyft ur batterierna.
Service eller reparationer
Vid driftstörningar eller fel ska Ergorapido lämnas till en auktoriserad Electrolux serviceverkstad.
4

English
Unpacking and assembly
Check that all the parts are in the box.
1.Fit the handle by carefully inserting it into the vacuum compartment. Take care to ensure that the cable does not jam.
2.Secure the handle by tightening the locking screw supplied. Use a Phillips screwdriver or a coin.
3.Position the charging station close to a mains socket (well away from heat sources or wet places). Insert the adaptor into the mains socket and connect the charging station.
4.The wall unit can also be mounted on a wall etc. Always ensure that the wall can bear the weight of the Ergorapido.
Charging
5.Hang Ergorapido on the charging station (NB – always make sure that the Ergorapido is turned off). The indicator lights will come on once Ergorapido has made contact with the charging station. It takes 8-10 hours to fully charge the batteries before the first use. When Ergorapido is totally discharged, approximately 12-16 hours’ charging is required for
the battery to regain full capacity. In order to ensure that it is always ready for use, Ergorapido should be left on charge when not being used. The adaptor may become warm during charging – this is normal.
Vacuuming floors and carpets
You should regularly check that the nozzle cushions and the brush roller are clean in order to avoid scratching sensitive floors
6.Start Ergorapido by pushing the on/off button away from you.
–first position = intermediate power for longer periods of use
–second position = full power
Cleaning of bellows
Sometimes objects can get stuck in the bellows, and this can affect suction power.
17.Remove the bellows by loosening the small screw and then pulling the bellows from the attachment. Clean the bellows using a stick or similar object. Place the bellows back in the attachment and lock using the locking screw.
Cleaning of wheel axles
If a wheel is jammed by threads or dirt:
18.Remove the wheels by carefully prizing them loose using a screwdriver inserted into the cavity. Remove threads or any other objects that may have become jammed in the wheels axles. Reassemble the wheels by pressing them tightly together.
NB:
•Never vacuum in wet places.
•Never vacuum near flammable gases, liquids etc.
•Never vacuum up sharp objects such as shards of glass etc.
•Never vacuum up liquids, as these can severely damage the machine.
•Never vacuum up ash, lit cigarette ends etc.
•Never vacuum up fine dust from plaster, concrete, flour or ash, for example.
•Do not leave the vacuum cleaner in direct sunlight.
•Avoid exposing the vacuum cleaner or battery to strong heat.
•The battery must not be dismantled, short-circuited, placed against a metal surface or exposed to strong heat.
Disposal
If an Ergorapido is to be disposed of, the batteries should be removed. Used batteries should never be disposed of with household waste. These should always be taken to a recycling station.
Vacuuming tables, furniture, car seats etc.
7.Remove the hand unit by pressing in both the release buttons at the same time. The hand unit will now come free and can easily be removed.
8.The crevice nozzle can be pulled out in order to reach awkward places.
9.If anything gets stuck in the crevice nozzle, it can be completely removed from the hand unit. Depress the release button and pull out the crevice nozzle. Clean it and remove anything that has got stuck in the air duct.
Emptying/cleaning
A. Quick emptying of the dust container
10.Open the quick emptying cover and empty the contents into a suitable vessel or bag. Press back the quick emptying cover until it clicks into place.
B. Quick cleaning using the vacuum cleaning cover
11.Lift up the vacuum cleaning cover. Vacuum clean the dust container and filter by placing the hose handle of another vacuum cleaner against the vacuum cleaning hole.
C. Careful cleaning of the dust container and filters
12.Remove the whole dust container by depressing the release button on either side of the container. Take out the dust container, separate both the filters and empty the contents of the dust container into a suitable vessel or bag.
13.The dust container, prefilter and fine filter can be shaken clean or cleaned and rinsed using warm water. Make sure that the parts are dry before they are reassembled.
Reassemble in reverse order.
Cleaning the roller brush
If the roller brush becomes blocked or jammed for any reason, the indicator light on the floor nozzle will go out. The roller brush may then need to be cleaned. First turn off the Ergorapido, then carefully use a pair of scissors or a sharp knife to remove any items such as threads that may have become entangled.
14.If the roller brush needs to be lifted out – open the hatch cover by turning the locking screw anti-clockwise with a coin or other tool. The hatch cover will come slightly free and can now be removed.
15.Lift out the roller brush and clean it. Replace the roller brush and make sure that it fits into its guiding tracks, and make sure that it can spin freely.
16.Replace the hatch cover and lock by turning anticlockwise as far as possible.
Removal of batteries ( see illustration page 2)
19.NB – Ergorapido must not be connected to the charging station while the batteries are being removed.
•Undo the four screws.
•Carefully lift the hood.
•Unclip the connecting cables and lift out the batteries.
Servicing or repairs
In cases of breakdown or faults, your Ergorapido must be taken to an authorised Electrolux service centre.
5
 Loading...