


AEG-Electrolux VAMPYRTC345.2, VAMPYRTC345.3, VAMPYRTC315.0F, VAMPYRTC355, VAMPYRTC375.0 User Manual
...VAMPYR® TC . . . electronic
Cylinder vacuum cleaner Aspirateur-traîneau Stofzuiger, sledemodel Aspirapolvere da pavimento Aspiradora arrastrable Aspirador de pó Golvdammsugare Støvsuger
Pölynimuri
Vysavaè prachu Porszívó
Odkurzacz podlogowy
H𪸽¼¯¸± ÷¸Œ³õ¦
ПЫЛЕСОС
Operating instructions
Mode d’emploi
Gebruiksaanwijzing
Istruzioni per l’uso
Instrucciones para el uso
Instruções de manejo
Bruksanvisning
Brugsanvisning
Käyttöohje
Návod k pou¤ití
Használati útmutató
Instrukcja obs¢ugi
Oå®ã¥ªÿ ¿¼±÷ªþÿ
ИНСТРУКЦИЯ ПО ЭКСПЛУАТАЦИИ

Depending on the model, the equipment marked with * may be different or not available.
A |
= Cable Retraction Button |
I |
= Tool Rail |
B |
= On/Off Button |
J |
= Power Indicator Light* |
C |
= Filter Replacement Indicator* |
K |
= Hygiene Filter |
D |
= Power Regulation* |
L |
= Carrying Handle |
E |
= Button to Open the Accessory Compart- |
M = Handle |
|
F |
ment |
N = ROTOSOFT Remote Control* |
|
= Button to Open the Paper Filter Compart- |
O |
= Telescopic Tube* |
|
|
ment |
P |
= Suction Hose |
G = Socket for Electrical Vacuum Brush* |
Q |
= Nozzle* |
|
H = Button for Hose Release* |
R |
= Button for Filter Box Lid |
|
2

Contents
Appliance Description. . . . . . . . . . . . . . . . . . . . .2 Safety Instructions . . . . . . . . . . . . . . . . . . . . . . .3
Making the Vacuum Cleaner Ready
for Use . . . . . . . . . . . . . . . . . . . . . . . . . . . . . . . . . .4 Switching On . . . . . . . . . . . . . . . . . . . . . . . . . . . .4
Adjusting the Suction Power . . . . . . . . . . . . . .4
Using the Nozzles . . . . . . . . . . . . . . . . . . . . . . . .6
Additional Accessories . . . . . . . . . . . . . . . . . . . .7
Filter Replacement . . . . . . . . . . . . . . . . . . . . . . .8
Maintenance and Cleaning . . . . . . . . . . . . . . . 11
What to do if . . . . . . . . . . . . . . . . . . . . . . . . . . . 11
AEG Customer Service in Europe . . . . . . . . 175
Dear customer,
Please read these operating instructions through carefully. Above all please observe the safety instructions on the initial pages of these operating instructions! Please keep these operating instructions for future reference. Pass them onto any subsequent owner of the appliance.
Safety Instructions
•Only connect the appliance to – 220/230 V – AC.
•The circuit for the socket used must be protected with a fuse with a rating of at least 16 A, or 10 A slow blow.
•Never remove the mains plug from the socket by pulling on the cable.
•Do not use the appliance if:
–the mains lead is damaged,
–the electrical hose, electrical telescopic tube or electrical vacuum brush show visible signs of damage,
–the housing shows visible signs of damage.
•Important! The electrical hose and electrical telescopic tube contain electrical connections. These should be checked regularly and must not be used if damaged. Do not immerse the electrical hose, electrical telescopic tube or electrical vacuum brush in water. Never vacuum liquids using the vacuum cleaner.
•Avoid running over the mains lead with the appliance, the vacuum brush or the electrical vacuum brush. The insulation could be damaged.
•If a paper filter is not inserted, it is not possible to close the cover. Please do not use force!
•Ensure that a paper filter, a fresh air activated charcoal filter/microfilter* and a hygiene filter are always fitted.
•Toner dust from laser printers and copiers must not be vacuumed using normal household vacuum cleaners.
•It is only permitted to use this vacuum cleaner for dry vacuuming. People and animals must not be vacuumed using the appliance.
Keep children away from electrical appliances.
•The manufacturer does not accept any liability for any damage caused by incorrect use or incorrect operation of the appliance.
•Leave wet shampooed carpets to dry completely. Otherwise the vacuum cleaner will be damaged. Furthermore, protection against electric shock may be impaired.
•Do not vacuum matches, glowing ashes or cigarette ends using the appliance. Avoid picking up hard, pointed objects as these may damage the appliance or the paper filter.
•Do not subject the appliance to the effects of the weather, moisture or sources of heat.
•If the mains lead is defective, the complete cable roller must be replaced by AEG customer service, or an authorised repair centre.
•Repairs to electrical appliances are only to be performed by qualified service engineers. Improper repairs can give rise to significant hazards for the user.
•Therefore if your appliance needs repairing, please contact your retailer or AEG customer service.
; This appliance complies with the following EC directives: - 73/23/EWG dated 19.02.1973 – Low Voltage Directive – 89/336/EWG dated 03.05.1989 (including Directive Amendment 92/31/EWG) – EMC Directive.
*) depending on model
3
Making the Vacuum Cleaner Ready for Use
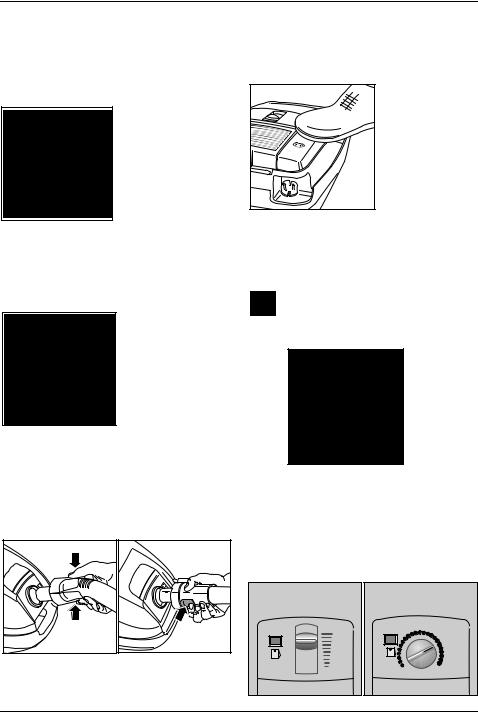
Connect suction hose and suction tube together until the catch engages
Firmly connect the suction hose handle to the suction tube.
Adjust Telescopic Tube
(depending on model)
The tube can be adjusted to the required working height by sliding the sleeve.
Connect Suction Hose
(depending on model)
Insert the connector on the suction hose in the suction inlet. The connector locks in place and can be rotated freely (depending on model).
To remove the hose, press the release button and pull out the connector.
Mains Connection/Cable Rewind
The mains cable is in the cable compartment. Pull out the cable and plug into a mains socket. After use, unplug from the mains. Press the foot button, the cable is rolled up automatically.
Switching On
Switch On and Off
You can switch the appliance on and off by pressing the On/Off button. When switched on, the mains power indicator is illuminated (depending on model).
Adjusting the Suction Power
(depending on model)
The suction power can be adjusted to suit the specific situation using the electronic power regulation. By reducing the suction power, you can significantly reduce the amount of force needed to push the nozzle.
On the Appliance
4
 Loading...