


 Loading...
96901KFE-N
Ceramic glass hob
Table de cuisson vitrocéramique
Glaskeramische kookplaat
Operating and installation instructions Notice d’utilisation et instructions d’installation
Gebruiksaanwijzing en montage-instructie

Dear customer
Please read these operating instructions carefully.
Pay particular attention to the „Safety Instructions” section on the first pages. Please retain these operating instructions for later reference. Pass them on to any potential new owners of the appliance.
The following symbols are used in the text:
Safety information
Warning! Information which serves your personal safety.
Important! Information on how to avoid damaging the appliance.
Information and practical hints
Environmental information
1. These numbers indicate step by step how to use the appliance as required.
2. ...
3. ...
In the event of any disturbances, these operating instructions contain information on how to eliminate the fault yourself; refer to the section “Rectifying faults”.
Printed on environmentally compatible paper.
Thinking ecologically means acting ecologically…
2
Contents |
|
Operating instructions............................................................................. |
5 |
Safety instructions .................................................................................................................... |
5 |
Intended usage ....................................................................................................................................... |
5 |
Appliance operation ............................................................................................................................. |
5 |
Appliance implementation ................................................................................................................. |
5 |
Appliance cleaning ............................................................................................................................... |
6 |
Avoid damage to the appliance ........................................................................................................ |
6 |
Environmental awareness ................................................................................................................... |
6 |
Appliance description ............................................................................................................... |
7 |
Your appliance components .............................................................................................................. |
7 |
Ceramic glass hob ................................................................................................................................. |
8 |
Your appliance functions .................................................................................................................. |
10 |
Operating the hob ................................................................................................................... |
12 |
Before using for the first time ........................................................................................................ |
12 |
Touch Control-Sensor fields ............................................................................................................ |
12 |
Switching on the appliance ............................................................................................................. |
12 |
Switching off the appliance ............................................................................................................ |
13 |
Cancelling the safety cut-out ......................................................................................................... |
13 |
Heat setting .......................................................................................................................................... |
13 |
Setting the keep warm function .................................................................................................... |
14 |
Switching off the cooking zone ..................................................................................................... |
14 |
Switching the casserole cooking zone on and off ................................................................... |
15 |
Switching the triple ring cooking zone on and off .................................................................. |
16 |
Using STOP&GO ................................................................................................................................... |
17 |
Using the automatic warm-up function ..................................................................................... |
18 |
Do not use the automatic warm-up function ........................................................................... |
18 |
Using the child safety feature ......................................................................................................... |
19 |
Using the look function .................................................................................................................... |
21 |
Using the timer .................................................................................................................................... |
21 |
Hob operation tips .................................................................................................................. |
24 |
Pots and pans ....................................................................................................................................... |
24 |
Energy saving ....................................................................................................................................... |
25 |
Cooking with and without the automatic warm-up function ............................................. |
26 |
3
Cleaning and care ................................................................................................................... |
29 |
Rectifying faults ...................................................................................................................... |
30 |
Installation instructions ........................................................................ |
34 |
Technical data .......................................................................................................................... |
34 |
Appliance dimensions ........................................................................................................................ |
34 |
Cut-out dimensions ............................................................................................................................ |
34 |
Safety instructions .................................................................................................................. |
34 |
Appliance assembly ................................................................................................................ |
34 |
Electrical connection .............................................................................................................. |
35 |
Service........................................................................................................ |
36 |
Hob mounting .......................................................................................................................... |
114 |
4

Operating instructions
Safety instructions
The safety aspects of this appliance comply with the accepted technical standards and the German Appliance Safety Law. However, as the manufacturer we also believe it is our responsibility to familiarise you with the following safety instructions.
Please observe these instructions otherwise guarantee claims on the manufacturer will be nullified.
Intended usage
This appliance may only be used for normal cooking and frying of foods in the home.
This appliance complies with the following EU directives
•73/23/EWG dated 19.02.1973 Low voltage directive
•89/336/EWG dated 03.05.1989 (EMC-directive including Amending Directive 92/ 31/EWG).
•93/68/EWG dated 22.07.1993 CE Identification directive.
Appliance operation
The appliance may only be mounted and connected electrically by trained and authorised specialised personnel.
The appliance may only be operated when properly built into standard, suitable built-in cabinets or worktops.
In the event of malfunctions and damage (breaks, cracks or fissures) the appliance must be switched off and disconnected from the power supply.
The appliance may only be repaired by trained and authorised specialised personnel (factory customer care service, specialist dealers).
Appliance implementation
Careless handling on the cooking zones represents a risk of burns.
Keep small children away from the appliance at all times.
Keep older children under instruction and supervision when they are using the appliance.
Please exercise care and attention when operating the appliance.
The handles of cooking utensils must not project out over the hob.
The handles of cooking utensils must not be positioned above a hot and warm cooking zone.
Be careful when plugging in electrical appliances into main sockets near the appliance. Connecting leads must not come into contact with any hot parts of the appliance.
Overheated fats and oils catch fire quickly. You should supervise cooking when preparing foods in fat or oil (e.g. chips).
5
Switch off the cooking zones after use.
The residual heat from hot pots or pans heats the ceramic glass hob although the residual heat display does not indicate this.
Appliance cleaning
Always switch off the appliance before cleaning.
The cooking zones must have cooled down to the extent that they may be touched without risk of burning.
For reasons of safety, never use a steam jet or a high pressure cleaner to clean the hob.
Avoid damage to the appliance
Never use the hob as a work surface or for storage.
Do not operate the cooking zones with empty pots or pans, or with no pots and pans on them.
Avoid boiling pots and pans dry.
Ceramic glass is insensitive to temperature shocks and is very robust, however it is not unbreakable. Especially sharp and hard objects that fall on the cooking surface could damage it.
Do not use any cast iron pots or pans with damaged bases with rough edges or burrs. Sliding these across the hob could cause scratches.
The frameless edge of the ceramic glass surface is susceptible to knocks. Be careful when moving pots and pans around.
Always make sure that no acid-containing liquids such as vinegar, lemon or lime-dissolving agents are split on the hob or frame as these can cause dull spots to appear and damage the glass.
Remove sugary substances with a cleaning scraper while still hot. If left to cool down, it may damage the surface when removed.
Keep objects and materials, liable to melt (e.g. synthetic materials, aluminium foils etc.), away from the ceramic glass surface.
Remove melted substances with a cleaning scraper while still hot. If left to cool down, it may damage the surface when removed.
Environmental awareness
All packaging materials used can be recycled.
The materials used must not be disposed of in the household refuse.
The national and regional regulations for the proper and orderly recovery of the packaging materials and the appliance in the recycling chain are to be observed.
6
Disposing of the packaging material
The plastic materials are identified as follows:
Symbol |
Plastic |
Use |
|
|
|
PE |
Polyethylene |
Outer wrapping, bags |
|
|
|
PS |
Polystyrene (CFC free) |
Cushioning parts |
|
|
|
Appliance disposal
The appliance may only be disconnected from the power supply by trained and authorised specialised personnel.
The specialised person must put the appliance out of commission electrically (removal of connection cable).
Appliance description
Your appliance components
Your hob components
Ceramic glass cooking surface: The appliance has a ceramic glass surface with five rapid response cooking zones.
The cooking surface is non-porous and resistant to thermal shock. Pots may therefore be swapped from a hot to a cold zone.
The smooth surface is easy to clean.
Rapid response cooking zones: The appliance has rapid response cooking zones. The particularly powerful radiant heater elements substantially shorten the amount of time taken for the zones to heat up.
On switching on the cooking zones a brief buzzing tone in the heating elements may be heard. This noise is physically conditioned and has no negative influences on the appliance’s function. It is no longer heard once the cook zone is sufficiently heated.
Single ring cooking zone: The cooking area has three single ring cooking zones. As such your appliance features three cooking zones for smaller pots. This saves energy.
Triple ring cooking zone: The cooking area has a triple ring cooking zone. With this, your appliance has a cooking zone with variable size, e.g., for smaller pots. This saves energy.
Casserole cooking zone (multi-purpose cooking zone): The cooking area is equipped with a casserole cooking zone (multi-purpose cooking zone). Depending on the setting it may be used as a round or oval cook zone.
7

Ceramic glass hob
8

Control panel elements
Sensor fields: Your appliance is operated using Touch-Control-sensor fields.
|
|
Sensor field |
Function |
|
|
|
|
|
|
On/Off |
Switching the appliance on and off (separate |
|
|
main switch). |
|
|
|
|
|
|
|
|
|
|
|
Triple ring cooking zone |
Switching centre heating ring on and off. |
|
|
|
|
|
|
Switching outer heating rings on and off. |
|
|
|
|
|
|
|
|
|
|
|
Casserole cooking zone |
Switching outer heating ring on and off. |
|
|
|
|
|
|
Heat setting selection |
Increasing heat setting/timer. |
|
|
|
|
|
|
Heat setting selection |
Decreasing heat setting/timer. |
|
|
|
|
STOP&GO |
STOP&GO |
Switching the keep warm function on/off. |
|
|
|
|
|
|
|
Timer |
Switching the timer on and off. |
|
|
||
|
|
|
|
|
|
Locking |
Locking/unlocking the control panel. |
|
|
|
|
Displays: Digital displays and/or control lamps inform the user about heat settings, selected functions as well as any possible residual heat of the corresponding cooking zone.
Control lamp |
Description |
|
|
On/Off |
The appliance is switched on/off. |
|
|
Bottom triple ring cooking |
The centre heating ring is switched on. |
zone |
|
|
|
Top triple ring cooking zone |
The outer heating ring is switched on. |
|
|
Casserole cooking zone |
The outer heating ring is switched on. |
|
|
Timer function |
The respective cooking zone is operated via the timer. |
|
|
9

|
Display |
Description |
|
|
|
|
|
The appliance is switched on. |
|
|
|
- |
Heat setting |
Set cooking zone heat setting. |
|
|
|
. |
Decimal point |
Set cooking zone intermediate heat setting. |
|
|
|
|
Keep warm function |
Keep warm function is set. |
|
|
|
|
Automatic warm-up |
Automatic warm-up function is activated. |
|
function |
|
|
|
|
|
|
|
|
Error display |
A malfunction has occurred. |
|
|
|
|
Residual heat display |
The cooking zone is switched off but still hot. |
|
|
|
|
Child safety feature |
Child safety feature is activated. |
|
|
|
|
|
Safety cut-out is activated. |
|
|
|
Your appliance functions
Automatic warm-up function: All cooking zones may be regulated in fourteen stages and feature an automatic warm-up function.
Using the automatic warm-up function 
 the cooking zone operates for a specific time at full power and then switches back automatically to the heat setting selected.
The duration of the warm-up phase depends on the heat setting selected.
The power management system switches back the automatic warm-up function automatically to the heat setting selected.
Direct control of each cooking zone: Each cooking zone is directly controlled via the appropriate touch control sensor fields.
Error display:  for errors lights up in the display when a malfunction occurs on the appliance (see section „Rectifying faults“).
Child safety feature:  With this function the hob can be locked to prevent any unintentional switching on of the appliance.
Residual heat display: 
 for residual heat will illuminate if the cooking zone becomes hot enough for there to be a risk of burning.
When the ceramic glass hob is switched off the residual heat display extinguishes only once the cooking zone has cooled down to the point that there is no longer a risk of burning.
Keep warm function: Meals may be kept hot using the keep warm function (heat setting 
 ).
).
STOP&GO: All set cooking zones are switched to the keep warm function 
 or back to the set heat setting (not in the automatic warm-up function).
10
Power management system: If the front left, rear and front right cooking zones are operated simultaneously the distribution of the maximum possible heat settings is established and is automatically monitored.
Cooking zone 1 |
Cooking zone 2 |
Cooking zone 3 |
-
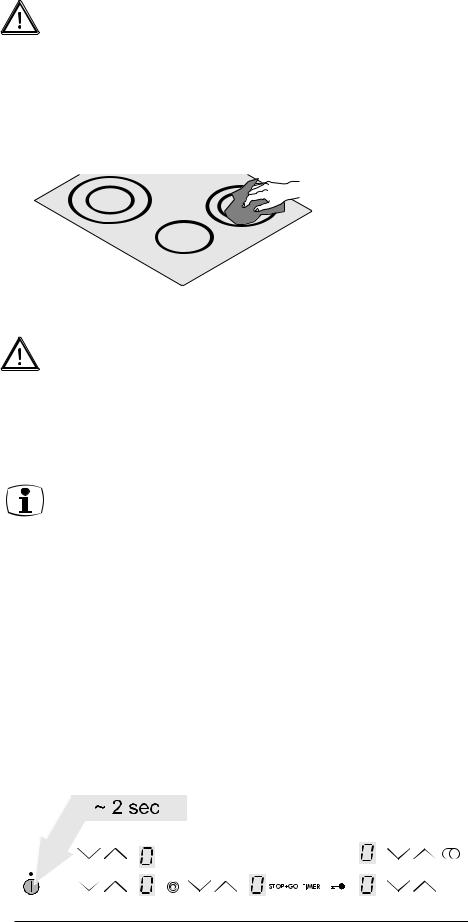
Control panel safety switch-off: Moisture (e.g. a wet cloth) or liquids boiling over on the control panel immediately switch off all cooking zones.
Hob safety switch-off: If, once the hob is switched on, a heat setting is selected on a cooking zone within approx. 10 seconds, the hob will switch off automatically.
If one or several sensor fields are pressed for longer than approx. 10 seconds, e.g. by a pot resting on it/them, the hob will switch off automatically.
If all cooking zones are switched off, the hob will switch off automatically after approx. 10 seconds.
Cooking zone safety switch-off: If a cooking zone is not switched off or changed within a specific period it will switch off automatically.
Heat setting |
Switch-off after |
||||
|
|
|
|
|
|
, |
, |
|
, |
6 hours |
|
|
|
|
|
|
|
, |
, |
|
, |
5 hours |
|
|
|
|
|
|
|
|
|
|
|
4 hours |
|
|
|
, |
|
|
|
|
|
|
|
||
|
|
|
|
|
|
, |
, |
|
, |
, |
1.5 hours |
|
|
|
|
|
|
Timer: The timer features two functions:
•the automatic switch-off function. On the expiry of the set time the cooking zone switches off automatically.
•the minute minder („Egg timer“). On the expiry of the set time an acoustic signal is emitted.
The timer may be set in one minute intervals up to 99 minutes.
Locking: With the exception of the „ON/OFF“ sensor field the control panel may be locked at any time to avoid the settings being misadjusted.
11
Operating the hob
Before using for the first time
IMPORTANT!
Damage to the ceramic glass surface.
Aggressive, scouring cleaning agents may damage the ceramic glass surface.
Use only water and washing-up liquid.
1.Wash down the ceramic glass hob with hot water and washing-up liquid and rub dry (with a tea towel).
.
IMPORTANT!
Damage to the ceramic glass surface.
Burnt-on stickers and film damage the ceramic glass surface.
Remove stickers and film.
2. Switch on the cooking zones briefly one after another to check them. When used for the first time a slight odour may be detected briefly.
Touch Control-Sensor fields
In order to operate the Touch Control sensor fields place your finger from above onto the required field until the corresponding display lights up or extinguishes, and/or the desired function is carried out.
For faster setting keep your finger on the sensor field until the required value is attained.
Switching on the appliance
To switch on the appliance completely, touch the „ON/OFF“ sensor field  .
.
12
Touch the „ON/OFF“ sensor field  for approx. two seconds.
 is illuminated in the digital display.
If the cooking zone is not set within ten seconds the appliance is switched off automatically.
Switching off the appliance
To switch off the appliance completely, touch the „ON/OFF“ sensor field  . Touch the „ON/OFF“ sensor field
  for approx. two seconds.
The digital displays extinguish.
Existing residual heat  is displayed in the cooking zones’ digital displays.
Cancelling the safety cut-out
In order to cancel the activated safety cut-out function the appliance must be switched off and on again via the „ON/OFF“ sensor field  .
.
The appliance is operational.
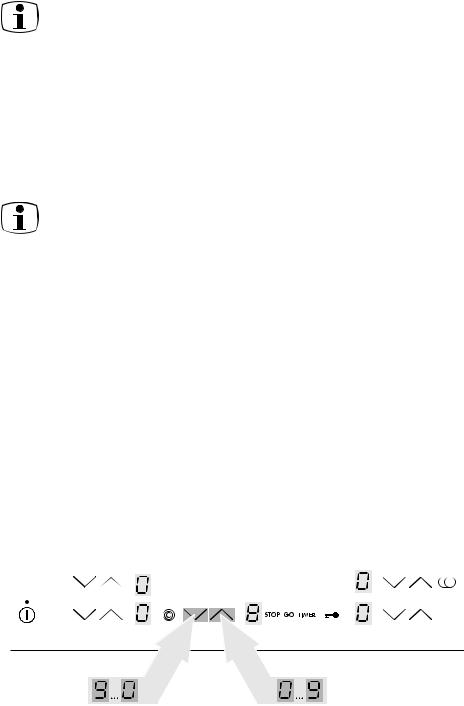
Heat setting
The heat setting is selected or changed by the respective „heat setting selection“ and
and  sensor fields.
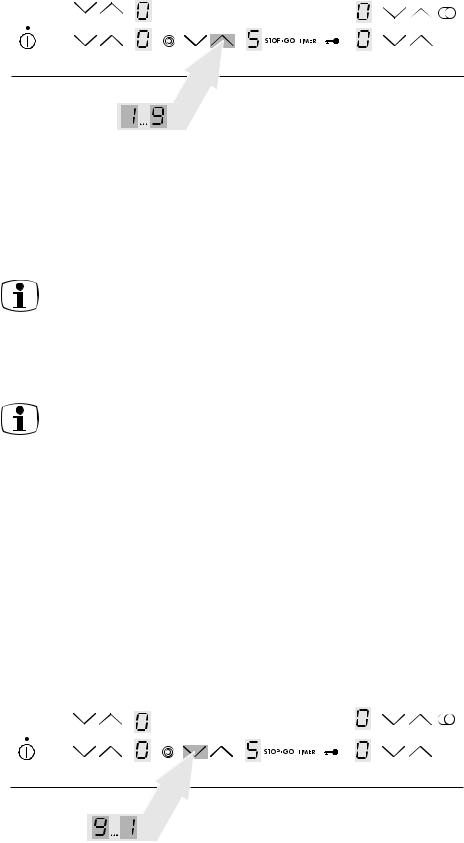
Increase heat setting
Touch the „heat setting selection“  sensor field.
The required heat setting lights up in the digital display.
Decrease heat setting
Touch the „heat setting selection“  sensor field.
The required heat setting lights up in the digital display.
13

Setting the keep warm function
Heat setting 
 is used as a keep warm function for all cooking zones. Touch the „heat setting selection“ sensor fields
  or
or  .
.
The keep warm function lights up in the digital display 
 .
.
Switching off the cooking zone
WARNING!
Risk of burning due to residual heat.
After switching-off the cooking zone takes some time to cool down.
Check ceramic glass hob.
Check residual heat display 
 .
.
There are two variants for switching off a cooking zone.
Variant 1
Touch the „heat setting selection“ sensor fields  or
or  simultaneously.
 is illuminated in the digital display.
The cooking zone is switched off.
Variant 2
Touch the „heat setting selection“ sensor field |
until |
is indicated in the digital display. |
is illuminated in the digital display. |
|
|
The cooking zone is switched off. |
|
|
If all cooking zones are switched off the appliance switches off automatically after ten seconds.
.
Existing residual heat  is displayed in the cooking zones’ digital displays.
14
In the event a power failure existing residual heat will no longer be indicated in the digital displays.
Residual heat may be used to melt or keep food hot.
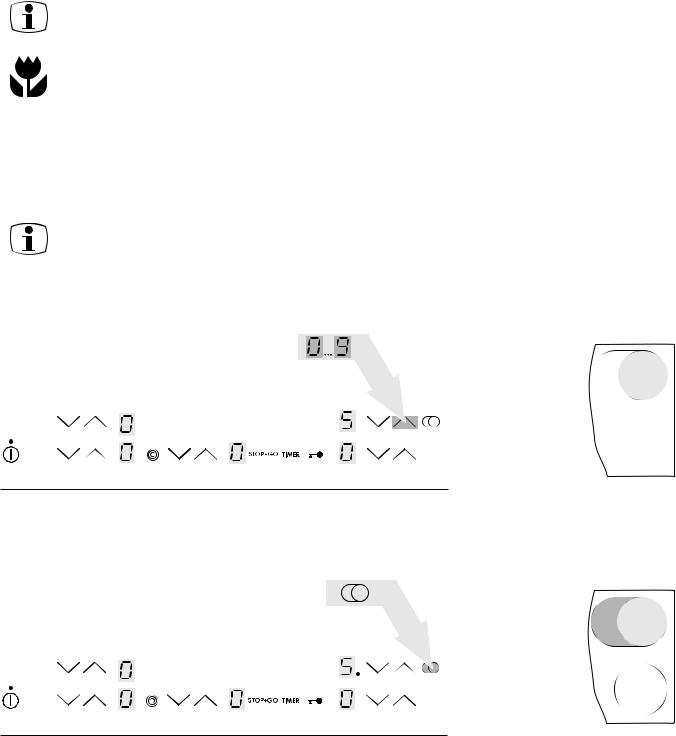
Switching the casserole cooking zone on and off
Depending on the size of the pot or pan, the “casserole cooking zone“ sensor field can be used to switch between the two sizes of the casserole cooking zone.
This can only be activated when a heat setting has already been made for the inner heating ring.
Switching on the casserole cooking zone
1. Set the desired heat setting.
The required heat setting lights up in the digital displays.
2. Touch the „casserole cooking zone“ sensor field  .
.
The outer heating ring is switched on.
The control lamp “casserole cooking zone” illuminates.
15
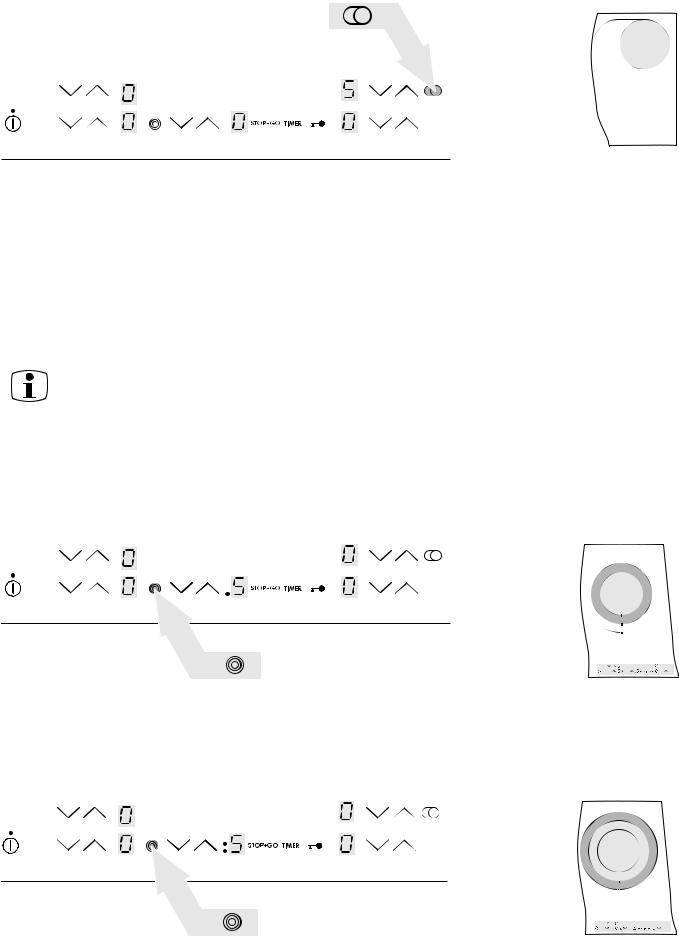
Switch off the outer heating ring
Touch the „casserole cooking zone” sensor field  .
.
The outer heating ring is switched off.
The control lamp “casserole cooking zone” extinguishes.
Switching the triple ring cooking zone on and off
Depending on the size of the pot or pan, the “triple ring cooking zone” sensor field can be used to switch between the three sizes of the zone.
This can only be activated when a heat setting has already been made for the inner heating ring.
Switching on the triple ring cooking zone
1. Set the desired heat setting.
The required heat setting lights up in the digital displays.
2. Touch the „triple ring cooking zone” sensor field  . The middle heating ring is switched on.
The control lamp “triple ring cooking zone” illuminates.
16
3. Touch the „triple ring cooking zone” sensor field  . The outer heating ring is switched on.
The „top triple ring cooking zone“ control lamp lights up.
Switch off the outer heating ring
Touch the „triple ring cooking zone” sensor field  .
.
The outer and middle heating ring, respectively, is switched off.
The relevant control lamp “triple ring cooking zone” extinguishes.
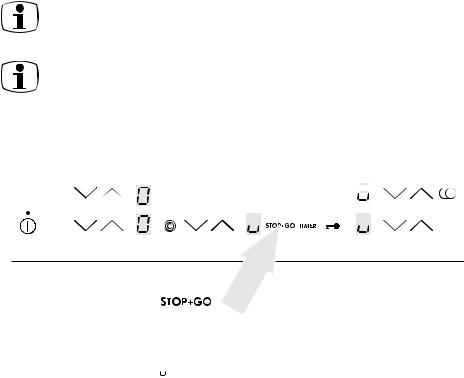
Using STOP&GO
„STOP&GO“ switches all set heat levels to the keep warm function 
 or back to the heat setting selected (not in the automatic warm-up function)..
The timer functions and settings are not changed by STOP&GO.
STOP&GO locks the entire control panel with the exception of the „On/Off“ sensor field  .
.
Switch to the keep warm function
|
|
|
|
|
|
|
|
|
|
|
|
|
|
|
|
|
|
|
|
|
|
|
|
|
|
|
|
|
|
|
|
|
|
|
|
|
|
|
|
|
|
|
|
|
|
|
|
|
|
|
|
|
|
|
|
|
|
|
|
|
|
|
Touch the „STOP&GO“ |
sensor field. |
|||||||
In the digital displays |
and the heat setting selected flash every second in alternation. |
|||||||
In the active digital displays  . lights up.
Switch to the heat settings
Touch the „STOP&GO“ sensor field.
The set heat settings light up in the digital displays.
17
Using the automatic warm-up function
Switching on the automatic warm-up function
The duration of the warm-up phase depends on the heat setting selected.
Set the required heat setting (  to
to 
 ) via the “heat setting selection” sensor field
  . The set power level lights up in the digital display.

 lights up in the digital display after approx. five seconds. The automatic warm-up function is activated.
In the event of residual heat being present the automatic warm-up function will not be activated for this cooking zone.
After the end of the warm-up time, the heat setting selected will be shown again.
When the automatic warm-up function is active select a higher heat setting, e.g.  instead of
  , the warm-up time will be automatically adjusted to the selected heat setting.
If you select a lower heat setting the automatic warm-up function will be switched off immediately.
Switching off the automatic warm-up function
Only an activated automatic warm-up function may be switched off. Touch the „heat setting selection“  sensor field.
The heat setting selected lights up in the digital display.
The automatic warm-up function is switched off.
Do not use the automatic warm-up function
18
The cooking zone is used without the automatic warm-up function if the required heat level is set via the „heat setting selection“  sensor field.
Using the child safety feature
With the child safety feature, the hob can be protected against undesirable use.
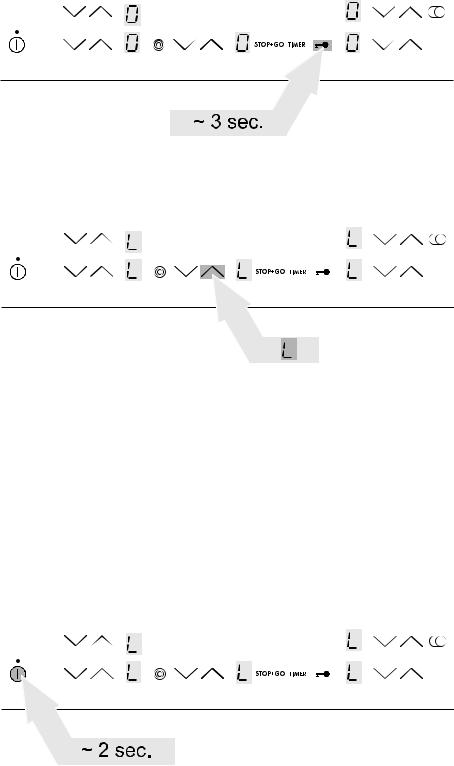
Switching on the child safety feature
The appliance is switched on and all the cooking zones are switched off.
1. Touch the „locking“ sensor field  for approx. 3 seconds.
An acoustic signal is sounded.
2. Touch any of the „heat setting selection“  sensor fields.
In the digital displays, there appears 
The child safety feature is activated.
The appliance switches off automatically after a few seconds.
Bypassing the child safety feature
The child safety feature can be bypassed for the one-time use of the appliance (up to the next switch-off of the appliance). At the next switch-on, the child safety feature is automatically activated again.
19
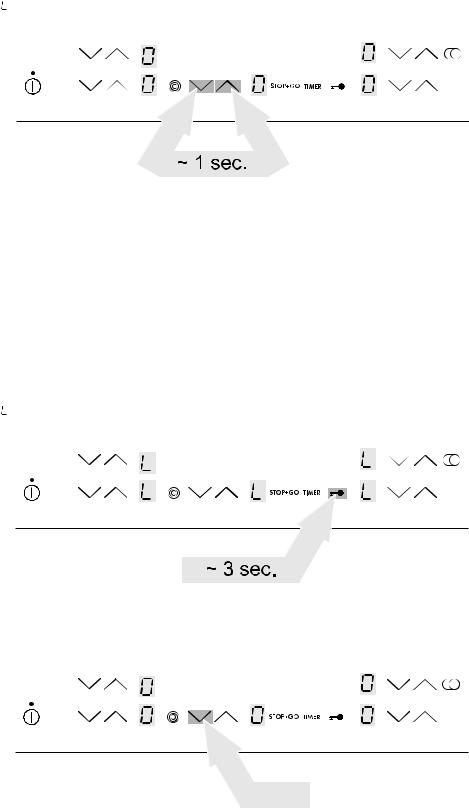
1. Switch on the appliance.
is illuminated in the digital display.
2.Touch the „heat setting selection“ sensor fields  and
and for approx. one second simultaneously.
An acoustic signal is sounded.

 is illuminated in the digital display.
The child lock is switched off until the appliance is switched off.
Switching off the child safety feature
1. Switch on the appliance.
is illuminated in the digital display.
2. Touch the „locking“ sensor field  for approx. 3 seconds. An acoustic signal is sounded.
3. Touch any of the „heat setting selection“  sensor fields. In the digital displays lights up
 .
.
The child safety feature is switched off.
The appliance switches off automatically after a few seconds.
20
Using the lock function
At any random time during cooking, the control panel can be locked with the exception of the sensor field „ON/OFF“  in order to prevent a changing of the settings caused by, for example, the wiping with a cloth.
Locking the control panel
Touch the „locking“ sensor field  for approx. 2 seconds.
lights up for five seconds in the digital displays.
The control panel is locked.
If a sensor field is touched  lights up in the digital displays.
Unlocking the control panel
Touch the „locking“ sensor field  for approx. 2 seconds.
The control panel may be used.
When switching off the appliance, the locking function is automatically switched off.
Using the timer
You can use the timer in two ways:
•as automatic switch-off function for a set heat level
•as minute minder („egg timer“) for a switched-off cooking zone.
21
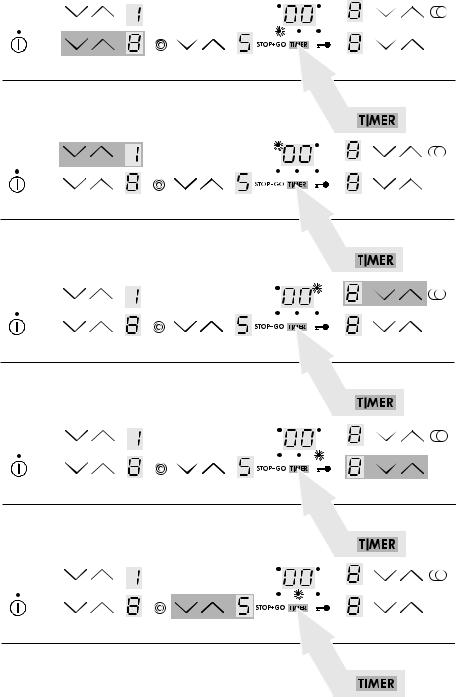
Cooking zone selection
1. Touch the „timer“ sensor field. 

 appears in the timer display.
The cooking zone „timer function“ control lamps light up.
The „timer function“ control lamp of the adjustable cooking zone flashes. 2. Touch the „timer“ sensor field.
The „timer function“ control lamp of the next adjustable cooking zone flashes.
Time setting
1. Cooking zone selection.
The „timer function“ control lamp of the adjustable cooking zone flashes.
22
|
|
|
|
|
|
|
|
|
|
|
|
|
|
|
|
|
|
|
|
|
|
|
|
|
|
|
|
|
|
|
|
|
|
|
|
|
|
|
|
|
|
|
|
|
|
|
|
|
|
|
|
|
|
|
|
|
|
|
|
|
|
|
|
|
|
|
|
|
|
|
|
|
|
|
|
|
|
|
|
|
|
|
|
|
|
|
|
|
|
|
|
|
|
|
|
|
|
|
|
|
|
|
|
|
|
|
|
|
|
|
|
|
|
|
|
|
|
|
|
|
|
|
|
|
|
|
|
|
|
|
|
|
|
|
|
|
|
|
|
|
|
|
|
|
|
|
|
|
|
|
|
|
|
|
|
|
|
|
|
|
|
|
|
|
|
|
|
|
|
|
|
|
|
|
|
|
|
|
|
|
|
|
|
|
|
|
|
|
|
|
|
|
|
|
|
|
|
|
|
|
|
|
|
|
|
|
|
|
|
|
|
|
|
|
|
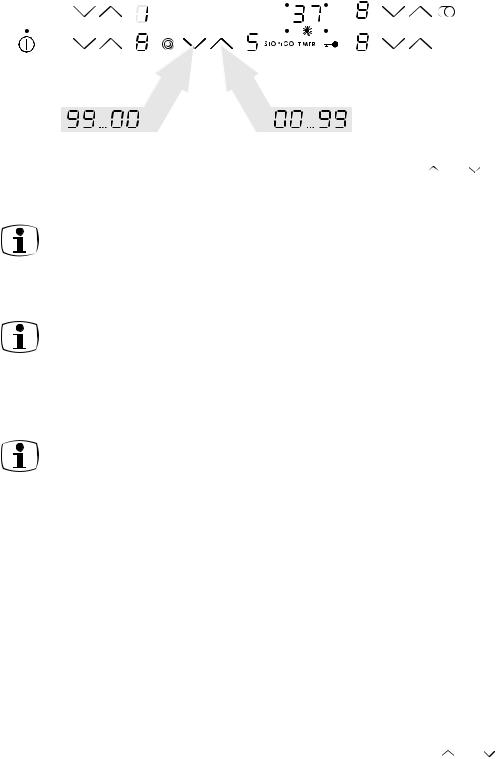
2. Set the required time via the „heat setting selection“ |
or |
sensor fields. |
|||||||||||||||||||||
The set time is indicated in the timer display.
For a faster adjustment, touch the “heat setting selection” sensor fields  or
or  for such time until the required value is obtained.
The time for the selected cooking zone is activated after approx. five seconds.
If the time is set for several cooking zones the timer display will indicate the shortest cooking time in each case and the „timer function“ control lamp of the appropriate cooking zone will flash.
Once the time has expired 
 is indicated in the timer display, the „timer function“ control lamp flashes and an acoustic signal is sounded for approx. two minutes.
The acoustic signal is switched off by touching the „timer“ sensor field.
Remaining time display
1. Select the required cooking zone.
The remaining time is indicated in the timer display.
The “timer function” control lamp belonging to the cooking zone flashes.
Time changing
1. Select the required cooking zone.
The remaining time is indicated in the timer display.
The „timer function“ control lamp of the adjustable cooking zone flashes.
2. The required time is set via the „heat setting selection“ |
or |
sensor fields. |
The set time is indicated in the timer display.
The time for the selected cooking zone is changed.
Switching off cooking zone and automatic switch-off function
If a cooking zone is switched off the timer settings for this cooking zone are automatically switched off.
23
Switching off the timer
1. Select the required cooking zone.
The remaining time is indicated in the timer display.
The „timer function“ control lamp of the adjustable cooking zone flashes.
|
|
|
|
|
|
|
|
|
|
|
|
|
|
|
|
|
|
|
|
|
|
|
|
|
|
|
|
|
|
|
|
|
|
|
|
|
|
|
|
|
|
|
|
|
|
|
|
|
|
|
|
|
|
|
|
|
|
|
|
|
|
|
|
|
|
|
|
|
|
|
|
|
|
|
|
|
|
|
|
|
|
|
|
|
|
|
|
|
|
|
|
|
|
|
|
|
|
|
|
|
|
|
|
|
|
|
|
|
|
|
|
|
|
|
|
|
|
|
|
|
|
|
|
|
|
|
|
|
|
|
|
|
|
|
|
|
|
|
|
|
|
|
|
|
|
|
|
|
|
|
|
|
|
|
|
|
|
|
|
|
|
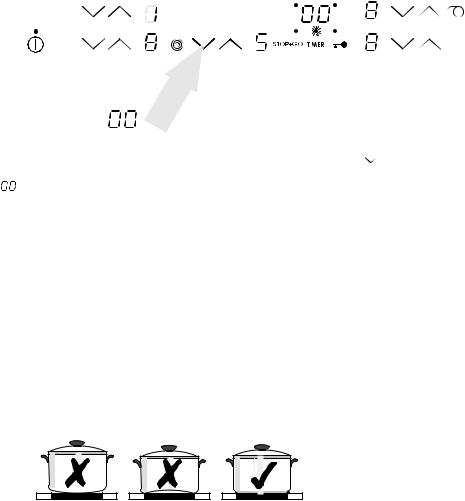
2. Set the time via the „heat setting selection“ |
|
sensor field to zero. |
|||||||||||||||
|
appears in the timer display. |
|
|
|
|||||||||||||
The timer is switched off. |
|
|
|
||||||||||||||
Hob operation tips
Pots and pans
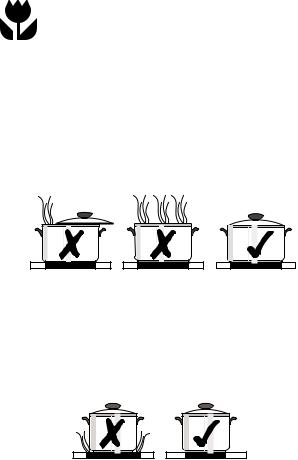
The better the pot, the better the cooking results.
•You can recognise good pots and pans by their bases. The base should be as thick and flat as possible.
•When buying new pots and pans, pay particular attention to the diameter of the base. Manufacturers often only state the diameter of the rim.
•Pots with aluminium or copper bases can cause metallic discolouring on the ceramic glass surface which is very difficult or impossible to remove.
•Do not use cast iron pots or pots with damaged bases which are rough and/ or have burrs on them. Scratches can occur if they are slid across the surface.
•When cold, pot bases are normally bowed slightly inwards (concave). They should never be bowed outwards (convex).
•If you use special pots and pans (e.g., a pressure cooker, simmering pan, wok etc.) please observe the manufacturer’s instructions.
24
General information
•The base should always be clean and dry.
•In order to avoid scratches on the ceramic glass cooking surface, do not slide pots and pans around but lift them up instead when changing positions.
•Severe scratches may weaken the glass.
•Scratches can result from grains of sand (e.g., after washing out vegetables) which are dragged with the pot across the cooking surface.
•Always use large pots for dishes with lots of liquid so that nothing can boil over.
Energy saving
You will save valuable energy by observing the following points:
•Always position pots and pans before you switch on the cooking zone.
•Dirty cooking zones and pot bases increase power consumption.
•Whenever possible, always have the lid firmly placed on the pots and pans so that they are completely covered.
•Switch off the cooking zones before the end of the cooking time to use the residual heat for keeping foods warm or for melting purposes.
•The base of the pot should have the same size as the cooking zone.
•Using a pressure cooker shortens the cooking times by up to 50%.
25
Cooking with and without the automatic warm-up function
The automatic warm-up function is suitable for:
•Dishes that start off cold, are heated up at high power and do not need to be continually watched when cooking on the lower heat setting.
•Dishes that are put into a hot frying pan.
The automatic warm-up function is not suitable for:
•Goulash, beef olives and similar braised dishes that need continual turning until browned correctly, have liquid added and are then braised until cooked,
•Dumplings, pasta dishes with lots of liquid,
•Cooking with pressure cookers,
•Very large quantities of soups/stews with more than 2 litres of liquid.
General information:
•When cooking without the automatic warm-up function, we recommend the use of a high heat setting to warm up the food (with the  -button) and then leaving the dish to finish cooking at a suitable lower heat setting.
•Pay special attention to the results of your first use of the appliance. You can then decide which heat setting is the best for „your dishes” in the “quantities you are accustomed to preparing” with your own „pots and pans”. You will then quickly appreciate the advantages of the automatic function and will feel secure and relaxed with your new hob.
26

Duration of the warm-up phase
The duration of the warm-up phase depends on the heat setting selected.
Heat setting |
Duration of the warm-up phase [min] |
1
1,7
3
4,8
5,5
6,5
8,2
10,2
12,3
2
2,5
3,5
4,5
---
27

Typical heat settings for cooking
The details shown in the following table are guidelines. The heat setting required for cooking depends on the quality of the pans and on the type and quantity of food.
Heat |
Warm-up |
Slow cooking |
Examples for use |
setting |
time of the |
procedure |
|
|
automatic |
|
|
|
function1) |
|
|
|
[Min.] |
|
|
|
|
|
|
|
|
Warming up |
Warming up large amounts of liquid |
|
|
Frying |
boiling pasta, |
|
|
Deep-fat frying |
browning of meat, |
|
|
|
(browning goulash, pot-roast) |
|
|
|
|
|
4,5 |
Fast frying |
Steaks, pieces of loin, |
|
|
|
potato fritters, |
|
|
|
|
|
3,5 |
|
fried sausages, |
|
|
pancakes/flat cakes |
|
|
|
|
|
|
|
|
|
|
|
Frying |
Schnitzel/cutlets, |
|
2,0 |
|
liver, fish, |
|
|
|
rissoles, fried eggs |
|
|
|
|
|
10,2 |
Boiling |
Boiling up to 1.5 l liquid, |
|
|
|
|
|
|
|
potatoes, vegetables |
|
6,5 |
|
|
|
|
|
|
|
|
|
|
|
4,8 |
Steaming |
Steaming and sautéing of |
|
|
Sautéing |
small quantities of vegetables, |
|
|
||
|
1,7 |
Poaching |
cooking rice and |
|
|
milk-based dishes |
|
|
|
|
|
|
|
|
|
|
|
Melting |
Melting butter, |
|
1,0 |
|
dissolving gelatine, |
|
|
|
melting chocolate |
|
|
|
|
|
0,5 |
Keeping warm |
Keeping food warm |
|
|
|
|
1) When cooking without the automatic warm-up function, the warm-up time can be individually selected.
When heating up or frying, we recommend using the warm-up setting „  “ and then continue cooking foods that require longer cooking times at a suitable lower heat setting.
28
Cleaning and care
Hob
Important! Cleaning agents must not come into contact with the hot ceramic glass surface! All cleaning agents must be removed with plenty of clean water after cleaning because they have a caustic effect when the zones are heated up again.
Never use any aggressive cleaners such as grill or oven sprays, coarse scourers or abrasive pot cleaners.
Clean the ceramic glass surface after every use when it is hand-warm or in a cold condition. In this way you avoid spillage burning solidly to the surface.
Remove scale and water marks, fat spots and metallic shimmer discolouring with commercially available ceramic glass or stainless steel cleaner.
Minor soiling
1.Wipe the ceramic glass surface with a damp cloth and a little washing up liquid.
2.Then, rub dry with a clean cloth. Cleaner residues must not remain on the surface.
3.Once a week, you must thoroughly clean the entire ceramic glass cooking surface with a commercially available ceramic glass or stainless steel cleaner.
4.Then wipe the ceramic glass surface using plenty of clean water and rub dry with a clean fluff-free cloth.
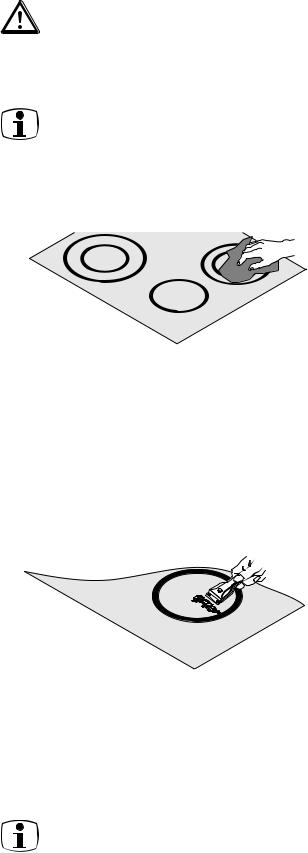
Stubborn soiling
1.To remove food that has boiled over, or to remove stubborn splashes, use a ceramic hob scraper.
2.Place the scraper at an angle to the ceramic glass surface.
3.Remove the soiling by sliding the blade.
.
Scrapers and ceramic glass cleaners are available from Service Force.
29

Problem soiling
1.Carefully remove burnt-on sugar, melted plastic, aluminium foil or other materials which melt immediately while they are still hot, using a suitable cleaning scraper.
Important! You risk burning yourself when using the cleaning scraper on the hot cooking zone!
2. Then clean the hob normally when it has cooled down.
If the cooking zone on which something has melted has already cooled down, warm it up again before cleaning.
Scratches or dark marks on the ceramic glass surface, caused for example by a pot or pan base with sharp edges, cannot be removed. However, they do not impair the functioning of the hob.
Rectifying faults
It is possible that faults have been caused by a minor error which you can rectify yourself with the help of the following instructions.
If the malfunction cannot be cleared with the following information please contact your specialist dealer or Service Force.
If you request a service visit to resolve a fault listed above or because of improper operation, the visit of the service technician is not free of charge even during the guarantee period.
If the ceramic glass hob has a glass fracture, please specify to the service centre the threedigit number, which is printed on the glass plate.
Malfunction |
|
|
Cause |
|
|
|
Remedy |
|
|
|
|
|
|||
The digital displays go out |
The power has failed. |
|
1. |
Wait for the power cut to |
|||
of order |
|
|
|
|
|
|
end. |
|
|
|
|
|
|
2. |
Switching on the appliance. |
|
|
|
|
|
|
||
|
The |
household |
fuse |
has |
Insert fuse. |
||
|
been tripped. |
|
|
The fuse is tripped again: |
|||
|
|
|
|
|
|
1. |
Switching off the appliance |
|
|
|
|
|
|
2. |
Call a qualified electrician. |
|
|
|
|
|
|||
|
The |
overheat |
protection |
Allow the cooking zones to |
|||
|
feature has switched off all |
cool down. |
|||||
|
cooking |
zones |
and |
|
|
||
|
inhibited their functions. |
|
|
||||
|
|
|
|
|
|
|
|
30
Loading...