


86731K-MN
User manual |
Ceramic glass hob |
Benutzerinformation |
Glaskeramik-Kochfeld |
Notice d'utilisation |
Table vitrocéramique |
Gebruiksaanwijzing |
Glaskeramische |
|
kookplaat |
2 Contents
Thank you for choosing one of our high-quality products.
To ensure optimal and regular performance of your appliance please read this instruction manual carefully. It will enable you to navigate all processes perfectly and most efficiently. To refer to this manual any time you need to, we recommend you to keep it in a safe place. And please pass it to any future owner of the appliance.
We wish you much joy with your new appliance.
Contents
Operating instructions |
2 |
Safety instructions |
2 |
Description of the appliance |
4 |
Operating the appliance |
6 |
Tips on cooking and frying |
11 |
Cleaning and care |
13 |
What to do if... |
14 |
Disposal |
15 |
Installation Instructions |
15 |
Safety information |
15 |
Service |
17 |
Subject to change without notice
Operating instructions
Safety instructions
WARNING!
Please comply with these instructions. If you do not, any damage resulting is not covered by the warranty.
Correct use
•This appliance is not intended for use by children or other persons whose physical, sensory or mental capabilities or lack of experience and knowledge prevents them from using the appliance safely without supervision or instruction by a responsible person to ensure that they can use the appliance safely.
•Do not leave the appliance unattended during operation.
•This appliance should be used only for normal domestic cooking and frying of food.
•The appliance must not be used as a work surface or as a storage surface
•Additions or modifications to the appliance are not permitted.
•Do not place or store flammable liquids, highly inflammable materials or fusible objects (e.g. plastic film, plastic, aluminium) on or near the appliance.
Children’s safety
•Small children must be kept away from the appliance.
•Only let bigger children work on the appliance under supervision.
Safety instructions |
3 |
|
|
•To avoid small children and pets unintentionally switching the appliance on, we recommend activation of the child safety device.
General safety
•The appliance may only be installed and connected by trained, registered service engineers.
•Built-in appliances may only be used after they have built in to suitable built-in units and work surfaces that meet standards.
•In the event of faults with the appliance or damage to the glass ceramic (cracks, scratches or splits), the appliance must be switched off and disconnected from the electrical supply, to prevent the possibility of an electric shock.
•Repairs to the appliance must only be carried out by trained registered service engineers.
Safety during use
•Overheated fats and oils can ignite very quickly. Warning! Fire hazard!
•There is the risk of burns from the appliance if used carelessly.
•Remove stickers and film from the glass ceramic.
•Cables from electrical appliances must not touch the hot surface of the appliance or hot cookware.
•Switch the cooking zones off after each use.
•Risk of burns! Do not place objects made of metal, such as knives, forks, spoons and saucepan lids on the cooking surface, as they can get hot.
Safety when cleaning
•For cleaning, the appliance must be switched off and cooled down.
•For safety reasons, the cleaning of the appliance with steam jet or highpressure cleaning equipment is not permitted.
How to avoid damage to the appliance
•The glass ceramic can be damaged by objects falling onto it.
•The edge of the glass ceramic can be damaged by being knocked by the cookware.
•Cookware made of cast iron, cast aluminium or with damaged bottoms can scratch the glass ceramic if pushed across the surface.
•Objects that melt and things that boil over can burn onto the glass ceramic and should be removed straightaway.
•To avoid damaging cookware and glass ceramics, do not allow saucepans or frying pans to boil dry.
•Do not use the cooking zones with empty cookware or without cookware.

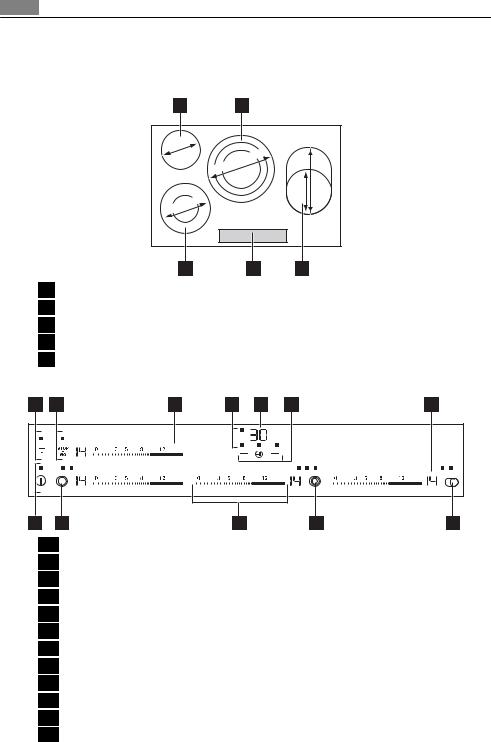
4 Description of the appliance
Description of the appliance
Cooking surface layout
1 |
2 |
|
mm |
|
|
145 |
mm |
|
|
|
|
|
145/210/270 |
|
|
170 |
265 |
|
mm |
mm |
mm |
|
|
120/180 |
|
|
5 4
1Single zone 1200W
2Triple ring zone 1050/1950/2700W
3Multi-purpose zone 1400/2200W
4Control panel
5Double ring zone 700/1700W
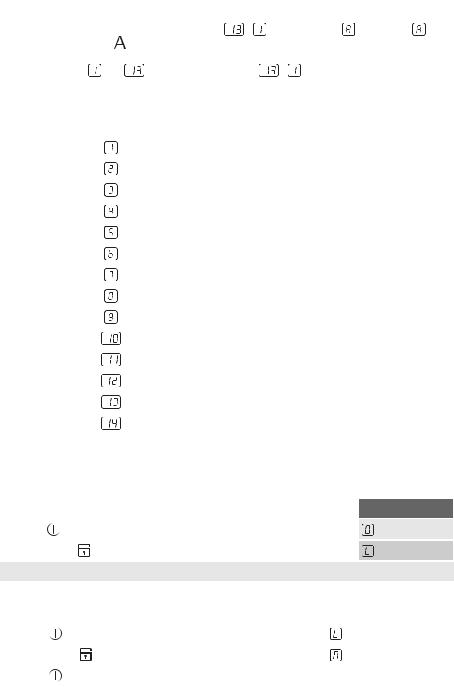
Control panel layout
|
A |
|
|
|
|
A |
|
A |
A |
12 |
11 |
10 |
9 |
8 |
1Child lock with a pilot light
2Stop+Go with a pilot light
3Automatic warm-up function
4Cooking zones' indicators of Timer
5Timer display
6Timer
7Heat setting indicator
8Multi-purpose zone with pilot lights
9Triple ring zone with pilot lights
10Heat setting selection
11Double ring zone with pilot lights
12On/Off with indicator
Description of the appliance |
5 |
|
|
Touch Control sensor fields
The appliance is operated using Touch Control sensor fields. Functions are controlled by touching sensor fields and confirmed by displays and acoustic signals. Only touch the sensor fields which activate a desired function. Do not cover other sensor fields.
If the control bar is touched for longer than 6 seconds, a signal sounds and the appliance switches itself off.
|
|
|
|
|
Sensor field |
Function |
|
|
|
|
|
On / Off |
Switches appliance on and off |
|
|
|
|
|
|
|
|
|
|
|
|
Child lock |
Locking control panel for children |
|
|
|
|
|
|
|
|
|
|
|
|
Triple ring |
To switch outer rings on and off |
|
|
|
|
|
|
|
|
|
|
|
|
Double ring |
To switch outer rings on and off |
|
|
|
|
|
|
|
|
|
|
|
|
Multi-purpose |
To switch outer rings on and off |
|
|
|
|
|
zone |
|
|
|
|
|
|
STOP+GO |
To switch the Keep Warm setting on/ off |
|
|
|
|
|
|
|
|
|
|
|
|
Automatic warm- |
To switch the automatic warm-up function on and off |
|
|
|
|
|
up |
|
|
|
|
|
|
|
|
|
|
|
|
|
Timer |
Timer selection |
|
|
|
|
|
||
|
|
|
|
|
|
|
|
|
|
|
|
Increase settings |
To increase Timer time |
|
|
|
|
|
|
|
|
|
|
|
|
Reduce settings |
To reduce Timer time |
|
|
|
|
|
||
|
|
|
|
|
|
|
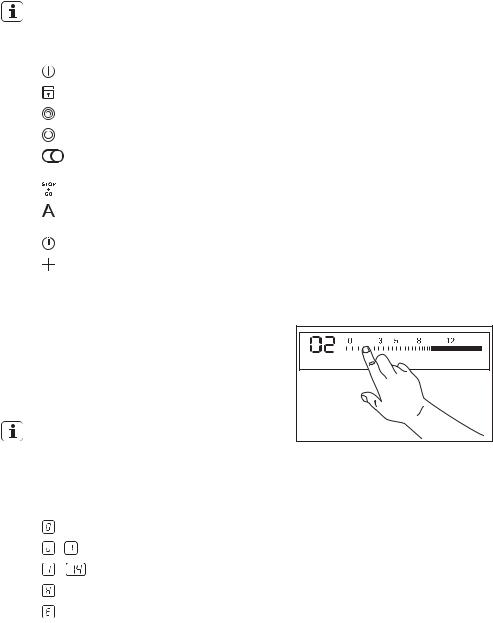
Control bar
The control bar is a special Touch Control field. The control bar is touched where the desired heat setting is positioned. The heat setting is shown in the display. Correct to the left or the right, if necessary. Do not release before the desired heat setting is reached.
If the control bar is touched for longer than 6 seconds, a signal sounds and the appliance switches itself off.
A
Displays
|
Display |
|
Description |
|
|
|
|
|
The cooking zone is switched off |
|
|
|
|
|
/ |
|
Keep Warm settings |
|
Keep Warm / STOP+GO function is switched on |
|
|
|
|
|
- |
|
Heat settings |
|
To set heat settings |
|
|
|
|
|
|
|
Automatic Warm-up |
|
The Automatic Warm-up function is switched on |
|
|
|
|
|
|
|
Fault |
|
Malfunction has occurred |
|
|
|
|
|
6 |
Operating the appliance |
|
|
|
|
|
|
|
|
|
|
|
|
|
|
Display |
|
Description |
|
|
|
Residual heat |
|
Cooking zone is still hot |
|
|
|
|
|
|
|
Child safety device |
|
Lock/Child safety device is set |
|
|
|
|
|
|
|
Automatic Switch off |
|
Switch off is active |
|
|
|
|
|
Residual heat indicator
The residual heat indicator lights up, as soon as one cooking zone is hot.
WARNING!
Risk of burns from residual heat! After you switch the appliance off, the cooking zones need some time to cool down. Look at the residual heat indicator.
Use residual heat for melting and keeping food warm.
Operating the appliance
Switching the appliance on and off
|
|
|
Control panel |
Display |
Pilot light |
|
|
|
|
|
|
Switch on |
|
Touch |
for 1 second |
/ |
lights up. |
Switch off |
|
Touch |
for 1 second |
/ none |
goes out. |
|
|
|
|
|
|
After switching on, within approx. 10 seconds a heat setting or a function must be set, otherwise the appliance automatically switches itself off.
Setting the heat setting
|
|
Control panel |
|
Display |
To set the heat |
|
Touch the desired heat setting, if necessary, correct |
/ |
to |
setting |
|
up or down |
|
|
|
|
|
|
|
Switch off |
|
Touch |
|
|
|
|
|
|
|
Switching the outside ring on and off
By switching the outside rings on or off, the effective heating surface can be matched to the size of the cookware.
Before an outside ring can be switched on, the inside ring must be switched on
Double ring zone |
|
Sensor field |
Pilot light |
To switch on outside ring |
Touch |
for 1-2 seconds |
Second pilot light lights up |
To switch off outside ring |
Touch |
for 1-2 seconds |
Second pilot light goes out |
|
|
|
|
|
|
|
|
Operating the appliance |
|
7 |
||
|
|
|
|
|
|
|
|
|
|
|
|
|
|
|
|
|
|
|
Triple cooking zone |
|
Sensor panel |
|
|
Pilot light |
|
|
|
To switch on the central ring |
Touch |
for 1-2 seconds. |
|
Second pilot light lights up |
|
||
|
To switch on the outside ring |
Touch |
for 1-2 seconds. |
|
Third pilot light lights up |
|
||
|
|
|
|
|
|
|
|
|
|
To switch off the outside ring |
Touch |
for 1-2 seconds. |
|
Third pilot light goes out |
|
||
|
To switch off the central ring |
Touch |
for 1-2 seconds. |
|
Second pilot light goes out |
|
||
|
|
|
|
|
|
|
|
|
|
Multi-purpose zone |
|
Sensor field |
|
|
Pilot light |
|
|
|
To switch on outside ring |
Touch |
for 1-2 seconds |
|
|
Second pilot light lights up |
||
|
To switch off outside ring |
Touch |
for 1-2 seconds |
|
|
Pilot light goes out |
|
|
|
|
|
|
|
|
|
|
|
Locking/unlocking the control panel
The control panel, with the exception of the “On/Off” sensor field, can be locked at any time in order to prevent the settings being changed e.g. by wiping over the panel with a cloth.
|
Control panel |
Display |
To switch on |
Touch |
(for 4 seconds) |
To switch off |
Touch |
previously set heat setting |
|
|
|
When you switch the appliance off, the locking function is automatically switched off.
Turning the STOP+GO function on and off
The STOP+GO function simultaneously toggles all active cooking zones to keep-warm mode then back to the heat setting they were at before
|
Control panel |
Display |
To switch on |
Touch |
|
To switch off |
Touch |
Previous heat setting (not automatic warm-up or power |
|
|
function) |
STOP+GO does not stop timer functions.
STOP+GO controls the entire control panel apart from the sensor field  .
.
Using the automatic warm-up function
All cooking zones are equipped with an automatic warm-up function. When setting a heat setting using the automatic warm-up function, the cooking zone switches to full power for a certain amount of time and then automatically switches back to the heat setting set.
Step |
Control Panel |
Display |
1. |
Touch |
|
|
|
|
8 |
Operating the appliance |
|
|
|
|
|
||
|
|
|
|
|
|
|
|
|
|
|
|
|
|
|
|
|
|
|
Step |
|
Control Panel |
|
|
Display |
|
|
|
2. |
Move your finger down |
/ |
after 5 seconds |
. As long as |
is |
||
|
|
from |
to select the de- |
displayed, the appliance works at full power. After |
||||
|
|
sired heat setting between |
the automatic warm up is completed, the heat |
|||||
|
|
and |
setting |
/ |
is displayed again. |
|
||
|
|
|
|
|
|
|
|
|
The length of time that the automatic warm up function operates depends on the heat setting selected.
Heat setting |
Length of the automatic warm up [min:sec] |
|
|
|
1:00 |
|
|
|
1:40 |
|
|
|
2:40 |
|
|
|
4:50 |
|
|
|
5:30 |
|
|
|
6:30 |
|
|
|
8:10 |
|
|
|
10:10 |
|
|
|
12:20 |
|
|
|
2:30 |
|
|
|
2:30 |
|
|
|
3:30 |
|
|
|
4:30 |
|
|
|
--- |
|
|
Using the child safety device
The child safety device prevents unintentional use of the appliance.
Switching on the child safety device
Step |
|
Control panel |
Display/Signal |
1. |
Switch on appliance. Do not set a heat setting. |
|
|
|
|
|
|
2. |
Touch |
for 4 seconds |
|
|
|
|
|
The child safety device is switched on.
Switching off the child safety device
Step |
|
Control panel |
Display/Signal |
1. |
Switch on appliance. Do not set a heat setting. |
|
|
2. |
Touch |
for 4 seconds |
lights up |
|
|
|
|
3. |
Switch appliance off. |
|
|
|
|
|
|
|
|
|
Operating the appliance |
|
9 |
|
|
|
|
|
|
|
|
|
|
|
|
|
|
|
|
Step |
Control panel |
|
Display/Signal |
|
|
|
|
|
|
|
|
|
The child safety device is switched off.
The child safety device can only be switched on and off if no heat setting is set.
Overriding the child safety device
The child safety device can be switched off in this way for a single cooking session; it remains activated afterwards.
Step |
|
Control panel |
Display/Signal |
1. |
Switch appliance on |
|
|
2. |
Touch |
for 4 seconds |
lights up |
|
|
|
|
Until the appliance is next switched off, it can used as normal. After switching off the appliance, the child safety device is active again.
After overriding the child safety device, a heat setting or a function must be set within approx. 10 seconds, otherwise the appliance automatically switches itself off.
Using the timer
Function |
Condition |
Outcome after the time has |
|
|
elapsed |
|
|
|
Automatic cut-out |
a heat setting is set |
acoustic signal |
|
|
00 flashes |
|
|
Cooking zone switches off |
Countdown timer |
cooking zones not in use |
acoustic signal |
|
|
00 flashes |
|
|
|
If just one countdown value is set you can change it only when the appliance is switched on.
If a heat setting is set on this cooking zone in addition to a countdown timer, the cooking zone is switched off after the time set has elapsed.
If a cooking zone is switched off, the timer function set is also switched off.
Selecting a cooking zone
Step |
Control panel |
Display |
||
|
|
|
|
|
1. |
Touch |
|
once |
Pilot light of the first cooking zone flashes |
|
||||
|
|
|
|
|
|
|
|
|
|
2. |
Touch |
|
once |
Pilot light of the second cooking zone flashes |
|
||||
|
|
|
|
|
3. |
Touch |
|
once |
Pilot light of the third cooking zone flashes |
|
||||
|
|
|
|
|
10 |
Operating the appliance |
||||
|
|
|
|
|
|
|
|
|
|
|
|
|
Step |
Control panel |
Display |
||
|
4. |
Touch |
|
once |
Pilot light of the fourth cooking zone flashes |
|
|
||||
|
|
|
|
|
|
If other timer functions are set, after a few seconds the shortest remaining time of all the timer functions is displayed and the corresponding pilot light flashes.
Setting the time
Step |
|
|
|
|
|
|
Control panel |
|
Display |
|
1. |
Select |
|
|
|
cooking zone |
|
Pilot light for the cooking zone selected |
|||
|
|
|||||||||
|
|
|
|
|
|
|
|
|
|
flashes |
|
|
|
|
|
|
|
|
|
||
2. |
Touch or |
/ |
|
|
|
00 to 99 minutes |
||||
|
|
|
||||||||
|
|
|
|
|||||||
After a few seconds the pilot light flashes more slowly. |
||||||||||
The time is set. |
|
|
|
|
|
|||||
The time counts down. |
|
|
||||||||
Switching off the timer function |
|
|
||||||||
|
|
|
|
|
|
|
|
|
||
Step |
|
|
|
|
|
Control panel |
|
Display |
||
|
|
|
|
|
|
|||||
1. |
Select |
|
|
|
cooking zone |
Pilot light of cooking zone selected flashes faster |
||||
|
||||||||||
|
|
|
|
|
|
|
|
|
Time remaining is displayed |
|
|
|
|
|
|
|
|
|
|||
2. |
Touch |
|
|
|
|
|
The time remaining counts backwards to 00 . |
|||
|
|
|
|
|||||||
|
|
|
|
|
|
|
|
|
|
|
The pilot light goes out.
The Timer function for the selected cooking zone is switched off.
Changing the time
Step |
|
|
|
|
Control panel |
|
Display |
|
1. |
|
|
Selecting a cooking zone |
|
Pilot light of the selected cooking zone |
|||
|
|
|
||||||
|
|
|
|
|
|
|
|
flashes more quickly |
|
|
|
|
|
|
|
|
Remaining time is displayed |
2. |
Touch |
or |
|
|
|
01 to 99 minutes |
||
|
|
|||||||
|
|
|||||||
After a few seconds the pilot light flashes more slowly. |
||||||||
The time is set. |
|
|
|
|
|
|||
The time counts down. |
|
|
||||||
Displaying the time remaining for a cooking zone |
||||||||
|
|
|
|
|
|
|||
Step |
|
|
Control panel field |
|
Display |
|||
1. |
|
|
Select cooking zone |
Pilot light of the cooking zone selected flashes faster |
||||
|
|
|||||||
|
|
|
|
|
|
|
The time remaining is displayed |
|
|
|
|
|
|
|
|
|
|
After a few seconds the pilot light flashes more slowly.
Switching off the acoustic signal
Step |
|
|
Control panel field |
Acoustic signal |
1. |
Touch |
|
|
Acoustic signal to acknowledge. |
|
||||
|
|
|
|
|
|
|
|
Tips on cooking and frying |
11 |
|
|
|
|
|
|
|
|
|
|
|
Step |
Control panel field |
Acoustic signal |
|
|
|
|
|
|
Acoustic signal stops.
Automatic switch off
Cooking surface
•If after switching on the cooking surface, a heat setting is not set for a cooking zone within approx. 10 seconds, the cooking surface automatically switches itself off.
•If one or more sensor fields are covered by objects (a pan, etc.) for longer than approx. 10 seconds, a signal sounds and the cooking surface switches off automatically.
•If all cooking zones are switched off, the cooking surface automatically switches itself off after approx. 10 seconds.
Control panel
•When the appliance is switched off, if one or more of the sensor fields on the control panel are covered for more than 10 seconds, an acoustic signal sounds. The acoustic signal switches itself off automatically when the sensor fields are no longer covered.
Cooking zones
•If one of the cooking zones is not switched off after a certain time, or if the heat setting
is not modified, the relevant cooking zone switches off automatically.  is displayed. Before being used again, the cooking zone must be set to
  .
.
Heat setting |
Switches off after |
- |
6 hours |
|
|
- |
5 hours |
- |
4 hours |
|
|
- |
1.5 hours |
|
|
Tips on cooking and frying
Information about acrylamides
According to the latest scientific research, intensive browning of food, especially in products containing starch, may present a health risk due to acrylamide. Therefore we recommend cooking at low temperatures and not browning foods too much.
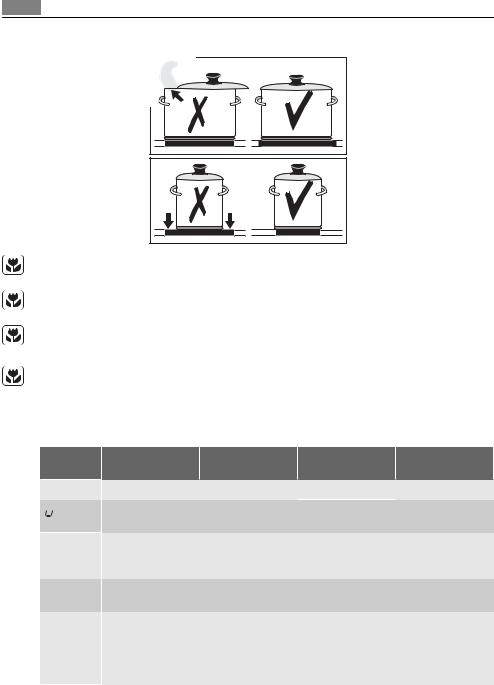
Cookware
•You can recognise good cookware from the bottoms of the pans. The bottom should be as thick and flat as possible.
•Cookware made of enamelled steel or with aluminium or copper bottoms can leave discolorations on the glass ceramic surface which are difficult or impossible to remove.
12 Tips on cooking and frying
Energy saving
Always place cookware on the cooking zone before it is switched on.
If possible, always place lids on the pans.
Switch cooking zones off before the end of the cooking time, to take advantage of residual heat.
Bottom of pans and cooking zones should be the same size.
Examples of cooking applications
The information given in the following table is for guidance only.
Heat set- |
Cooking process |
suitable for |
Cook time |
Tips/Hints |
ting |
|
|
|
|
0 |
|
Off position |
|
|
1 |
Keeping food warm |
Keeping cooked |
as required |
Cover |
|
|
foods warm |
|
|
1-3 |
Melting |
Hollandaise sauce, |
5-25 mins. |
Stir occasionally |
|
|
melting butter, |
|
|
|
|
chocolate, gelatine |
|
|
1-3 |
Solidifying |
Fluffy omelettes, |
10-40 mins. |
Cook with lid on |
|
|
baked eggs |
|
|
3-5 |
Simmering |
Simmering rice and |
25-50 mins. |
Add at least twice |
|
|
milkbased dishes |
|
as much liquid as |
|
|
Heating up ready- |
|
rice, stir milk dishes |
|
|
cooked meals |
|
part way through |
|
|
|
|
cooking |
|
|
|
|
Cleaning and care |
|
13 |
|
|
|
|
|
|
|
|
|
|
|
|
|
|
|
|
|
|
Heat set- |
Cooking process |
suitable for |
Cook time |
Tips/Hints |
|
|
|
ting |
|
|
|
|
|
|
|
5-7 |
Steaming |
Steaming vegeta- |
20-45 mins. |
With vegetables |
||
|
|
Braising |
bles, fish Braising |
|
add only a little liq- |
||
|
|
|
meat |
|
uid (a few table- |
||
|
|
|
|
|
spoons) |
|
|
|
7-9 |
Boiling |
Steaming potatoes |
20-60 mins. |
Use only a little liq- |
||
|
|
|
|
|
uid, e. g.: max. ¼ l |
||
|
|
|
|
|
water for 750 g of |
||
|
|
|
|
|
potatoes |
|
|
|
7-9 |
Boiling |
Cooking larger |
60-150 mins. |
Up to 3 l liquid plus |
||
|
|
|
quantities of food, |
|
ingredients |
|
|
|
|
|
stews and soups |
|
|
|
|
|
|
|
|
|
|
|
|
|
9-12 |
Gentle frying |
Frying escalope, |
as required |
Turn halfway |
|
|
|
|
|
veal cordon bleu, |
|
through cooking |
||
|
|
|
cutlets, rissoles, |
|
|
|
|
|
|
|
sausages, liver, |
|
|
|
|
|
|
|
roux, eggs, pan- |
|
|
|
|
|
|
|
cakes, doughnuts |
|
|
|
|
|
|
|
|
|
|
|
|
|
12-13 |
Heavy frying |
Hash browns, loin |
5-15 mins. per pan |
Turn halfway |
|
|
|
|
|
steaks, steaks, Flä- |
|
through cooking |
||
|
|
|
dle (pancakes for |
|
|
|
|
|
|
|
garnishing soup) |
|
|
|
|
|
14 |
Boiling Searing |
Boiling large quantities of water, cooking pasta, searing meat |
||||
|
|
Deep frying |
(goulash, pot roast), deep frying chips |
|
|
|
|
|
|
|
|
|
|
|
|
Cleaning and care
WARNING!
Sharp objects and abrasive cleaning agents will damage the appliance. Clean the appliance and remove the residues with water and washing up liquid after each use. Remove also the remnants of the cleaning agents!
Scratches or dark stains on the glass ceramic that cannot be removed do not affect the functioning of the appliance.
Cleaning the appliance after each use
1.Food containing sugar, plastics, tin foil residues should be removed at once using a scraper. Place a scraper on the glass ceramic surface at an angle and remove residues by sliding the blade over the surface. Wipe the appliance with a damp cloth and a little washing up liquid. Finally, rub the appliance dry using a clean cloth .
2.Limescale rings, water rings, fat splashes, shiny metallic discolorations should be removed after the appliance has cooled down using cleaner for glass ceramic or stainless steel.
14 What to do if...
What to do if...
Problem |
Possible cause |
Remedy |
|
The cooking zones will not |
More than 10 seconds have |
Switch the appliance on again. |
|
switch on or are not function- |
passed since the appliance was |
|
|
ing |
switched on |
|
|
|
The child safety device is |
Deactivate child safety device |
|
|
switched on |
(See the section “Child safety |
|
|
|
device”) |
|
|
|
|
|
|
Several sensor fields were |
Only touch one sensor field |
|
|
touched at the same time |
|
|
|
|
|
|
|
Automatic switch off has been |
Remove any objects (pan, |
|
|
triggered |
cloths, etc.) that are lying on |
|
|
|
the control panel. Switch the |
|
|
|
appliance on again |
|
|
|
|
|
|
There is water on the control |
Wipe the control panel |
|
|
panel, or the control panel is |
|
|
|
covered with splashes |
|
|
|
is active - |
Switch off |
|
|
|
|
|
Acoustic signal sounds when |
The control panel is wholly or |
Remove objects. |
|
appliance is switched off |
partly covered by objects. |
|
|
|
|
|
|
The residual heat indicator is |
The cooking zone was only on |
If the cooking zone is supposed |
|
not displaying anything |
for a short time and is therefore |
to be hot, call the Customer |
|
|
not hot |
Service Department. |
|
|
|
|
|
The automatic warm up func- |
There is still residual heat on |
Let the cooking zone cool down |
|
tion is not switching itself on |
the cooking zone |
|
|
|
The highest heat setting is set |
The highest heat setting has |
|
|
|
the same power as the auto- |
|
|
|
matic warm up function |
|
|
|
|
|
Acoustic signal sounds and ap- |
The On/Off sensor field has |
Do not place any objects on the |
|
pliance switches itself on and |
been covered up, e.g. by a cloth |
control panel |
|
then off again; after 5 seconds |
|
|
|
another acoustic signal sounds |
|
|
|
is lit |
Overheating protection for the |
Switch off the cooking zone. |
|
|
cooking zone has been trig- |
Switch the cooking zone on |
|
|
gered |
again |
|
and number are displayed |
Electronics fault |
Disconnect the appliance from |
|
|
|
the electrical supply for a few |
|
|
|
minutes (Take the fuse out of |
|
|
|
the house’s wiring system) If |
|
|
|
after switching on again, |
is |
|
|
displayed again, call the cus- |
|
|
|
tomer service department |
|
|
|
|
|
Disposal 15
If you are unable to remedy the problem by following the above suggestions, please contact your dealer or the Customer Care Department.
WARNING!
Repairs to the appliance are only to be carried out by qualified service engineers. Considerable danger to the user may result from improper repairs.
If the appliance has been wrongly operated, the visit from the customer service technician or dealer may not take place free of charge, even during the warranty period.
Disposal
The symbol  on the product or on its packaging indicates that this product may not be treated as household waste. Instead it should be taken to the appropriate collection point for the recycling of electrical and electronic equipment. By ensuring this product is disposed of correctly, you will help prevent potential negative consequences for the environment and human health, which could otherwise be caused by inappropriate waste handling of this product. For more detailed information about recycling of this product, please contact your local council, your household waste disposal service or the shop where you purchased the product.
Installation Instructions
Safety information
Safety instructions
WARNING!
This must be read!
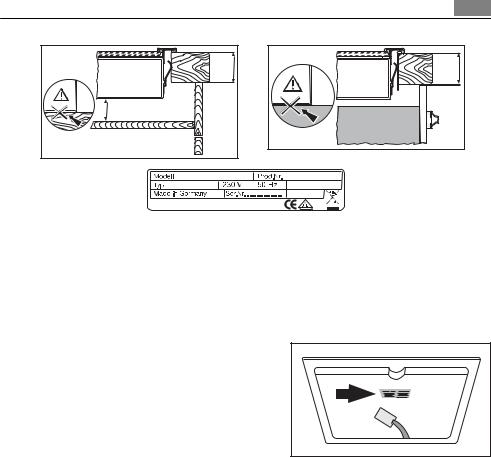
The laws, ordinances, directives and standards in force in the country of use are to be followed (safety regulations, proper recycling in accordance with the regulations, etc.) Installation may only be carried out by a qualified electrician. The minimum distances to other appliances and units are to be observed.
Anti-shock protection must be provided by the installation, for example drawers may only be installed with a protective floor directly underneath the appliance. The cut surfaces of the worktop are to be protected against moisture using a suitable sealant.
The sealant seals the appliance to the work top with no gap. When building in, protect the underside of the appliance from steam and moisture, e.g. from a dishwasher or oven. Avoid installing the appliance next to doors and under windows. Otherwise hot cookware may be knocked off the rings when doors and windows are opened.

16 Safety information
WARNING!
Risk of injury from electrical current.
•The electrical mains terminal is live.
•Make electrical mains terminal free of voltage.
•Follow connection schematic.
•Observe electrical safety rules.
•Ensure anti-shock protection by installing correctly.
•The appliance must be connected to the electrical supply by a qualified electrician.
•Loose and inappropriate plug and socket connections can make the terminal overheat.
•Have the clamping connections correctly installed by a qualified electrician.
•Use strain relief clamp on cable.
•In the event of single-phase or two-phase connection, the appropriate mains cable of type H05BB-F Tmax 90°C (or higher) must be used.
•If this appliance’s mains cable is damaged, it must be replaced by a special cable (type H05BB-F Tmax 90°C; or higher). Please contact your local Service Force Center for further
advice.
A device must be provided in the electrical installation which allows the appliance to be disconnected from the mains at all poles with a contact opening width of at least 3 mm Suitable isolation devices include line protecting cut-outs, fuses (screw type fuses are to be removed from the holder), earth leakage trips and contactors.
Assembly |
|
|
|
min. 500mm |
|
|
min. |
|
|
50mm |
|
|
600 |
|
min. 55 |
750+1 |
|
490+1 |
||
|
||
|
R5 |
min. 55
1 |
2 |
|
Service |
17 |
min. |
min. |
|
25 mm |
38 mm |
|
min. 20 mm |
|
|
86731K-MN |
949593121 |
|
55HBD68AO |
|
|
7,8 kW
AEG-ELECTROLUX
Service
In the event of technical faults, please first check whether you can remedy the problem yourself with the help of the operating instructions (section “What to do if…”).
If you were not able to remedy the problem yourself, please contact the Customer Care Department or one of our service partners.
In order to be able to assist you quickly, we require the following information:
– Three-digit-letter combination
for glass ceramic
– Model description
– Product number (PNC)
–Serial number
(S No. - see the rating plate)
–Type of fault
– Any error messages displayed by the appliance
18 Inhalt
Danke, dass Sie sich für eines unserer hochqualitativen Produkte entschieden haben.
Lesen Sie für eine optimale und gleichmäßige Leistung Ihres Gerätes diese Benutzerinformation bitte sorgfältig durch. Sie wird Ihnen helfen, alle Vorgänge perfekt und äußerst effizient zu steuern. Damit Sie diese Benutzerinformation bei Bedarf stets zur Hand haben, empfehlen wir Ihnen, sie an einem sicheren Ort aufzubewahren. Und geben Sie diese Benutzerinformation bitte an einen eventuellen neuen Besitzer dieses Gerätes weiter.
Wir wünschen Ihnen viel Freude mit Ihrem neuen Gerät.
Inhalt
Gebrauchsanweisung |
18 |
Sicherheitshinweise |
18 |
Gerätebeschreibung |
20 |
Bedienung des Geräts |
22 |
Tipps zum Kochen und Braten |
27 |
Wartung und Reinigung |
29 |
Was tun, wenn... |
30 |
Entsorgung |
31 |
Installationsanweisungen |
32 |
Sicherheitshinweise |
32 |
Kundendienst |
33 |
Änderungen vorbehalten
Gebrauchsanweisung
Sicherheitshinweise
WARNUNG!
Bitte halten Sie sich an die vorliegenden Anweisungen. Andernfalls entfällt bei auftretenden Schäden der Garantieanspruch.
Bestimmungsgemäße Verwendung
•Personen (einschließlich Kinder), die aufgrund ihrer physischen, sensorischen oder geistigen Fähigkeiten oder ihrer Unerfahrenheit oder Unkenntnis nicht in der Lage sind, das Gerät sicher zu benutzen, sollten dieses Gerät nicht ohne Aufsicht oder Anweisung durch eine verantwortliche Person benutzen.
•Lassen Sie das Gerät bei Betrieb nicht unbeaufsichtigt.
•Dieses Gerät darf nur für das haushaltsübliche Kochen und Braten von Speisen verwendet werden.
•Das Gerät darf nicht als Arbeitsoder Abstellfläche verwendet werden
•Umbauten oder Veränderungen am Gerät sind nicht zulässig.
•Brennbare Flüssigkeiten, leicht entzündliche Materialien oder schmelzbare Gegenstände (z.B. Folien, Kunststoff, Aluminium) nicht auf dem Gerät oder in dessen Nähe abstellen oder lagern

Sicherheitshinweise 19
Sicherheit für Kinder
•Kleinkinder grundsätzlich vom Gerät fernhalten.
•Größere Kinder nur unter Anleitung und Aufsicht am Gerät arbeiten lassen.
•Um ein unbeabsichtigtes Einschalten durch Kleinkinder und Haustiere zu verhindern, empfehlen wir, die Kindersicherung zu aktivieren.
Allgemeine Sicherheit
•Montage und Anschluss des Gerätes dürfen nur durch ausgebildete und autorisierte Fachkräfte vorgenommen werden.
•Einbaugeräte dürfen nur nach dem Einbau in normgerechte, passende Einbauschränke und Arbeitsplatten betrieben werden.
•Bei Störungen am Gerät oder bei Schäden an der Glaskeramik (Sprünge, Brüche bzw. Risse) muss das Gerät ausgeschaltet und von der Netzversorgung getrennt werden, um einen möglichen elektrischen Schlag zu vermeiden.
•Reparaturen am Gerät dürfen nur von ausgebildeten und autorisierten Fachkräften durchgeführt werden.
Sicherheit während der Benutzung
•Überhitzte Fette und Öle entzünden sich sehr schnell. Warnung! Brandgefahr!
•Am Gerät besteht beim unachtsamen Arbeiten Verbrennungsgefahr.
•Aufkleber und Folien von der Glaskeramik entfernen.
•Kabel von Elektrogeräten dürfen nicht an die heiße Geräteoberfläche bzw. heißes Kochgeschirr gelangen.
•Schalten Sie nach jedem Gebrauch die Kochzonen aus.
•Verbrennungsgefahr! Legen Sie keine Metallgegenstände wie Messer, Gabeln, Löffel oder Deckel auf die Oberfläche des Kochfelds, da diese heiß werden können.
Sicherheit beim Reinigen
•Zum Reinigen muss das Gerät ausgeschaltet und abgekühlt sein.
•Die Reinigung des Gerätes mit einem Dampfstrahloder Hochdruckreiniger ist aus Sicherheitsgründen nicht zugelassen.
Vermeidung von Schäden am Gerät
•Die Glaskeramik kann durch herabfallende Gegenstände beschädigt werden.
•Stöße mit dem Kochgeschirr können den Rand der Glaskeramik beschädigen.
•Kochgeschirr aus Gusseisen, Aluguss oder mit beschädigten Böden können beim Verschieben die Glaskeramik verkratzen.
•Schmelzbare Gegenstände und Überkochendes können auf der Glaskeramik einbrennen und sollten sofort entfernt werden.
•Das Leerkochen von Töpfen und Pfannen vermeiden. Es kann Beschädigungen am Kochgeschirr oder der Glaskeramik verursachen.
•Die Kochzonen nicht mit leerem oder ohne Kochgeschirr benutzen.
20 Gerätebeschreibung
Gerätebeschreibung
Ausstattung Kochfeld
1 |
2 |
|
mm |
|
|
145 |
mm |
|
|
|
|
|
145/210/270 |
|
|
170 |
265 |
|
mm |
mm |
mm |
|
|
120/180 |
|
|
5 4
1Einkreis-Kochzone 1200 W
2Dreikreis-Kochzone 1050/1950/2700W
3Bräterzone 1400/2200W
4Bedienfeld
5Zweikreis-Kochzone 700/1700 W
Ausstattung Bedienfeld
|
A |
|
|
|
|
A |
|
A |
A |
12 |
11 |
10 |
9 |
8 |
1Kindersicherung mit Kontrolllampe
2Stop+Go mit Kontrolllampe
3Ankoch-Automatik
4Kochzonen-Anzeigen Timer-Funktion
5Timer-Anzeige
6Timer
7Kochstufenanzeige
8Bräter-Kochzone mit Kontrolllampen
9Dreikreis-Kochzone mit Kontrolllampen 10 Kochstufenauswahl
11 Zweikreis-Kochzone mit Kontrolllampen
12 Ein/Aus mit Anzeige
Gerätebeschreibung 21
Touch Control-Sensorfelder
Das Gerät wird mit Touch Control-Sensorfeldern bedient. Die Funktionen werden durch Berühren der Sensorfelder gesteuert und durch Anzeigen und akustische Signale bestätigt. Berühren Sie nur die Sensorfelder, welche die gewünschte Funktion aktivieren. Decken Sie andere Sensorfelder nicht ab.
Wird die Bedienleiste länger als 6 Sekunden berührt, ertönt ein akustisches Signal und das Gerät schaltet sich ab.
|
|
|
|
|
Sensorfeld |
Funktion |
|
|
|
|
|
Ein / Aus |
Einund Ausschalten des Gerätes |
|
|
|
|
|
|
|
|
|
|
|
|
Kindersicherung |
Bedienfeld für Kinder sperren |
|
|
|
|
|
|
|
|
|
|
|
|
Dreikreis-Kochzo- |
Äußere Heizkreise einund ausschalten |
|
|
|
|
|
ne |
|
|
|
|
|
|
|
|
|
|
|
|
|
Zweikreis |
Äußere Heizkreise einund ausschalten |
|
|
|
|
|
|
|
|
|
|
|
|
Bräterzone |
Äußere Heizkreise einund ausschalten |
|
|
|
|
|
|
|
|
|
|
|
|
STOP+GO |
Warmhaltestufe ein-/ausschalten |
|
|
|
|
|
|
|
|
|
|
|
|
Ankoch-Automatik |
Ankoch-Automatik einschalten/ausschalten |
|
|
|
|
|
|
|
|
|
|
|
|
Timer |
Timer Auswahl |
|
|
|
|
|
||
|
|
|
|
|
|
|
|
|
|
|
|
Einstellungen er- |
Timer-Zeit erhöhen |
|
|
|
|
|
höhen |
|
|
|
|
|
|
|
|
|
|
|
|
|
Einstellungen ver- |
Timer-Zeit verringern |
|
|
|
|
|
||
|
|
|
|
|
ringern |
|
|
|
|
|
|
|
|
Bedienleiste
Die Bedienleiste ist ein besonderes Touch-Con- trol-Feld. Die Bedienleiste an der Position der gewünschten Kochstufe berühren. Die Kochstufe wird in der Anzeige angezeigt. Eventuell nach links oder rechts korrigieren. Nicht loslassen, bevor die gewünschte Kochstufe erreicht ist
Wird die Bedienleiste länger als 6 Sekunden berührt, ertönt ein akustisches Signal und das Gerät schaltet sich ab.
A
Anzeigen
|
Anzeige |
|
Beschreibung |
|
|
|
|
|
|
|
|
|
|
Kochzone ist ausgeschaltet |
|
|
|
|
|
/ |
|
Warmhaltestufe |
|
WarmhaltestufeSTOP+GO-Funktion ist einge- |
|
|
|
|
schaltet |
|
|
|
|
|
- |
|
Kochstufen |
|
Kochstufen einstellen |
|
|
|
|
|
22 |
Bedienung des Geräts |
|
|
|
|
|
|
|
|
|
|
|
|
|
|
Anzeige |
|
Beschreibung |
|
|
|
Ankoch-Automatik |
|
Ankoch-Automatik ist aktiv |
|
|
|
|
|
|
|
Fehler |
|
Fehlfunktion ist aufgetreten |
|
|
|
|
|
|
|
Restwärme |
|
Kochzone ist noch warm |
|
|
|
|
|
|
|
Kindersicherung |
|
Verriegelung/Kindersicherung ist eingeschaltet |
|
|
|
|
|
|
|
automatische Abschal- |
|
Abschaltung ist aktiv |
|
|
tung |
|
|
|
|
|
|
|
Restwärmeanzeige
Die Restwärmeanzeige leuchtet auf, sobald eine Kochzone heiß ist.
WARNUNG!
Verbrennungsgefahr durch Restwärme! Nach dem Ausschalten des Gerätes benötigen die Kochzonen eine gewisse Zeit zum Abkühlen. Restwärmeanzeige beachten.
Restwärme kann zum Schmelzen und Warmhalten von Speisen genutzt werden.
Bedienung des Geräts
Gerät einund ausschalten
|
|
|
Bedienfeld |
Anzeige |
Kontrolllampe |
Einschalten |
|
1 Sekunde |
berühren |
/ |
leuchtet. |
Ausschalten |
|
1 Sekunde |
berühren |
/ keine |
erlischt. |
|
|
|
|
|
|
Nach dem Einschalten muss innerhalb von ca. 10 Sekunden eine Kochstufe oder eine Funktion eingestellt werden, sonst schaltet sich das Gerät automatisch aus
Kochstufe einstellen
|
|
Bedienfeld |
|
Anzeige |
Kochstufe ein- |
|
die gewünschte Kochstufe mit dem Finger berühren, |
/ |
bis |
stellen |
|
gegebenenfalls nach oben oder unten korrigieren |
|
|
|
|
|
|
|
ausschalten |
|
berühren |
|
|
|
|
|
|
|
Äußere Heizkreise einund ausschalten
Durch Einoder Ausschalten der äußeren Heizkreise können die Heizflächen der Größe des Kochgeschirrs anpasst werden.
Vor dem Einschalten eines äußeren Heizkreises muss jeweils der innere Heizkreis eingeschaltet sein
 Loading...