


 Loading...
AirConnect®
Wireless PCI Card
User Guide
3CRWE777A
http://www.3com.com/
http://www.3com.com/productreg
Part No. 09-2006-000
Published October 2000
3Com Corporation ■ 5400 Bayfront Plaza ■ Santa Clara, California, U.S.A.
95052-8145
Copyright © 2000 3Com Corporation. All rights reserved. No part of this documentation may be reproduced in any form or by any means or used to make any derivative work (such as translation, transformation, or adaptation) without written permission from 3Com Corporation.
3Com Corporation reserves the right to revise this documentation and to make changes in content from time to time without obligation on the part of 3Com Corporation to provide notification of such revision or change.
3Com Corporation provides this documentation without warranty, term, or condition of any kind, either implied or expressed, including, but not limited to, the implied warranties, terms or conditions of merchantability, satisfactory quality, and fitness for a particular purpose. 3Com may make improvements or changes in the product(s) and/or the program(s) described in this documentation at any time.
If there is any software on removable media described in this documentation, it is furnished under a license agreement included with the product as a separate document, in the hard copy documentation, or on the removable media in a directory file named LICENSE.TXT or !LICENSE.TXT. If you are unable to locate a copy, please contact 3Com and a copy will be provided to you.
UNITED STATES GOVERNMENT LEGEND
If you are a United States government agency, then this documentation and the software described herein are provided to you subject to the following:
All technical data and computer software are commercial in nature and developed solely at private expense. Software is delivered as “Commercial Computer Software” as defined in DFARS 252.227-7014 (June 1995) or as a “commercial item” as defined in FAR 2.101(a) and as such is provided with only such rights as are provided in 3Com’s standard commercial license for the Software. Technical data is provided with limited rights only as provided in DFAR 252.227-7015 (Nov 1995) or FAR 52.227-14 (June 1987), whichever is applicable. You agree not to remove or deface any portion of any legend provided on any licensed program or documentation contained in, or delivered to you in conjunction with, this User Guide.
Unless otherwise indicated, 3Com registered trademarks are registered in the United States and may or may not be registered in other countries.
3Com, the 3Com logo, and AirConnect are registered trademarks of 3Com Corporation.
Microsoft, MS-DOS, Windows, and Windows NT are registered trademarks of Microsoft Corporation.
All other company and product names may be trademarks of the respective companies with which they are associated.
EXPORT RESTRICTIONS: This product or software contains encryption code which may not be exported or transferred from the U.S. or Canada without an approved US Department of Commerce export license.

CONTENTS
1 |
OVERVIEW |
|
|
|
|
|
|
Introduction |
1 |
|
|
|
|
|
Package Checklist |
1 |
|
|
|
|
|
Hardware Description |
2 |
|
|
||
|
Features |
2 |
|
|
|
|
|
Applications 2 |
|
|
|
|
|
|
Status LED Indicator |
3 |
|
|||
|
System Requirements |
4 |
|
|
||
2 |
|
|
|
|
|
|
INSTALLATION |
|
|
|
|
||
|
Introduction |
5 |
|
|
|
|
|
Card Installation Procedure |
5 |
|
|||
|
Windows 95/98/2000/Me Driver Installation Procedure 7 |
|||||
|
Windows NT 4.0 Driver Installation Procedure |
9 |
||||
|
|
|||||
3 NETWORK CONFIGURATION AND PLANNING |
||||||
|
Introduction |
13 |
|
|
|
|
|
Network Topologies |
13 |
|
|
||
|
Ad hoc Wireless LAN |
13 |
|
|||
|
Infrastructure Wireless LAN 14 |
|
||||
|
Setting the Communication Domain 15 |
|
||||
|
Stationary Wireless PCs |
15 |
|
|||
|
Roaming Wireless PCs |
15 |
|
|||
|
|
|||||
4 CONFIGURATION AND DIAGNOSTIC UTILITY |
||||||
|
Introduction |
17 |
|
|
|
|
|
Installing the Wireless LAN Configuration Utility |
17 |
||||
|
Using the Wireless LAN Configuration Utility |
17 |
||||
|
Link Information Screen |
18 |
|
|||
|
Configuration Screen |
19 |
|
|||
|
Encryption Screen |
21 |
|
|
||

5 TROUBLESHOOTING
Introduction 23
Preliminary Troubleshooting 23
PCI Compatibility 23
Network Connection Problems 24
6 TECHNICAL SPECIFICATIONS
Specifications 27
A TECHNICAL SUPPORT
Online Technical Services |
29 |
World Wide Web Site |
29 |
3Com FTP Site 29 |
|
Support from Your Network Supplier 30
Support from 3Com 30
Returning Products for Repair 32
INDEX
WARRANTY AND REGULATORY COMPLIANCE

1 OVERVIEW
Introduction
3Com's Wireless PCI Card is an 11 Mbps wireless network adapter that seamlessly integrates with existing Ethernet networks to support applications such as mobile users or temporary conferences. This solution offers a high data rate and reliable wireless connectivity with considerable cost savings over wired LANs (which include long-term maintenance overhead for cabling). Just install PCI adapters into your notebook PCs, and start networking.
Using this card in conjunction with 3Com's AirConnect Access Point, you can create an instant network that integrates seamlessly with 10 Mbps Ethernet LANs. Moreover, moving or expanding your network is as easy as moving or installing additional access points - no wires!
Package Checklist
The Wireless PCI Card package includes:
■One wireless PCI card (3CRWE777A)
■One CD containing drivers and utilities
■This Wireless PCI Card User Guide
■One registration card (please complete and return)
Please inform your dealer if there are any incorrect, missing or damaged parts. If possible, retain the carton, including the original packing materials. Use them again to repack the product in case there is a need to return it for repair.

2 CHAPTER 1: OVERVIEW
Hardware Description
3Com's Wireless PCI Card supports 1, 2, 5.5, and 11 Mbps half-duplex connections to Ethernet networks. This card is fully compliant with 2.4GHz DSSS CSMA/CA wireless networking as defined in IEEE 802.11b. It is designed to complement PCI Local Bus computers. It supports Windows 95/98/NT/2000/Me.
Features
■1, 2, 5.5, and 11 Mbps data rate.
■Wireless connection without the difficulties and cost of cabling
■Greater flexibility to locate or move networked PCs
■Integrates with or replaces wired LANs at dramatically lower cost than wired alternatives
■Seamless connectivity to wired Ethernet LANs augments existing networks quickly and easily
■Easy installation
■Operating range up to 30m (100 ft) at 11 Mbps , up to 100m (300 ft) at 5.5 Mbps and lower
■Point-to-point and point-to-multipoint access
■Direct Sequence Spread-Spectrum (DSSS) technology provides robust, interference-resistant and secure wireless connection
■Supports a wide range of operating systems (Win95/98/NT/2000/Me)
■Plug-and-Play
■Provides a user-friendly interface for configuration
■Enhances your network security with WEP data encryption
Applications
3Com wireless products offer a fast, reliable, cost-effective solution for wireless client access to the network in applications like these:
■Remote access to corporate network information: E-mail, file transfer and terminal emulation.

Hardware Description |
3 |
■Difficult-to-wire environments:
Historic or old buildings, asbestos installations, and open areas where wiring is difficult to employ.
■Frequently changing environments:
Retailers, manufacturers and banks who frequently rearrange the workplace and change location.
■Temporary LANs for special projects or peak times:
Trade shows, exhibitions and construction sites that need a temporary setup for a short time period.
Retailers, airline, and shipping companies that need additional workstations for peak periods.
Auditors who require workgroups at customer sites.
■Access to database for mobile workers:
Doctors, nurses, retailers, and white-collar workers who need access to databases while being mobile in the hospital, retail store, or office campus.
■SOHO (Small Office and Home Office) users:
SOHO environments needing easy and quick installation of a small computer network.
Status LED Indicator
The Wireless PCI Card includes one status LED indicator, as described in the following figure and table.
Figure 1

4 CHAPTER 1: OVERVIEW
Always On |
Blinking |
Off |
■Power is being supplied to the PCI card.
■A valid connection to the network exists.
■The PCI card is transmitting or receiving data.
The PCI card is attempting to associate with an access point.
No power is being supplied to the PCI card.
System Requirements
Before you install the wireless PCI card, check your system for the following requirements:
■Windows 95/98/NT/2000/Me operating system (prepare the Windows installation CD-ROM for use during installation).
■A minimum of 500 Kbytes of free disk space for installing the driver and utility program.
■Other IEEE 802.11b-compliant devices installed in your service area (such as 3Com's AirConnect access point and wireless PC card.

2 INSTALLATION
Introduction
Before Installing the 3Com Wireless PCI Card, be sure you read and follow the precautions listed here:
■Network cards are sensitive to static electricity.
To protect the card, always touch the metal chassis of your computer before handling the card.
■Be sure to turn off power to your computer before you plug in or remove a wireless PCI card.
Card Installation Procedure
1Turn off power to your desktop computer and unplug the power cord.
2Remove the cover of your computer.
3Locate an empty PCI slot and remove its slot cover. Save the screw.
4Carefully insert the PCI card into the selected slot until it seats snugly (see Figure 2). The shielded part of the wireless PCI card protrudes from the card faceplate and juts out beyond the back panel of your computer when the card is installed.
CAUTION: DO NOT REMOVE the shielded part of the
!PCI card from the printed circuit carrier.
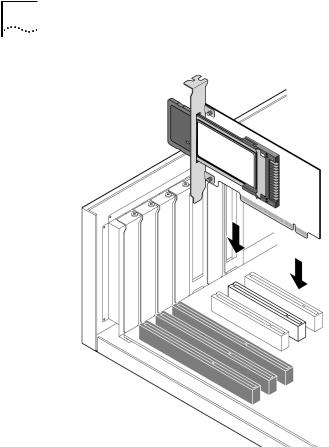
6 CHAPTER 2: INSTALLATION
Figure 2
5Secure the card with the screw that you removed earlier.
6Replace the cover of your PC and plug in the power cord.
7Turn on the power to your computer.
8Depending on your operating system, proceed to either “Windows 95/98/2000/Me Driver Installation Procedure” or “Windows NT 4.0 Driver Installation Procedure”.

Windows 95/98/2000/Me Driver Installation Procedure |
7 |
Windows 95/98/2000/Me Driver Installation Procedure
Your End User Utilities CD contains all the software drivers available for the 3Com Wireless PCI Card. New or updated drivers can be downloaded from 3Com's web site at http://www.3Com.com.
1Windows 95/98/2000/Me will automatically detect the new hardware and prompt you to install the driver. Click "Next" to find the driver.
2Insert the CD and click "Next".
3Specify the CD drive and click "Next". The setup program automatically finds the appropriate .INF file and driver for your operating system.
4Click "Next" to copy files from the CD.
5The Adapter Properties window appears, showing the Advanced tab screen.

8 CHAPTER 2: INSTALLATION
6If you are setting up an ad hoc wireless LAN, set "Channel" to the same radio channel as that used by the other wireless clients in your group. However, if you are connecting to a network via an access point, then use the same channel as that used by the access point (access point default: 3).
7Set "Mode" to ad hoc or infrastructure, depending on the type of network you want to connect to. Click OK (default: infrastructure).
8Set "RTS Threshold" to the same as that used by the other devices in your network (access point default: 2432).
9Set the "SSID" identifier to the same as that used by the ad hoc workgroup or access point you want to connect to (access point default: 101).
10For more secure data transmission, set the "Use WEP" to "Enabled" to ensure wireless network security. The advanced Wired Equivalent Privacy (WEP) is implemented in this card to prevent unauthorized access (default: Disabled).
If the access point you wish to connect to is set for encryption, you must also enable encryption on the wireless client. Click Encryption in the Wireless LAN Configuration Utility to go to screens where you can enable and configure encryption.
You must set the wireless client for the same encryption algorithm and shared key values as the access point it will associate with. Save the configuration settings and exit by clicking OK.
11Click "OK". At this point, depending on how your computer is configured, Windows 98/98SE may prompt you to insert the Windows 98/98SE installation CD to copy required system files. Follow the instructions displayed, then click "Finish."
12Restart your computer when prompted.

Windows NT 4.0 Driver Installation Procedure |
9 |
Windows NT 4.0 Driver Installation Procedure
1From the Windows desktop, select "Control Panel," double-click "Network," click "Adapters," and then click the "Add" button on the Network dialog box.
2Windows NT will present a list of all its supported adapters. Click "Have Disk" to continue.
3Windows NT will ask for the drive/path containing the Windows NT drivers. Insert the CD into the drive, specify the drive letter of the CD, then click "OK."
4When prompted, select 3Com 3CRWE777A WLAN PCI adapter, then click "OK."
5Windows NT will attempt to locate the SYS and INF files in the specified path. If you have entered the path name correctly, Windows NT should copy the appropriate drivers to the Windows NT system. You must confirm the selection by clicking "OK."
6The Adapter Properties dialog box appears. Configure the card as described below, and click "OK."

10CHAPTER 2: INSTALLATION
■Mode - Set to "ad hoc" or "infrastructure", depending on the type of network you want to connect to.
■SSID - Set the "SSID" identifier to the same as that used by the ad hoc workgroup or access point you want to connect to. (access point default: 101).
■Channel - If you are setting up an ad hoc wireless LAN, set the channel number to the same radio channel used by the other wireless clients in your group. However, if you are connecting to a network via an access point, then use the same channel as that used by the access point (access point default: 3).
■RTS Threshold - Set the RTS threshold to the same as that used by the other devices in your network (default: Disabled).
■Use WEP - For more secure data transmission, set this field to "Enabled" to ensure wireless network security. Wired Equivalent Privacy (WEP) is implemented in the PCI card to prevent unauthorized access (default: Disabled).
If the access point you wish to connect to is set for encryption, you must also enable encryption on the wireless client. Click Encryption in the Wireless LAN Configuration Utility to go to screens where you can enable and configure encryption.
You must set the wireless client for the same encryption algorithm and shared key values as the access point it will associate with. Save settings and exit by clicking OK.
7If desired, select the Services tab and Click "Add..." to install the network protocols you want to use, such as IPX/SPX, NetBEUI or TCP/IP.
If you install TCP/IP, be sure to set the appropriate gateway, DNS server, and domain for your network. If you install an IPX/SPX-compatible protocol, then you also need to install the Client for NetWare Networks.
8Click "Close."
Loading...