


3C905B

This manual covers installation and operating instructions for the following 3Com® U.S. Robotics
®
modems:
Sportster® Voice 33.6 kbps internal modems
3Com, the 3Com logo, U.S. Robotics, the USRobotics logo, and Sportster are registered
trademarks; Connections, Total Control, Courier, RapidComm, x2, and the x2 logo are trademarks
and Towne Square 2000 is a service mark of 3Com Corporation or its subsidiaries. Windows and
Internet Explorer are registered trademarks of Microsoft Corp. CompuServe is a registered
trademark of CompuServe Inc. America Online is a registered trademark of America Online Inc.
Netscape Navigator is a trademark of Netscape Communications Corp. Any other trademarks, trade
names, or service marks used in this manual are the property of their respective owners.
Copyright © 1997 3Com Corporation or its subsidiaries
7770 North Frontage Road
Skokie, IL 60077-2690
All Rights Reserved

TABLE OF CONTENTS
Before You Begin (Windows 95 Users) 1
Determining Available Resources 1
Determining Your Version of Windows 95 2
Upgrading to x2 Technology 2
Modem Installation with Windows 3.x 3
A Word About COM Ports and IRQs 3
How to Use ComTest to Determine Your Modem’s Settings 5
Testing an Installed Modem 7
What to Do with ComTest’s Recommendation 8
How to Change the Modem’s Settings 10
How to Insert the Modem into the Computer 12
Modem Installation with Windows 95 19
How to Prepare for Plug and Play Installation 19
How to Insert the Modem into the Computer 21
Installing the Modem Drivers 25
Software Installation and Testing 33
Software Installation and Registration Using the Setup Wizard 33
Sending Your First Fax 48
ii

TABLE OF CONTENTS
Installing Other Fax/Data Software 52
Type of Modem 52
Initialization String 52
Flow Control 52
U.S. Robotics Modem Update Wizard 53
Installation 53
Operation 58
Using Modem Station 65
Troubleshooting and Online Help Resources 89
When Plug and Play Fails 95
Online Help Resources 96
Are You Still Having Problems? 100
If You Need to Return the Modem to Us 101
RapidComm Voice Troubleshooting Tips 102
A Note to Users with Older Versions of RapidComm Voice on Their Systems 102
Glossary 103
Technical Quick Reference 113
AT Command Summary 114
S Registers 128
Regulatory Information 138
Manufacturer’s Declaration of Conformity 138
iii

TABLE OF CONTENTS
Caution to the User 139
IC (Canada) 139
UL Listing/CUL Listing 139
Connecting to the Telephone Company 140
Fax Branding 140
Radio and Television Interference 141
For Canadian Modem Users 142
Limited Warranty 145
Index 148
iv

BEFORE YOU BEGIN (WINDOWS
®
95 USERS)
Determining Available
Resources
Your Sportster® Voice modem is a Plug and
Play device. Windows™ 95 can automatically
identify a Plug and Play device and determine if
your system has the resources necessary to
support the device. However, Plug and Play
will not work if you do not have resources
available or if devices on your system are not
reporting resource usage correctly. Here’s
how you can verify that your system has the
necessary resources before installing the
modem:
1. Click the Windows 95 Start button, point
to Settings, and then click Control Panel.
2. Double-click the System icon.
3. When the “System Properties” screen
appears, click the Device Manager tab.
4. Double-click Computer and the
“Computer Properties” screen appears.
5. Select the option at the top of the screen to
show Interrupt Requests (IRQs).
You will see the IRQs your system is currently
using. If IRQs 3, 4, 5, and 7 are being used,
you need to free an IRQ before you begin
installation. This process involves moving a
device from the IRQ you want to use to a
different (and usually higher) IRQ setting.
Please read the documentation for (or contact
the manufacturer of) the device that is currently
using the IRQ you want to use for your modem
to learn more about how to free the IRQ for
your modem.
1
BEFORE YOU BEGIN (WINDOWS 95 USERS)
Determining Your Version of
Windows 95
Follow these steps to determine your version
of Windows 95. This information will be
important during installation.
1. Click the My Computer icon on your
desktop with the right mouse button.
2. Click Properties.
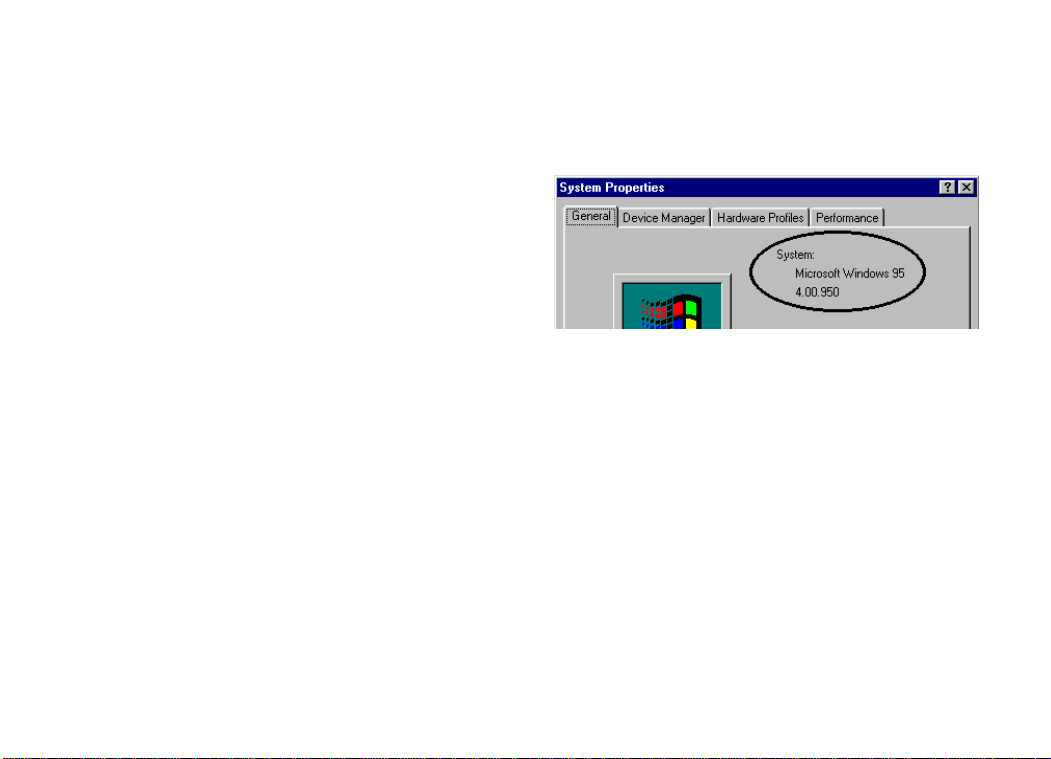
3. In the “System Properties” screen, look at
the system information under the General
tab (circled in the following screen image).
The number following the text “Microsoft
Windows 95” will end with “950”, “950a”,
or “950b”. This indicates your version of
Windows 95. Write this number on the
blank below for later reference. Then click
OK.
Windows 95 version
_________________
Upgrading to x2™ Technology
Be sure to read the section titled “U.S.
Robotics Modem Update Wizard” on page 53
for information on upgrading your 33.6
faxmodem to x2™ technology, allowing
downloads of up to 56 kbps*.
• IMPORTANT! All x2 products are capable of 56 kbps
downloads; however, due to FCC rules which restrict power
output of the service providers' modems, current download
speeds are limited to 53 kbps. Actual speeds may vary
depending on line conditions. Uploads from end users to service
providers travel at speeds up to 28.8 kbps. An x2 modem, an
analog phone line compatible with x2 technology, and an
Internet Service Provider with x2 service are necessary for these
high-speed downloads. See http://www.3com.com/x2 for details.
2
MODEM INSTALLATION WITH WINDOWS
®
3.X
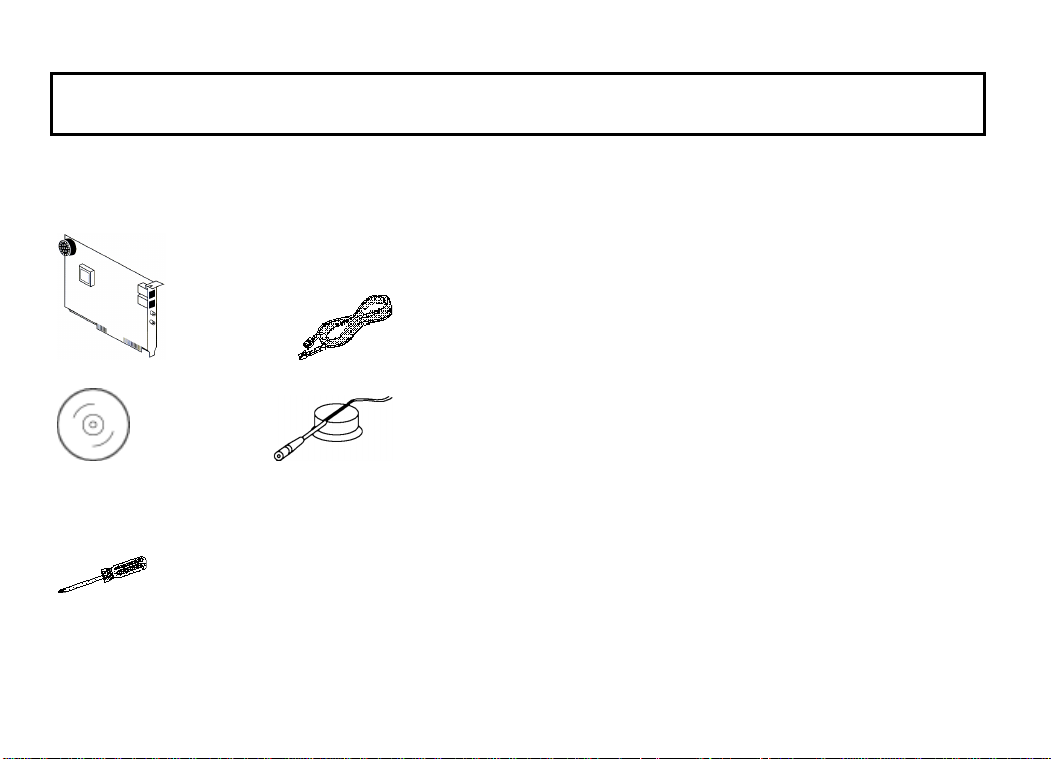
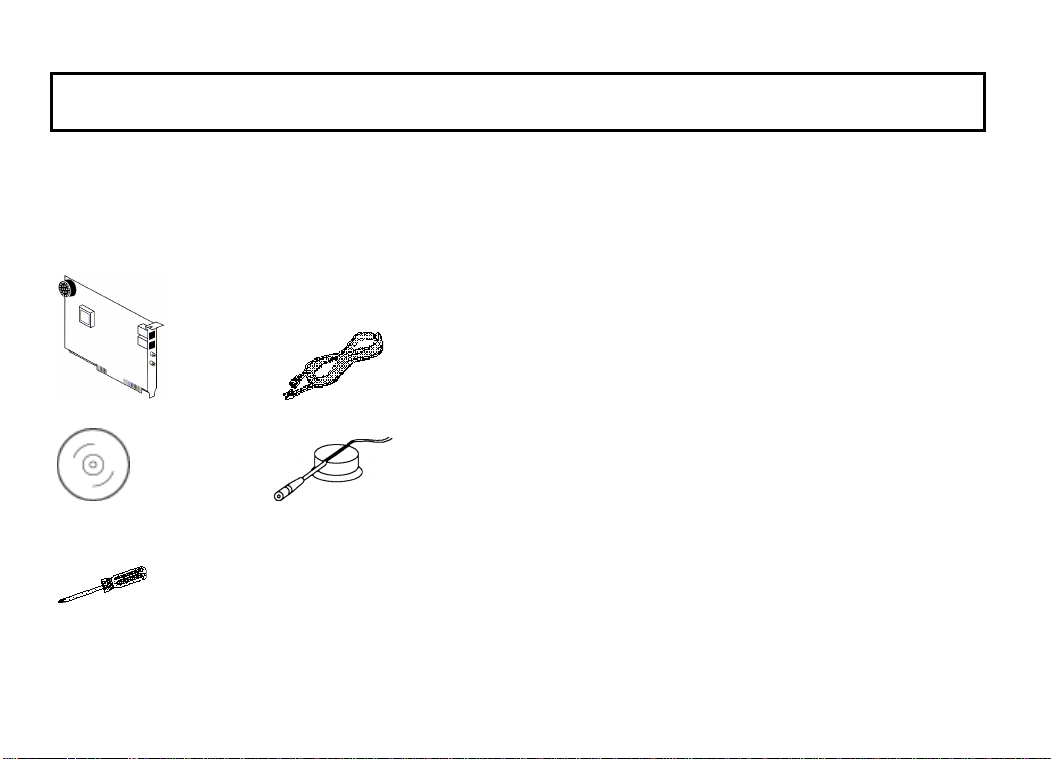
You’ll need these items from your
Sportster® modem box:
modem phone cord
Connections™ CD microphone
Plus:
a screwdriver (not included)
A Word about COM Ports
and IRQs
Most computer accessories — a mouse,
sound card, enhanced graphics card, scanner,
etc. — require a special connection through
which they can communicate with the
computer. For some devices, this connection is
called a communications (or COM) port. Most
computers have 1 or 2 COM ports, but they
can have up to 4. Although internal modems
do not connect to COM ports directly, they do
require a COM port setting, which is
determined by the setting on the modem’s
COM jumper pins.
Each COM port uses an interrupt request
(IRQ). An accessory uses an IRQ to get the
attention of your computer’s central
3

MODEM INSTALLATION WITH WINDOWS 3.X
processing unit (CPU) so that the accessory
can perform a task. The computer stops what
it’s doing, depending on the priority of the
request, to help the accessory perform its task.
When two accessories share an IRQ, it’s like
two people asking different questions in unison
to a third person. Just as the person being
asked the two questions cannot understand
either request, a computer can lock up or
otherwise fail to communicate properly with
your modem when there is an IRQ conflict.
D KEY POINT: Accessories cannot
share COM ports and should not share
IRQs. When accessories try to share
settings, they will either not work
properly or not work at all. This section
of the manual will help you understand
the COM/IRQ settings on your new
Sportster modem.
3Com has set your modem to a default Plug
and Play setting geared towards Windows 95
users. In this configuration, the shunts used to
set your modem’s COM port and IRQ settings
are hanging from single jumper pins and will
not affect your modem’s settings. As a
Windows 3.x user, you need to run the
ComTest program (on the Connections CD) to
determine what settings your modem should
use.
NOTE: Some communications
software programs require a particular
setting for your modem (RapidComm,
which shipped with your modem, does
not). If you wish to use a program other
than RapidComm, now is a good time to
read that software’s manual to
determine what setting is required.
4
MODEM INSTALLATION WITH WINDOWS 3.X
How to Use ComTest to
Determine Your Modem’s
Settings
1. Insert the Connections CD into your CD-
ROM drive.
2. In Windows’ Program Manager, click Run
on the File menu. Type d:\comtest.exe
and press ENTER. This starts ComTest,
the program that determines which COM
ports and IRQs are available for use by
your modem.
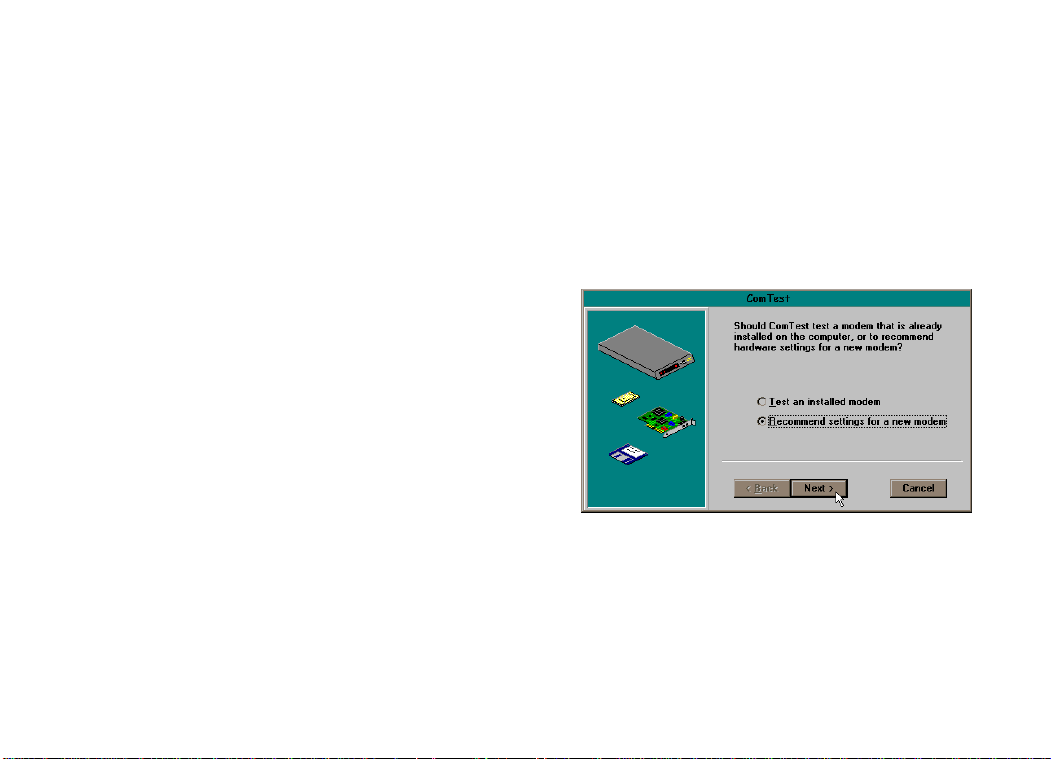
3. The screen in the next column appears
when ComTest starts.
• If there is a modem in your computer
which you are replacing with your new
Sportster modem, go to “Testing an
Installed Modem” on page 7 to
determine which COM and IRQ settings
the older modem is using.
• If a modem is not currently installed in
your computer, click Recommend
settings for a new modem.
Then click Next.
5
MODEM INSTALLATION WITH WINDOWS 3.X
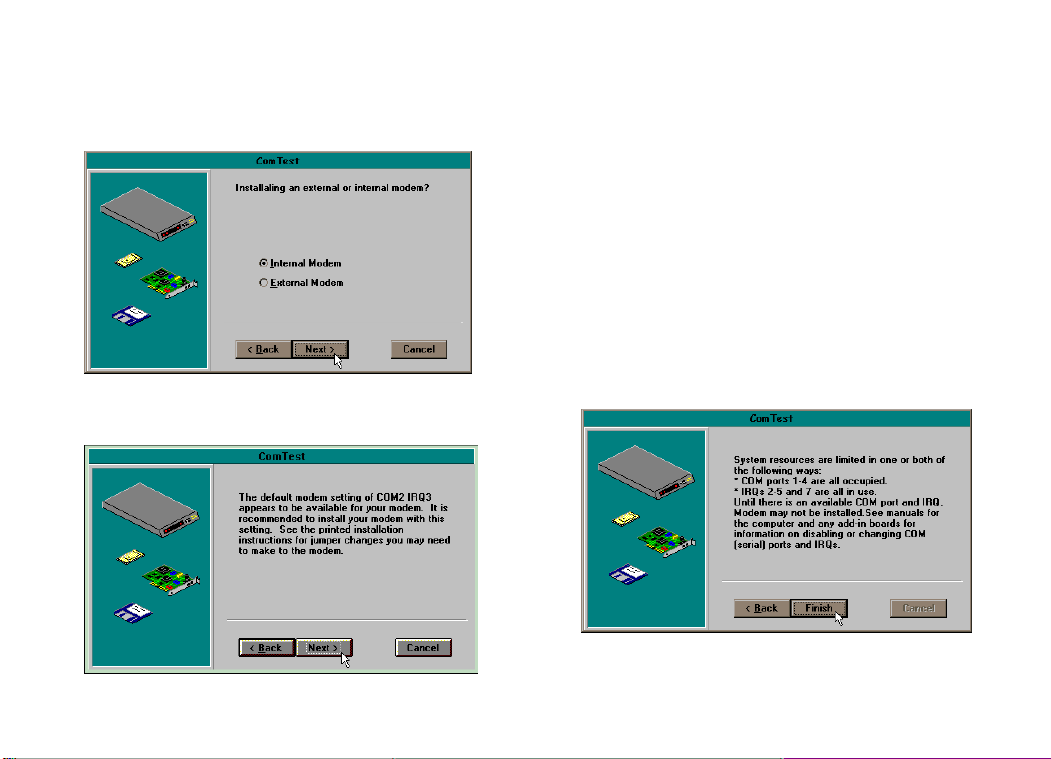
4. Click Internal Modem. Then click Next.
5. If you have a free setting, you will see a
screen like this.
COM2/IRQ3 is free in this example.
ComTest might instead recommend
COM1/IRQ4, COM3/IRQ4, or
COM4/IRQ3 for your modem.
Write down the displayed settings. You’ll
need to know these settings later. Click
Next.
If you do not have a free setting, you will
see a screen like this.
6
MODEM INSTALLATION WITH WINDOWS 3.X
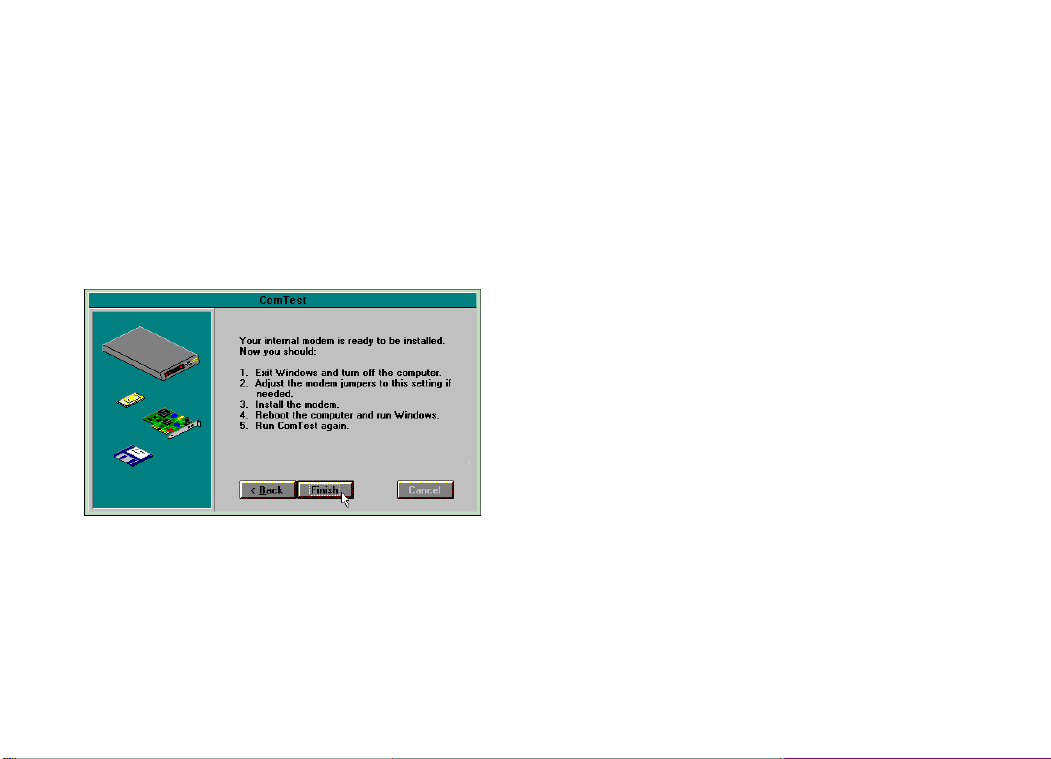
Click Finish to exit ComTest. Go to “What
to Do with ComTest’s Recommendation”
on page 8.
6. When you see this screen, click Finish to
exit ComTest.
Go to “What to Do with ComTest’s
Recommendation” on page 8.
Testing an Installed Modem
If there is a modem already installed in your
computer, you can determine its COM and
IRQ settings by selecting the Test an
installed modem option. Follow the
instructions on screen until you see the screen
that tells you “Testing is complete.” This screen
will also tell you which COM and IRQ settings
your present modem is using. These are the
settings you want to use for your new
Sportster modem. Write the settings down.
Turn off and unplug your computer and
remove your present modem. Go to “How to
Change the Modem’s Settings” on page 10.
7

MODEM INSTALLATION WITH WINDOWS 3.X
What to Do with ComTest’s
Recommendation
NOTE: If your communications
software requires a modem that
ComTest does not recommend, there is
a good chance that the setting is being
used by another device in your system.
To free that setting in your system,
consult your computer’s manual. Go to
“How to Change the Modem’s Settings”
on page 10.
If ComTest recommended COM1/IRQ4
Write down “COM1” and “IRQ4” somewhere
where it will be handy during software
installation. Go to “How to Change the
Modem’s Settings” on page 10.
If ComTest recommended COM2/IRQ3
Write “COM2” and “IRQ3” somewhere
where it will be handy during software
installation. Go to “How to Change the
Modem’s Settings” on page 10.
If ComTest recommended COM3/IRQ4
or COM4/IRQ3
Do not use either of these settings. While the
COM port part of the setting is acceptable
(ComTest only recommends COM ports that
are not being used), the IRQ part of the setting
is not acceptable. When ComTest
recommends either COM3/IRQ4 or
COM4/IRQ3, the IRQ in the setting is being
used by another accessory. You could use the
suggested IRQ for the modem, but you run the
risk that the modem and/or the other accessory
sharing the IRQ might not work properly.
8

MODEM INSTALLATION WITH WINDOWS 3.X
If you do not have a sound card, use
COM3/IRQ5. Write “COM3” and “IRQ5”
somewhere where it will be handy during
software installation. You will have to change
the settings on your modem. Go to “How to
Change the Modem’s Settings” on page 10.
If you do have a sound card, use
COM2/IRQ3. To use this setting, you have to
first disable your computer’s second serial port
(COM2). This is a pronged socket on the
back of your computer.
• Go to your computer manufacturer’s
manual.
• Find out how to disable the COM port.
• Find out which of the sockets on the back
of your computer is the second serial port.
• If you have something plugged into that
port, find out if you can plug it in
somewhere else. Any accessory plugged
into that port will not work after the port
has been disabled.
• Then return to this point in this manual to
continue.
After disabling COM2, you can use the
COM2/IRQ3 setting.
Write “COM2” and “IRQ3” somewhere
where it will be handy during software
installation and go to “How to Change the
Modem’s Settings” on page 10.
If ComTest reports that “You do not
have any available COM ports and/or
IRQs”
We recommend you disable COM1 or
COM2. When you disable one of these COM
ports, you can use it and its default IRQ for
your modem. Go to your computer
manufacturer’s manual.
9

MODEM INSTALLATION WITH WINDOWS 3.X
• Find out which socket is COM1 and which
is COM2.
• If nothing is plugged into either port, you
may choose either of the ports to disable.
Your computer manufacturer’s manual will
tell you how to disable the COM port.
• If one port does not have anything plugged
into it, note if the port is COM1 or COM2.
This is the port you’ll want to disable for
your modem.
• If both ports are being used, you may be
able to attach one of the plugged-in
accessories elsewhere so that you can
disable its COM port. The accessory will
not work once its port is disabled.
If you’ve disabled COM1, you can now use
the COM1/IRQ4 setting. Write it down
somewhere where it will be handy during
software installation. Go to “How to Change
the Modem’s Settings” (on this page).
If you’ve disabled COM2, you can now use
the COM2/IRQ3 setting. Write the setting
down somewhere where it will be handy during
software installation.
How to Change the Modem’s
Settings
1. Always touch an unpainted metal part of
your computer (the back is usually
unpainted) to discharge static electricity
before handling the modem. Static can
damage your modem. Then take the
modem out of its plastic bag.
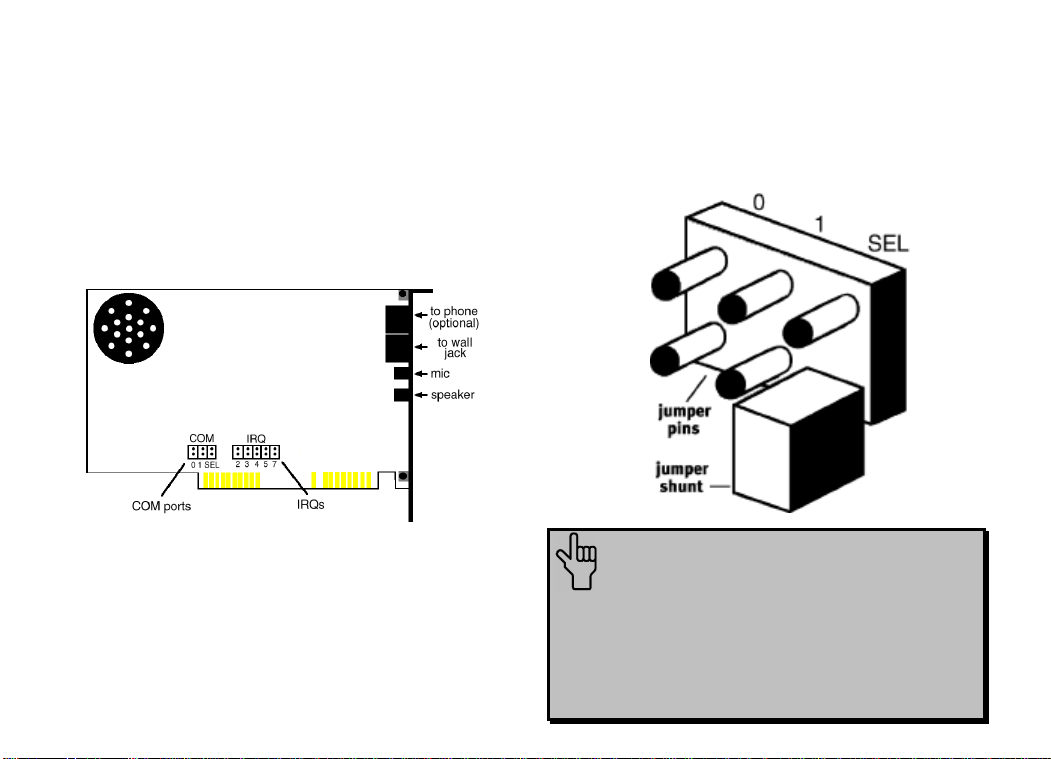
2. Find the COM and IRQ jumper shunts
(small black plastic pieces) on your
10
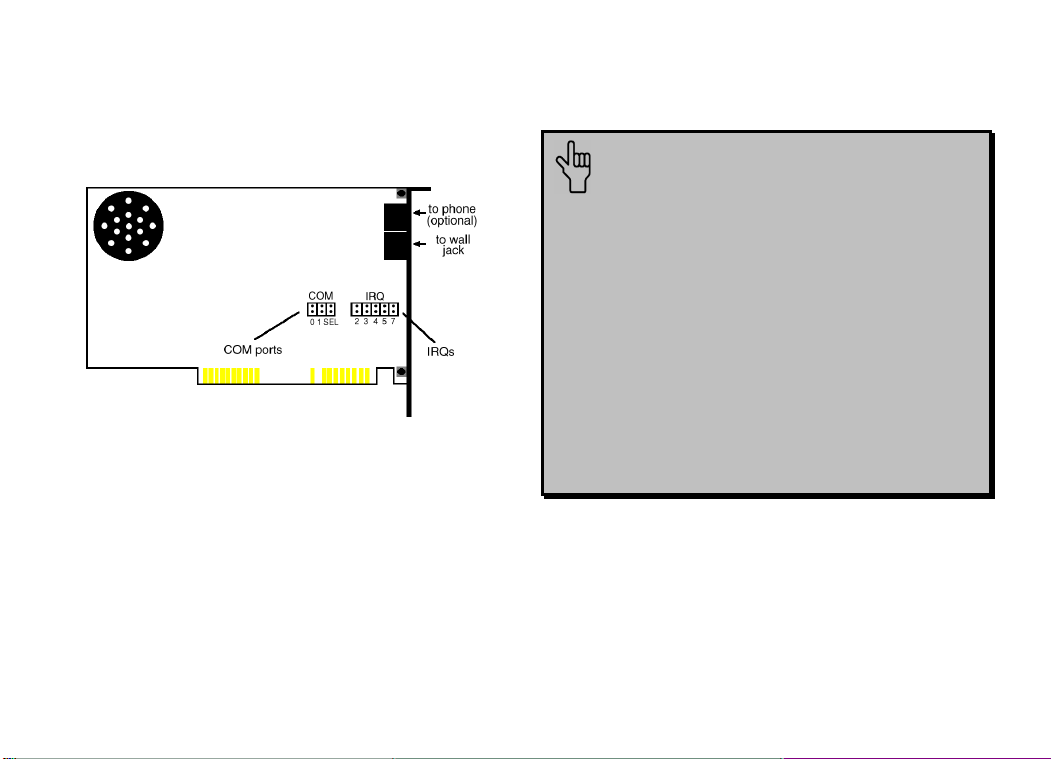
MODEM INSTALLATION WITH WINDOWS 3.X
modem’s jumper pins (see the following
diagram).
3. To change the COM port and IRQ settings,
you need to reposition the jumper shunts on
the COM port and IRQ pins. To do this, lift
the jumper shunts off the pins.
TIP: Grasp the jumper shunts with
a tweezers or needle-nosed pliers. DO
NOT grasp too firmly, as you may crush
the jumper shunts. If a jumper shunt
seems stuck, gently rock it back and
forth as you lift. Do not touch any other
part of the modem or your computer
with the tweezers/pliers. A jumper
shunt needs to be sitting on both
jumper pins in order to effectively set
the modem to the desired setting.
11
MODEM INSTALLATION WITH WINDOWS 3.X
0 1 SEL
0 1 SEL
0 1 SEL
0 1 SEL
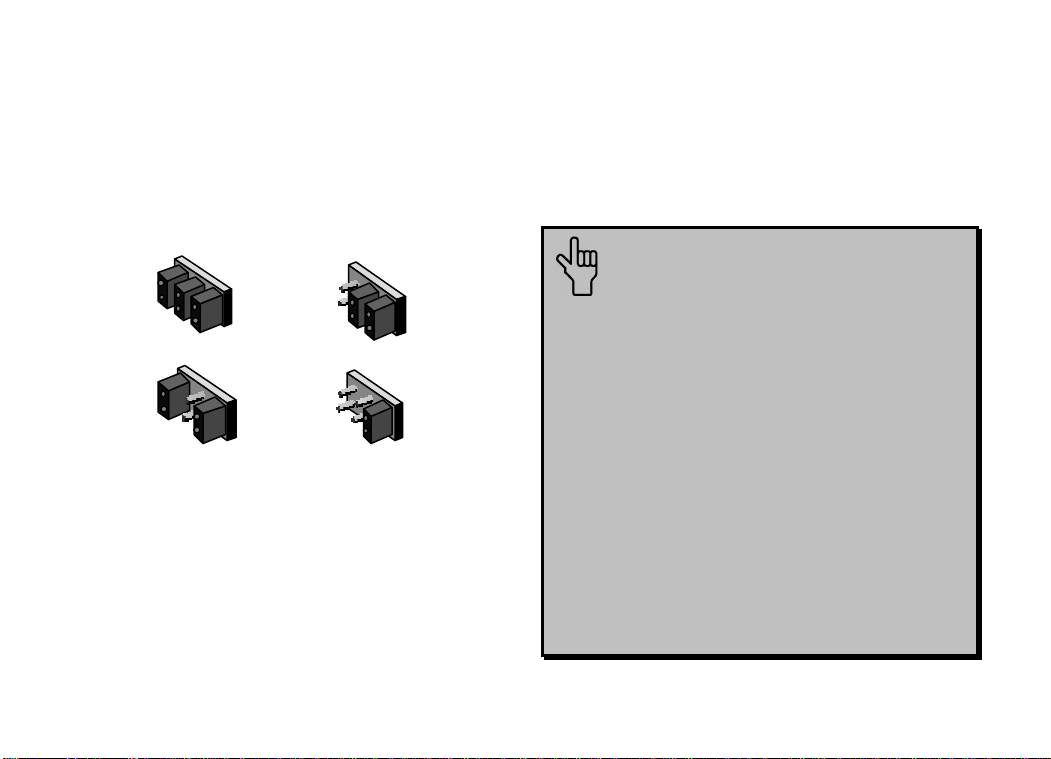
4. Move the jumper shunt to the new setting.
• The COM port setting can involve one
to three shunts. The four possible COM
port settings are as follows:
COM 1
COM 3
COM 2
COM 4
• Unlike most COM port settings, the
IRQ setting involves only one jumper
shunt. Simply move the jumper shunt to
the pins labeled with the IRQ you need.
How to Insert the Modem
into the Computer
NOTE: Before installing your
modem, write its serial number
somewhere where it will be handy
during software installation. (You’ll
find the serial number underneath the
bar code on the white sticker on the
modem and on the outside of the box
the modem came in.) If you ever need
to call our customer support
department, a customer support
representative will ask you for the
serial number. This will help him or
her identify your modem.
12
MODEM INSTALLATION WITH WINDOWS 3.X
1. Turn off your computer and unplug it from
the electrical outlet.
2. Unplug any peripheral devices (printer,
monitor, keyboard, mouse, etc.) from the
computer.
TIP: Before you unplug anything,
label the cords or make a sketch of how
things are connected. This can be
helpful when you plug things back in
later.
CAUTION: To avoid the risk of
electric shock, make sure your computer
and all peripheral devices are turned off
and unplugged.
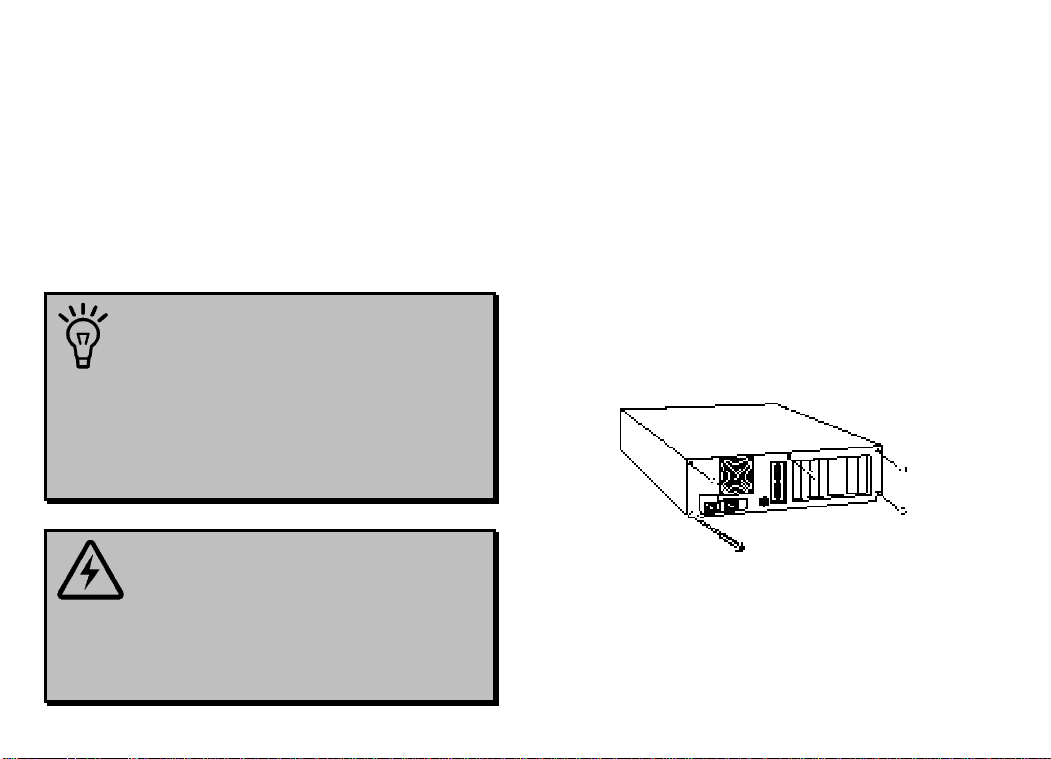
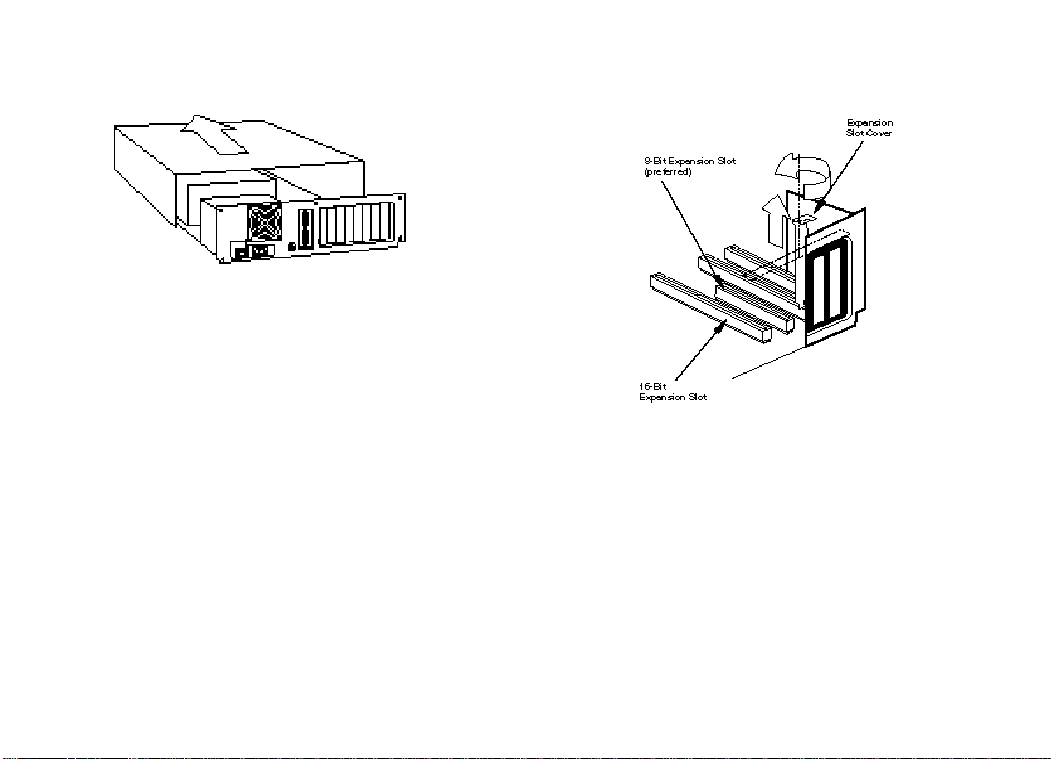
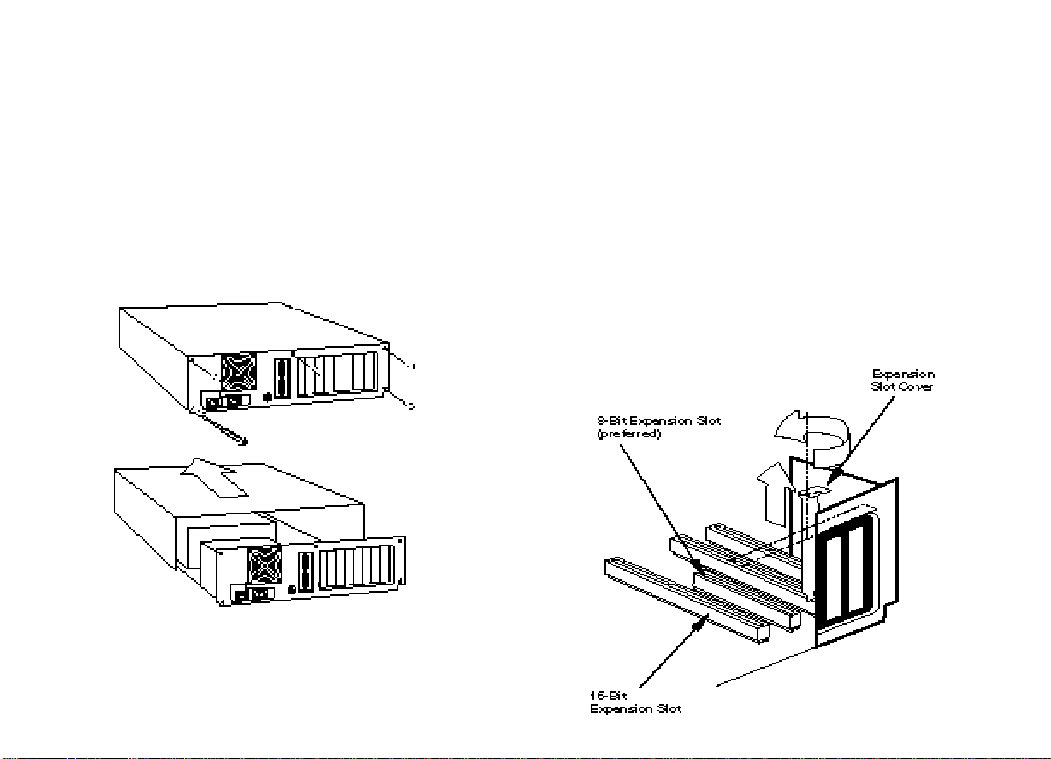
3. Remove the screws from your computer’s
cover and then remove the cover, as shown
in the following diagrams. Your computer
may differ in appearance from these
diagrams, but the basic principle for
removing the cover should be the same.
Contact your computer manufacturer or
review their manual if you need further
instructions.
13
MODEM INSTALLATION WITH WINDOWS 3.X
4. Find an empty ISA expansion slot at least
as long as the gold edge of your modem.
(ISA slots have black plastic grooves lined
with silver.) Unscrew and remove the
expansion slot cover (the long narrow piece
of metal that keeps dust from entering
through the opening perpendicular to the
slot). Be careful not to drop the screw into
the computer. You will need it later to
screw the modem into place.
5. Holding the modem at each corner, with the
gold edge facing the slot, push the modem
down as gently as possible until it snaps into
the expansion slot. (NOTE: The drawings
show horizontally aligned expansion slots.
Some computers have vertically aligned
slots. The instructions apply to both styles.)
You need to apply a little pressure to seat
the modem properly. Sometimes a gentle
back-and-forth motion helps to fit the
14

MODEM INSTALLATION WITH WINDOWS 3.X
modem all the way into the slot. If you feel
resistance, the modem may not be properly
lined up with the slot. Do not force it into
the slot. Remove the modem and try again.
6. Once the modem is in place, fasten it firmly
using the screw that you removed in step 4.
7. Replace the computer’s cover and fasten it
with the screws you removed in step 3.
8. If you currently have a phone plugged into
the wall jack you plan to use for the
modem, disconnect the phone’s cord from
the jack.
WARNING: The phone jack you use
must be for an ANALOG phone line (the type
found in most homes). Many office buildings
have digital phone lines. Be sure you know which
type of line you have. The modem will be
damaged if you use a digital phone line.
9. Plug one end of the phone cord that came
with the modem into the TELCO jack at
the rear of the modem. Plug the other end
of the cord into the wall jack.
10. If you wish to use a phone through the line
the modem uses (when the modem is not in
use), plug your phone’s cord into the
modem’s PHONE jack.
15
MODEM INSTALLATION WITH WINDOWS 3.X
NOTE: You cannot use the modem
and a phone at the same time if they
share the same telephone line.
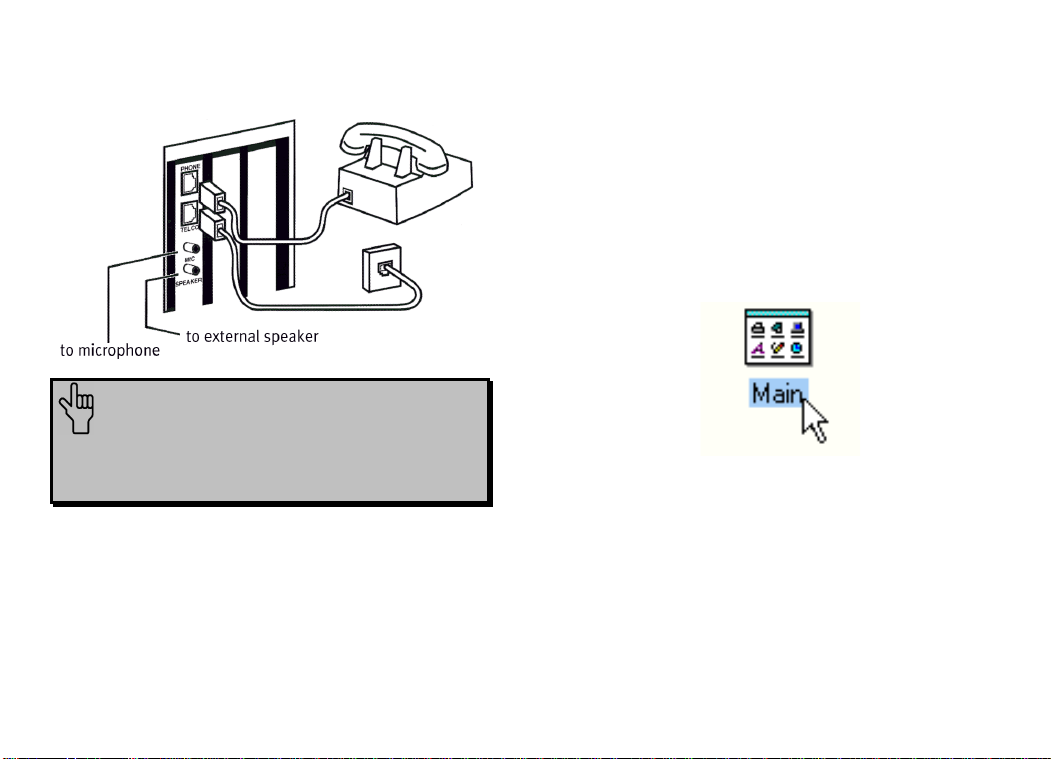
11. Plug the microphone included with your
modem into the MIC jack on the modem.
12. To enhance the modem’s full-duplex
speakerphone capabilities, plug a set of
powered external speakers (not included)
into the SPEAKER jack on the modem.
13. If you have your modem set to
COM1/IRQ4 or COM2/IRQ3, go to
“Software Installation and Testing” on page
33. If you have your modem configured to
any other setting, open Program Manager
and double-click the Main icon.
16
MODEM INSTALLATION WITH WINDOWS 3.X
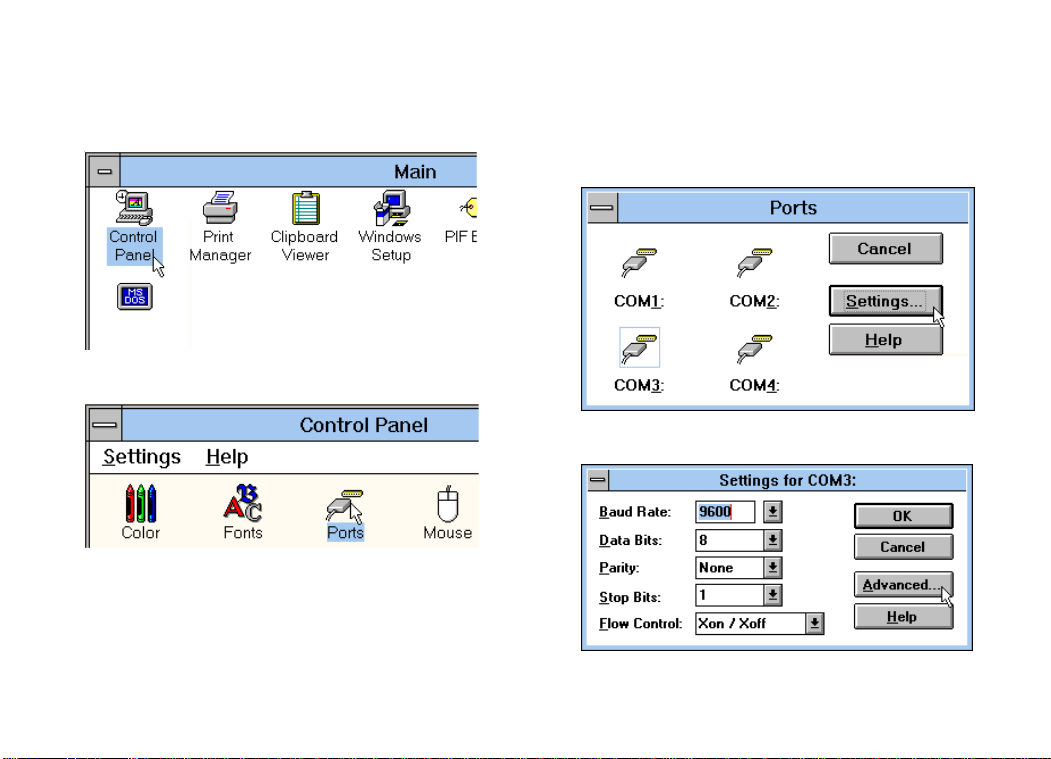
14. Double-click the Control Panel icon.
15. Double-click the Ports icon.
16. If it’s not already selected, click the COM
port for your modem. Then click Settings.
17. Click Advanced.
17
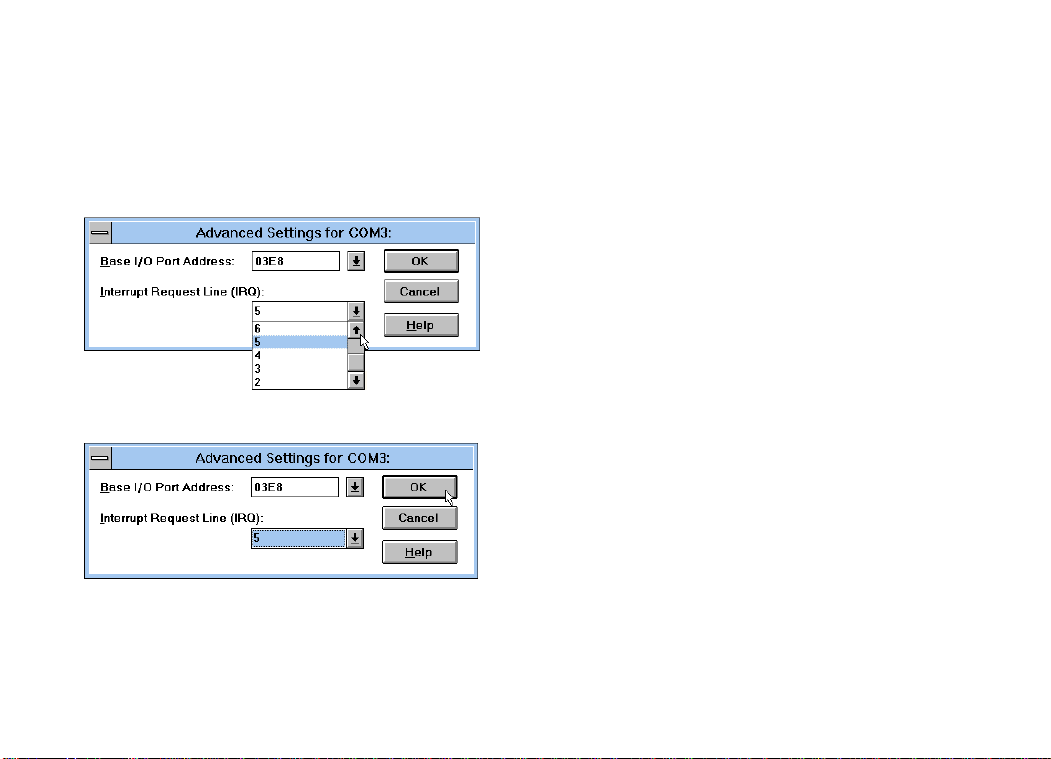
MODEM INSTALLATION WITH WINDOWS 3.X
18. In the Interrupt Request Line (IRQ)
box, select the IRQ that ComTest
recommended.
19. Click OK.
You will see a brief series of screens after the
preceding screen. Click OK on each screen
until you see a screen with a Close button.
Click Close to exit Program Manager.
You are now ready to install the software on
the Connections CD-ROM (included with
your Sportster modem). Turn to “Software
Installation and Testing” (page 33) for detailed
information about installing the software,
registering the modem, and trying out your
modem by faxing U.S. Robotics.
18
MODEM INSTALLATION WITH WINDOWS
®
95
You will need these items from your
Sportster™ modem box:
modem phone cord
Connections™ CD microphone
Plus:
a screwdriver (not included)
Since your new Sportster is a “Plug and Play”
device, Windows 95 may be able to detect
your modem automatically after you plug it into
your computer. The operating system should
do all the work of recognizing the modem for
you.
How to Prepare for Plug and
Play Installation
1. Touch an unpainted metal part of your
computer (the back is usually unpainted) to
discharge static electricity. Static can
damage your modem.
2. Take the modem out of its plastic bag.
19
MODEM INSTALLATION WITH WINDOWS 95
3. Find the jumper shunts (small black plastic
pieces) on the COM port and IRQ jumper
pins on your modem. They should be in
roughly the area indicated in the following
illustration.
When doing a “Plug and Play” installation,
the jumper shunts should be placed so that
they are hanging from single jumper pins
rather than on pairs of pins. Move your
20
jumper shunts so they are hanging as in the
following diagram.
NOTE: If you need to move the jumper
shunts, grasp them with a tweezers or a needlenosed pliers. DO NOT grasp too firmly, however,
or you may crush the jumper shunts. If a jumper
shunt seems stuck, try gently rocking it back and
forth as you lift.
MODEM INSTALLATION WITH WINDOWS 95
How to Insert the Modem
into the Computer
NOTE: Before installing your
modem, write down its serial number.
(You’ll find the serial number
underneath the bar code on the white
sticker on the modem and on the
outside of the box the modem came
in.) If you ever need to call our
customer support department, a
customer support representative will
ask you for the serial number. This
will help him or her identify your
Sportster modem.
1. Turn off your computer and unplug it from
the electrical outlet.
2. Unplug any peripheral devices (printer,
monitor, keyboard, mouse, etc.) from the
computer.
TIP: Before you unplug any cords,
label them or make a sketch of how
they are connected. This can be helpful
when you plug them back in later.
CAUTION: To avoid risk of
electric shock, make sure your computer
and all peripheral devices are turned off
and unplugged from electrical outlets.
3. Remove the screws from your computer’s
cover and then remove the cover, as shown
21
MODEM INSTALLATION WITH WINDOWS 95
in the following diagrams. Your computer
may differ in appearance from these
diagrams, but the basic principle for
removing the cover should be the same.
Refer to your computer manufacturer’s
manual if you need further instructions.
4. Find an empty ISA expansion slot that’s at
least as long as the gold edge of your
modem. (ISA slots are black plastic
grooves lined with metal.) Unscrew and
remove the expansion slot cover (the long
narrow piece of metal that keeps dust from
entering through the opening perpendicular
to the slot).
22
MODEM INSTALLATION WITH WINDOWS 95
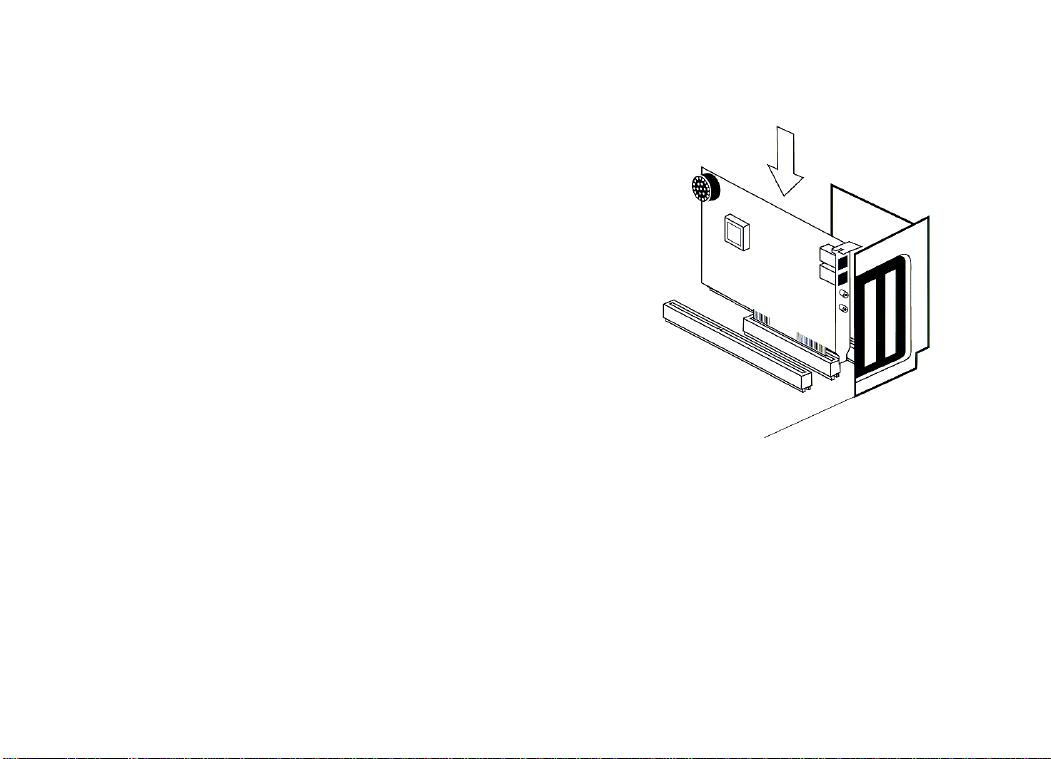
5. Holding the modem at each corner, with the
gold edge facing the slot, push the modem
down as gently as possible until it snaps into
the expansion slot. (NOTE: The following
diagram shows horizontally aligned
expansion slots. Some computers have
vertically aligned slots. The instructions
apply to both styles.)
You need to apply a little pressure to seat
the modem properly. Sometimes a gentle
back-and-forth motion helps fit the modem
all the way into the slot. If you feel
resistance, the modem may not be properly
lined up with the slot. Do not force it into
the slot. Remove the modem and try again.
6. Once the modem is in the slot, fasten the
modem firmly into place using the screw
that you removed in step 4.
7. Replace the computer’s cover and fasten it
with the screws you removed in step 3.
8. Locate the wall jack you plan to use for the
modem. If you have a phone plugged into
23
MODEM INSTALLATION WITH WINDOWS 95
this jack, disconnect the telephone cord
from the jack.
WARNING: The phone jack you
use must be for an ANALOG phone line
(the type found in most homes). Many
office buildings have digital phone
lines. Be sure you know which type of
line you have. The modem will be
damaged if you use a digital phone line.
9. Plug one end of the phone cord included
with the modem into the TELCO jack at
the rear of the modem. Plug the other end
of the cable into the wall jack.
10. If you wish to use a phone through the line
the modem uses (when the modem is not in
use), plug your phone’s cord into the
modem’s PHONE jack.
NOTE: You cannot use the modem
and a phone at the same time if they
share the same telephone line.
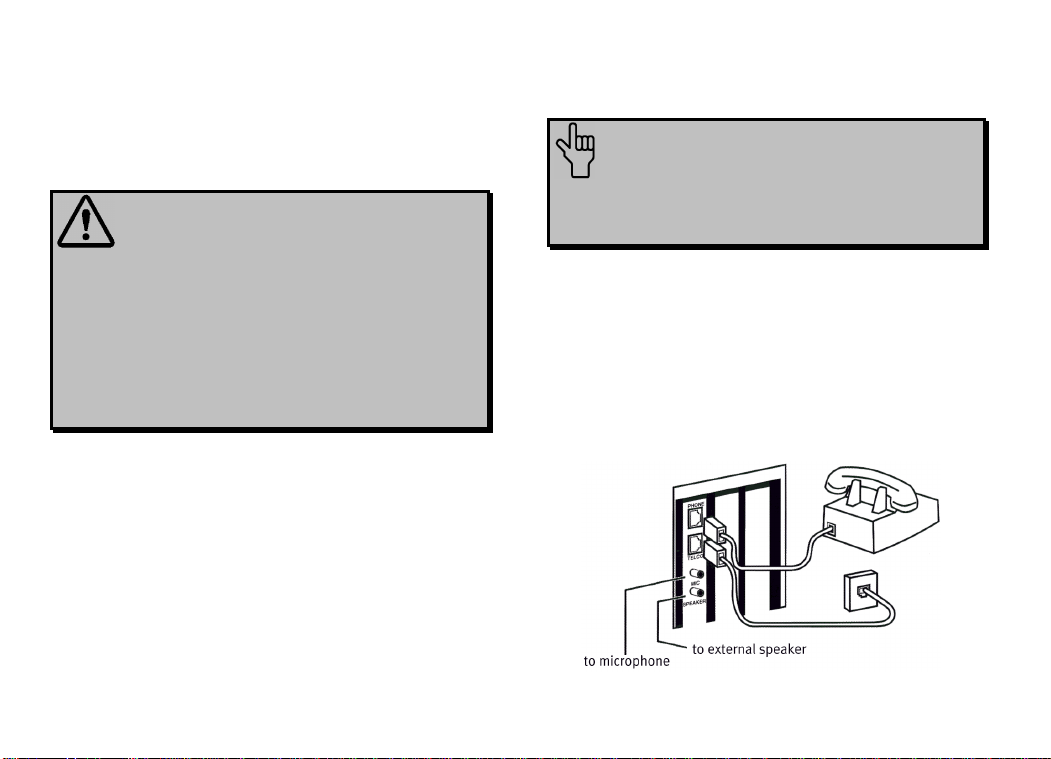
11. Plug the microphone included with your
modem into the MIC jack on the modem.
12. To enhance the modem’s full-duplex
speakerphone capabilities, plug a set of
powered external speakers (not included)
into the SPEAKER jack on the modem.
24
MODEM INSTALLATION WITH WINDOWS 95
13. Plug the power cords, cables, and
peripherals back into the computer and turn
on the computer.
Installing the Modem
Drivers
NOTE: If you wrote “950b” on
page 2 of this User’s Guide, go to
“Installing Modem Drivers with
Windows 95 Version 950b” on page 29.
Otherwise, follow these instructions.
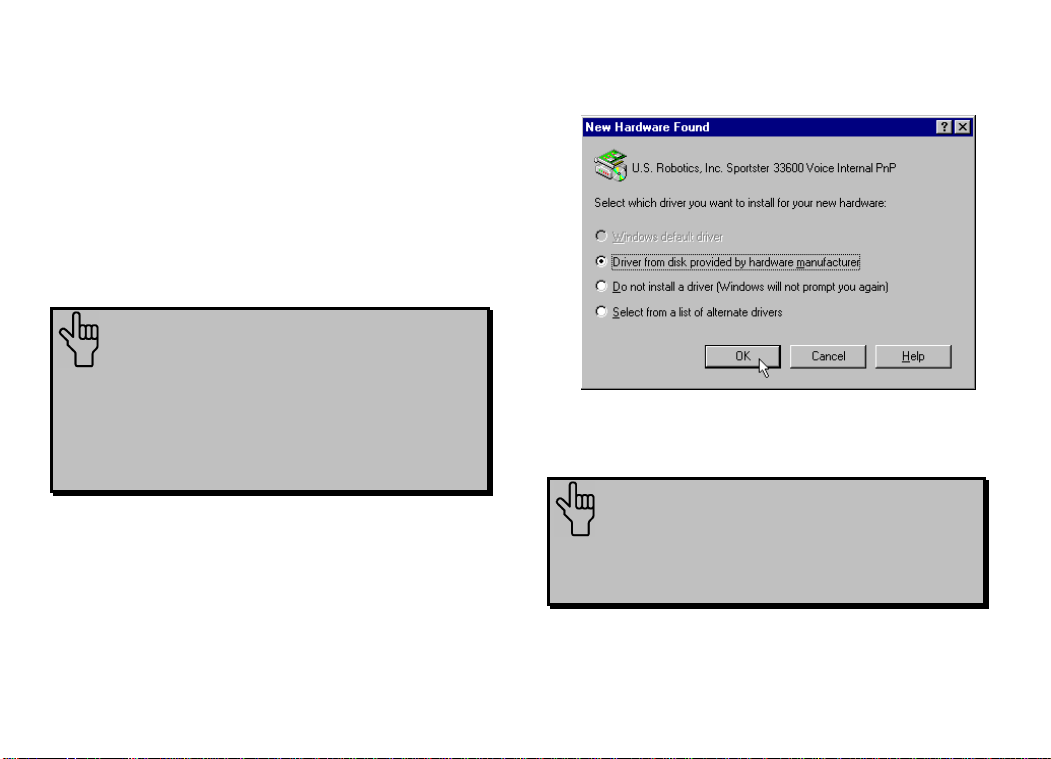
Click Driver from disk provided by
hardware manufacturer. Then click OK.
Installing Modem Drivers with
Windows 95 Versions 950 and 950a
1. When Windows 95 restarts, it should
detect the modem. If it does, you will see
the following screen.
NOTE: If this screen does not
appear, go to the section titled “When
Plug and Play Fails” on page 95.
25
MODEM INSTALLATION WITH WINDOWS 95
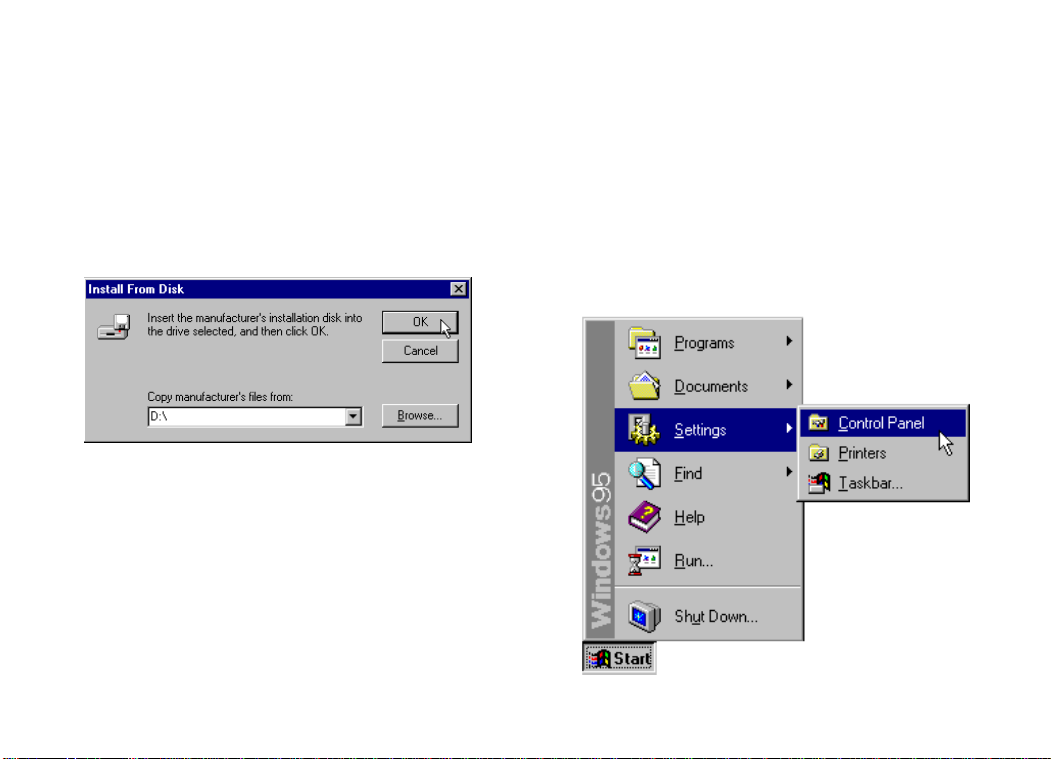
2. When you see this screen, insert the
Connections CD into your CD-ROM drive
and type D:\ to replace the A:\. (NOTE: If
your CD-ROM drive has a different letter
name, type that letter instead of D.)
Click OK. Windows will load the modem’s
drivers.
3. Once Windows finishes loading the
information from the CD-ROM, you should
verify that the modem installation was a
success. When your desktop returns, click
the Windows Start button and point to
Settings. Then click Control Panel.
26
 Loading...