


 Loading...
FAST ETHERLINKâ
® |
PARALLEL TASKINGâ |
|
|
|
10/100BASE-T4 PCI |
|
NETWORK ADAPTER |
|
USER GUIDE |
|
A member of the 3Com Fast EtherLink family |
|
of adapters |
Part No. 09-0808-000
Published January 1996
3Com Corporation ■ 5400 Bayfront Plaza ■ Santa Clara, California ■ 95052-8145
© 3Com Corporation, 1996. All rights reserved. No part of this documentation may be reproduced in any form or by any means or used to make any derivative work (such as translation, transformation, or adaptation) without permission from 3Com Corporation.
3Com Corporation reserves the right to revise this documentation and to make changes in content from time to time without obligation on the part of 3Com Corporation to provide notification of such revision or change.
3Com Corporation provides this documentation without warranty of any kind, either implied or expressed, including, but not limited to, the implied warranties of merchantability and fitness for a particular purpose. 3Com may make improvements or changes in the product(s) and/or the program(s) described in this documentation at any time.
UNITED STATES GOVERNMENT LEGENDS:
If you are a United States government agency, then this documentation and the software described herein are provided to you subject to the following restricted rights:
For units of the Department of Defense:
Restricted Rights Legend: Use, duplication or disclosure by the Government is subject to restrictions as set forth in subparagraph (c) (1) (ii) for restricted Rights in Technical Data and Computer Software clause at 48 C.F.R. 52.227-7013. 3Com Corporation, 5400 Bayfront Plaza, Santa Clara, California 95052-8145.
For civilian agencies:
Restricted Rights Legend: Use, reproduction or disclosure is subject to restrictions set forth in subparagraph (a) through (d) of the Commercial Computer Software - Restricted Rights Clause at 48 C.F.R. 52.227-19 and the limitations set forth in 3Com‘s standard commercial agreement for the software. Unpublished rights reserved under the copyright laws of the United States.
The software described in this documentation is furnished under a license agreement included with the product either as a separate document or on the software distribution diskette in a root directory file named LICENSE.TXT. If you are unable to locate a copy, please contact 3Com and a copy will be provided to you.
3Com, CardFacts, EtherDisk, EtherLink, NetFacts, Parallel Tasking, SmartAgent, and Transcend are registered trademarks of 3Com Corporation. 3TECH and AutoLink are trademarks of 3Com Corporation. 3ComFacts is a service mark of 3Com Corporation.
Microsoft, MS-DOS, Windows, and Windows NT are trademarks of Microsoft Corporation. OS/2 is a trademark of International Business Machines Corporation. CompuServe is a service mark of CompuServe, Inc. UNIX is a trademark of UNIX Systems Laboratories. NetWare and Novell are trademarks of Novell, Inc. Pentium is a trademark of Intel Corporation. DEC and PATHWORKS are trademarks of Digital Equipment Corporation. Banyan and VINES are trademarks of Banyan
Systems Incorporated. Artisoft and LANtastic are trademarks of Artisoft, Inc. Other brand and product names may be registered trademarks or trademarks of their respective holders. 3Com registered trademarks are registered in the United States and may or may not be registered in other countries.
Guide written by John Jeter. Edited by Chris Dresden. Technical illustration by Tim Buckreus. Production by Becky Whitmer.

LIFETIME WARRANTY
®
3Com’s EtherLinkâ, TokenLinkâ, Fast EtherLink, FDDILinkä, and 3Com Impactä ISDN ISA adapters have a Lifetime Warranty.
To ensure the very best 3Com service and support, take the time to complete the product registration card.
Any defective 3Com adapter will be repaired or replaced, at 3Com’s option, for as long as the adapter resides in its original IBMâ Personal Computer, Personal System/2â, or compatible computer (driver software is covered by the standard 90-day limited software warranty).
Customers in the countries shown below should send the completed registration card to the appropriate address. Customers in other non-U.S. locations should send the registration card to the U.S. address on the front of the card.
■ |
Asia |
■ |
Italy, Greece, Spain, Portugal, Malta |
|
3Com Asia Ltd., Marketing Department |
|
3Com Mediterraneo Srl, |
|
Room 2506-07, 25/F., Citibank Tower |
|
Marketing Department |
|
Citibank Plaza, Central |
|
Via Michelangelo Buonarroti, 1 |
|
Hong Kong |
|
20093 Cologno Monzese MI |
|
|
|
Italy |
■ |
Australia, New Zealand |
|
|
|
3Com Australia, Marketing Department |
■ |
Japan |
|
|
|
|
|
99 Walker Street |
|
3Com Japan, Marketing Department |
|
Level 7 |
|
Shinjuku Sumitomo Building 23F |
|
North Sydney |
|
2-6-1 Nishi Shinjuku, Shinjuku-ku |
|
New South Wales 2060 |
|
Tokyo 163-02 |
|
Australia |
|
Japan |
■ |
Belgium, Netherlands, Luxembourg |
■ |
Sweden, Finland, Norway, Denmark |
|
3Com Benelux B.V., Marketing Department |
|
3Com Nordic, Marketing Department |
|
Nevelgaarde 8-9 |
|
Torshamsgatan 39 |
|
3436 ZZ |
|
Box 1110 |
|
Nieuwegein |
|
164 22 KISTA |
|
Netherlands |
|
Sweden |
■ |
France, Israel |
■ |
United Kingdom, Eire |
|
3Com France, Marketing Department |
|
3Com UK Ltd., Marketing Department |
|
Immeuble McKinley |
|
Pacific House |
|
BP 965 |
|
Third Avenue |
|
1, Avenue de l’Atlantique |
|
Globe Park Marlow-on-Thames |
|
91976 Les Ulis Courtaboeuf Cedex |
|
Buckinghamshire, SL7 1YL |
|
France |
|
England |
■Germany, Austria, Switzerland
3Com GmbH, Marketing Department Gustav-Heinemann-Ring 123 D-81739 Muenchen
Munich
West Germany

CONTENTS
ABOUT THIS GUIDE
Introduction 1
How to Use This Guide 1
Conventions 2
1 INTRODUCTION
Adapter Features 1-3
|
PCI Technology |
1-4 |
|
|
|
|
|
|
|
|
|||||
2 INSTALLING THE ADAPTER |
|
||||||
|
Inspecting the Adapter |
2-1 |
|
|
|
||
|
Installing the Boot PROM |
2-2 |
|
|
|||
|
Installing the Adapter |
2-2 |
|
|
|
||
|
Connecting to the Network |
2-3 |
|
|
|||
|
|
||||||
3 LOADING THE NETWORK DRIVERS |
|||||||
|
Summary of Driver Loading Procedures |
3-1 |
|||||
|
Using the EtherDisk Diskette |
3-2 |
|
|
|||
|
Accessing DOS |
3-2 |
|
|
|
|
|
|
Using Windows 95 3-3 |
|
|
|
|
||
|
Confirming Adapter Installation for Windows 95 3-4 |
||||||
|
Using NetWare ODI |
3-5 |
|
|
|
|
|
|
One Adapter in a Client |
3-5 |
|
|
|||
|
AutoLink Requirements |
3-5 |
|
||||
|
AutoLink Installation |
3-6 |
|
||||
|
Multiple Adapters in a Client |
3-8 |
|
||||
|
Finding the Adapter’s Port Number 3-10 |
||||||
|
One or More Adapters in a Server |
3-11 |
|||||

Loading NDIS Drivers |
3-11 |
Updating NDIS Drivers |
3-12 |
Auto Select Media Type |
3-12 |
Transcend PC Link SmartAgent Driver Agents 3-13
Desktop Management Interface 3-13
4PERFORMING TROUBLESHOOTING AND DIAGNOSTIC TESTS
Troubleshooting with the Diagnostic Tests 4-1
|
Before Running the Tests |
4-2 |
|
||
|
Types of Tests |
4-2 |
|
|
|
|
Starting the Diagnostic Program |
4-3 |
|||
|
Running the Group 1 Tests |
4-3 |
|||
|
Running the Group 3 Test |
4-4 |
|||
|
Setting Up an Echo Server |
4-5 |
|||
|
Starting the Group 3 Test |
4-6 |
|||
|
Getting Help If a Test Fails |
4-7 |
|
||
|
Changing the Test Setup 4-9 |
|
|
||
|
Miscellaneous Checks 4-9 |
|
|
|
|
|
LEDs 4-10 |
|
|
|
|
|
|
|
|
|
|
A CABLING |
|
|
|
|
|
|
Adapter Cabling Requirements |
A-1 |
|||
|
Twisted-Pair Cable |
A-2 |
|
|
|
|
10BASE-T Operation |
A-3 |
|
|
|
|
10BASE-T Specifications |
A-3 |
|
||
|
100BASE-T Standard |
A-4 |
|
|
|
|
100BASE-TX Operation |
A-4 |
|
||
|
100BASE-T4 Operation |
A-5 |
|
||
|
100BASE-FX Operation |
A-5 |
|
||
|
RJ-45 Connector Pin Assignments |
A-6 |
|||
|
|
||||
B CONFIGURING SOFTWARE SETTINGS |
|||||
|
Changing Software Settings |
B-2 |
|
||

C SPECIFICATIONS
Adapter Specifications C-1
Network Interface C-1
Physical Dimensions C-1
Environmental Operating Range C-1
Power Requirements C-1
D TECHNICAL SUPPORT
On-line Technical Services |
D-1 |
|
|
3Com Bulletin Board Service |
D-1 |
|
|
Access by Modem |
D-1 |
|
|
Access by ISDN D-2 |
|
|
|
World Wide Web Site |
D-2 |
|
|
3ComForum on CompuServe |
D-2 |
||
3ComFacts Automated Fax Service |
D-3 |
||
Support from Your Network Supplier |
D-3 |
||
Returning Products for Repair D-4 |
|
||
GLOSSARY
INDEX
LIMITED WARRANTY
FCC CLASS B CERTIFICATION
CISPR B COMPLIANCE
CE NOTICE
FIGURES
1-1 |
10/100BASE-T4 PCI Adapter |
1-2 |
|
2-1 |
PCI Computer with PCI and EISA Slots |
2-3 |
|
2-2 |
Connecting Twisted-Pair Cable 2-4 |
|
|
3-1 |
AutoLink Information Screen |
3-7 |
|
3-2 |
Main Menu 3-7 |
|
|
A-1 |
RJ-45 Connector Pin Assignments A-6 |
|
|
B-1 |
Multiple Adapter Option Configuration |
B-3 |
|
B-2 |
Changing Adapter Options |
B-4 |
|
TABLES
1 |
Text Conventions |
2 |
|
2 |
Notice Icons 2 |
|
|
3-1 |
Summary of Driver Loading Procedures 3-1 |
|
|
3-2 |
Accessing DOS from Other Operating Systems |
3-3 |
|
4-1 |
Adapter and Diagnostic Program Names (10 Mbps Adapter |
||
|
Only) 4-6 |
|
|
4-2 |
Fast EtherLink 10/100BASE-T4 PCI Adapter LEDs |
4-10 |
|
B-1 |
Option Settings |
B-2 |
|

ABOUT THIS GUIDE
Introduction
This guide explains how to install the 3Comâ Fast EtherLinkâ Parallel Taskingâ 10/100BASE-T4 PCI adapter. Also included is information about loading drivers, troubleshooting the adapter, and using the diagnostic tests if a malfunction occurs.
How to Use This Guide
The following table shows where to find specific information in this guide.
If you are looking for: |
Turn to: |
|
|
Overview of the Fast EtherLink 10/100BASE-T4 PCI adapter |
Chapter 1 |
Instructions for installing the adapter |
Chapter 2 |
Procedures for connecting the adapter to the network |
Chapter 2 |
Instructions for loading network drivers |
Chapter 3 |
Details on troubleshooting and running the diagnostic tests |
Chapter 4 |
Information about 10/100 Mbps cabling standards |
Appendix A |
Procedures for changing default configuration settings |
Appendix B |
A list of the adapter’s technical specifications |
Appendix C |
3Com technical support information |
Appendix D |
|
|
2 ABOUT THIS GUIDE
Conventions
The following tables list text and icon conventions that are used throughout this guide:
Table 1 Text Conventions
Convention |
Description |
||
|
|
||
Text represented as |
This typeface is used to represent displays that appear on |
||
screen display |
your terminal screen, for example: |
||
|
|
NetLogin: |
|
Text represented as |
This |
typeface is used to represent commands that you |
|
commands |
enter, for example: |
||
|
|
autolink.log |
|
Keys |
|
When specific keys are referred to in the text, they are called out |
|
|
|
by their labels, such as “the Return key” or “the Escape key,” or |
|
|
|
they may be shown as [Return] or [Esc]. |
|
|
|
If two or more keys are to be pressed simultaneously, the keys are |
|
|
|
linked with a plus sign (+), for example: |
|
|
|
Press [Ctrl]+[Alt]+[Del]. |
|
|
|
|
|
Table 2 |
Notice Icons |
|
|
|
|
|
|
Icon |
Type |
|
Description |
|
|
|
|
|
Information Note |
Information notes call attention to important features |
|
|
|
|
or instructions. |
|
Caution |
|
Cautions alert you to personal safety risk, system |
|
|
|
damage, or loss of data. |
|
Warning |
|
Warnings alert you to the risk of severe personal injury. |
|
|
|
|

1 INTRODUCTION
The 3Comâ Fast EtherLinkâ Parallel Taskingâ 10/100BASE-T4 PCI adapter is a 32-bit adapter for use in a personal computer with a Peripheral Component Interconnect (PCI) computer bus. It operates whether or not bus mastering is enabled.
This adapter (model number 3C595-T4) is a dual-speed adapter that can be connected to an Ethernet or Fast Ethernet network with a single connection over unshielded twisted-pair (UTP) cable. The adapter supports all UTP cable types, including Category 3, 4, and 5 UTP as well as screened Category 5 UTP. For 10BASE-T operation, the 10/100BASE-T4 adapter requires two pairs of Category 3, 4, or 5 UTP. For 100BASE-T4 operation, the 10/100BASE-T4 requires four pairs of Category 3, 4, or 5 UTP.
The adapter automatically senses and switches to either 10 Mbps or 100 Mbps operation depending on the type of hub to which the adapter is connected, as follows:
■When the adapter is connected to a hub that supports 10BASE-T Ethernet (10 Mbps), it switches to a network speed of 10 Mbps.
■When the adapter is connected to a hub that supports 100BASE-T4 Fast Ethernet, it switches to a network speed of 100 Mbps.
The bus master drivers supplied with this adapter are compatible with the Fast EtherLink 10/100BASE-TX PCI and EISA adapters. The bus master drivers shipped on the 3C59X EtherDiskâ diskette are compatible with the 3C59X family of adapters; they are not backward-compatible with the 3C5X9 family of EtherLink III adapters.
The computer’s PCI BIOS automatically configures the I/O port address and IRQ. All other required parameters are set to factory-default values.
1-2 CHAPTER 1: INTRODUCTION
The 10/100BASE-T4 PCI adapter connects your PCI-compliant personal computer to an Ethernet network wired with
IEEE 802.3 standard 10BASE-T or 100BASE-T4 twisted-pair cable. For information on the IEEE 802.3 standard as it relates to twisted-pair cable, refer to Appendix A.
The adapter interoperates with all 10BASE-T products and all 10/100 T4 adapters and hub products. It is compatible with 3Com’s SNMP network management software (Transcendâ WorkGroup Manager).
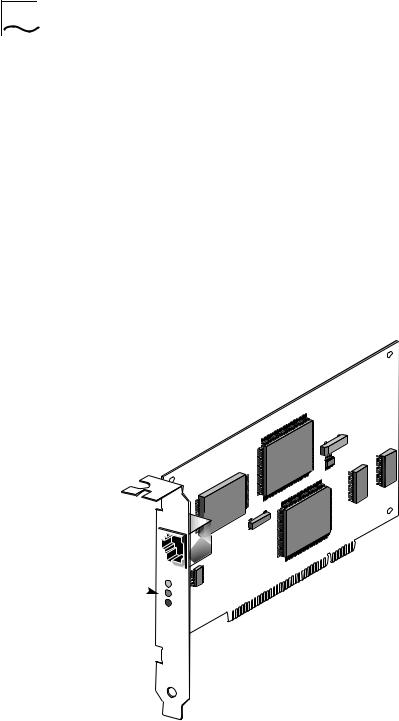
The 10/100BASE-T4 PCI adapter (shown in Figure 1-1) can be installed in any PCI slot, either master or non-bus master. However, the adapter will produce higher levels of performance in a bus master slot.
RJ-45 
 connector
T4
Adapter
LEDs 
|
T4 |
|
L |
ACT |
|
10 |
||
N |
||
K |
100 |
|
|
Figure 1-1 10/100BASE-T4 PCI Adapter
Adapter Features |
1-3 |
Check the documentation provided with the PCI computer to locate the bus master slots.
Adapter Features
The 10/100BASE-T4 PCI adapter provides the following features:
■Parallel Tasking architecture with bus mastering for high throughput and low processor utilization
■Automatic selection of 10 or 100 Mbps network operation
■Single-slot, 32-bit half-card
■Automatic PCI configuration without jumpers
■Three status LEDs, shown in Figure 1-1
■Single shielded RJ-45 connector for use at either speed (2 pair Category 3, 4, or 5 for 10BASE-T Ethernet networks, and 4 pair Category 3, 4, or 5 UTP for 100BASE-T4 Fast Ethernet networks)
■Diagnostic software and drivers on the 3C59X EtherDisk diskette
■AutoLinkä auto installation software, which installs and configures all Novellâ NetWareâ DOS ODI client software on your operating system
■Auto Select Media Type capability, which enables drivers to automatically detect the speed of the media that connects the adapter to the network
■The Desktop Management Interface (DMI), which increases the manageability of PCs by standardizing how information relating to PCs is made available and how it is accessed
The 10/100BASE-T4 PCI adapter can be managed remotely with Transcend PC Link SmartAgentâ software. Driver agents for this adapter are provided on the 3C59X EtherDisk diskette.

1-4 CHAPTER 1: INTRODUCTION
PCI Technology
The PCI local bus is a high-performance bus that provides a processor-independent data path between the CPU in a PC and high-speed peripherals.This interconnect mechanism is designed specifically to accommodate multiple highperformance peripheral devices that support networking and disk subsystems, graphics, full-motion video, and multimedia.
The PCI specification defines two types of PCI devices: a target and a master. A target is a device that accepts commands and responds to the requests of a master. The Fast Ethernet PCI T4 adapter is a bus master device that can transfer information directly to system memory without interrupting the system processor.
The PCI specification supports the following:
■High performance. The PCI bus runs at a clock speed of
33 MHz and employs a 32-bit data bus that supports multiple peripheral components and add-on cards at a peak bandwidth of 132 Mbps, up to an order of magnitude greater than that of other PC buses (ISA, EISA, or MCA).
■Automatic configuration. A PCI adapter has configuration specifications set in on-board memory and provides installation information to the computer at start-up.
■Shared slots. The PCI specification calls for “shared slots,” which denotes the shared expansion backplate slot.This shared backplate slot provides access to one of two types of adapters: a PCI adapter and an ISA adapter, for example, or a PCI adapter and an EISA adapter. Only one adapter at a time can be installed in a shared slot. Manufacturers are currently producing computers that support the PCI bus in conjunction with conventional ISA and EISA buses in the same chassis.
For detailed information about the PCI local bus, consult the PCI specification.
2 |
INSTALLING THE ADAPTER |
This chapter discuses the following topics:
■Inspecting the Fast EtherLink 10/100BASE-T4 PCI adapter
■Installing the boot PROM
■Inserting the adapter
■Connecting to the network
Inspecting the Adapter
Before installing the adapter in your computer, you should visually inspect it for damage that might have occurred during shipment from the factory.
CAUTION: Each adapter is packed in an antistatic container to protect it during shipment. To avoid damaging any static-sensitive components after removal from the container, be sure to reduce any static electricity on your person. One way to do this is to touch the metal chassis of your computer. You can maintain grounding by wearing a wrist strap attached to the chassis.
1Open the shipping container and carefully remove its contents.
The package should contain the following items:
■3Com Fast EtherLink Parallel Tasking 10/100BASE-T4 PCI adapter
■Fast EtherLink Parallel Tasking 10/100BASE-T4 PCI Adapter User Guide
■3C59X EtherDisk diskette (version 5.1 or above)
2-2 CHAPTER 2: INSTALLING THE ADAPTER
2Verify that you have received all items listed in step 1, and inspect each item for damage.
If you find any omissions or damage, contact your network supplier and the carrier that delivered the package.
Installing the Boot PROM
The boot PROM is optional and can be purchased separately. If you are installing it onto the adapter, follow the instructions that accompanied the boot PROM.
Installing the Adapter
This adapter is equipped with a backplate that allows installation of the Fast EtherLink 10/100BASE-T4 PCI adapter in any standard PCI computer with ISA or EISA slots. The slot can be a bus master slot or a non-bus master slot.
To install the adapter into the computer, follow these steps:
1Unplug the computer and disconnect all cables that are connected to the main system unit.
2Remove all jewelry from your hands and wrists.
3Use only insulated or nonconductive tools.
4Remove the computer’s cover and select any of the available PCI expansion slots.
5Insert the adapter in the slot and secure the screw.
The PCI slots in some PCI computers need to be enabled with a special setup program. Refer to your hardware documentation to see if this is necessary.
Install the Fast EtherLink 10/100BASE-T4 PCI adapter only in a PCI slot (see Figure 2-1).

Connecting to the Network |
2-3 |
EISA slot
PCI slot
Figure 2-1 PCI Computer with PCI and EISA Slots
The adapter’s backplate should be flush with the computer’s chassis. Be sure that the adapter’s connector fingers are completely seated in the slot.
6Replace the computer cover and reconnect all previously connected cables.
Refer to the documentation provided by the computer’s manufacturer for details on installing expansion boards.
Connecting to the Network
This section describes how to connect the Fast EtherLink 10/100BASE-T4 PCI adapter to the network.
You must connect the adapter to the network before loading drivers.
The backplate of the Fast EtherLink PCI adapter contains one RJ-45 connector, as shown in Figure 1-1. The adapter automatically senses and switches speed based on the type of hub to which it is connected.
2-4 CHAPTER 2: INSTALLING THE ADAPTER
For both 10BASE-T and 100BASE-T4 Ethernet networks, the Fast EtherLink PCI adapter uses Category 3, 4, or 5 unshielded twisted-pair (UTP) cable. Refer to Appendix A for more information on cabling.
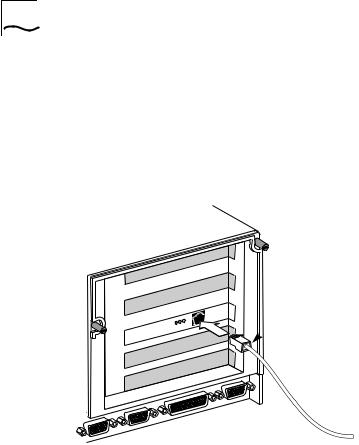
Figure 2-2 shows the backplate of an installed adapter with its RJ-45 connector.
L N K |
T4 |
ACT 10 100 |
T4 |
RJ-45  connector
Figure 2-2 Connecting Twisted-Pair Cable
The Fast EtherLink 10/100BASE-T4 PCI adapter is equipped with an on-board transceiver for connection to twisted-pair cable. To establish a valid 10 Mbps connection, the cable must be connected to a 10BASE-T hub. To establish a valid 100 Mbps connection, the cable must be connected to a 100BASE-T4 hub.
Connect the network cable as follows:
1Make sure that the connector on your cable is wired appropriately for standard 10BASE-T or 100BASE-T4
adapters.

Connecting to the Network |
2-5 |
100BASE-T4 connections use all 4 pairs of wire normally contained in a bundle of Category 3, 4, or 5 UTP cable. The “straight through” connection should be made from the Fast EtherLink PCI adapter through the cable and connectors to the hub. No crossover in the cable is required.
Refer to Appendix A for RJ-45 connector pin assignments.
2Align the RJ-45 connector on the end of the twisted-pair cable with the notch on the adapter’s connector and insert it into the adapter connector.
3For 100 Mbps operation, be sure the connection is to a 100BASE-T4 hub port.
4The next step is to install network drivers, as explained in Chapter 3.
3 |
LOADING THE NETWORK |
|
|
|
DRIVERS |
This chapter describes how to load the network drivers required to let the 3C595-T4 PCI adapter operate with your network operating system. This information is arranged according to the following topics:
■Summary of driver loading procedures
■Using the EtherDisk diskette
■Accessing DOS
■Loading network drivers
Summary of Driver Loading Procedures
Table 3-1 summarizes the driver loading procedures based on the network operating system running on your computer.
Table 3-1 Summary of Driver Loading Procedures
Network Operating System |
Driver Loading Procedure |
|
|
Windows 95 |
Windows 95 will detect the presence of the T4 adapter |
|
and request a driver for it. Refer to the section “Using |
|
Windows 95.” |
NetWare ODI: |
AutoLink auto installation software loads all NetWare client |
client environment |
software, including drivers, if a single adapter is being |
|
installed in a NetWare DOS ODI client. Refer to the section |
|
“One Adapter in a Client” under “Using NetWare ODI.” |
NetWare ODI: |
Load the appropriate server drivers from the EtherDisk |
server environment |
diskette. Refer to the section “One or More Adapters in a |
(versions 3.1X, 4.0X, 4.X) |
Server” under “Using NetWare ODI.” |
DECâ PATHWORKSâ |
Load the appropriate NDIS driver from the EtherDisk |
Banyanâ VINESâ |
diskette. Refer to the section “Loading NDIS Drivers.” |
IBMâ LAN Server |
|
Microsoftâ LAN Manager |
|
Artisoftâ LANtasticâ |
|
Windows NT 3.5x |
Follow the instructions in the README.TXT file on the |
Windows for Workgroups |
EtherDisk diskette. If updating a driver, refer to the |
|
section “Updating NDIS Drivers.” |
|
|
3-2 CHAPTER 3: LOADING THE NETWORK DRIVERS
Using the EtherDisk Diskette
The EtherDisk diskette contains the latest versions of the network drivers available when 3Com shipped the adapter. It also contains other important information concerning Fast EtherLink and EtherLink III adapters and their configuration.
To obtain network operating system drivers not included on the EtherDisk diskette, contact the manufacturer of that network operating system or application. To obtain a list of supported drivers along with software driver updates and patches for the drivers on the EtherDisk diskette, use one of the bulletin board services listed in Appendix D. For example, Document 9071 in 3Com’s automated fax service contains a list of all available drivers and drivers still being developed.
Refer to your network operating system manuals for specific instructions for using the driver with your network operating system.
The drivers on the 3C59X EtherDisk diskette are compatible with the following bus master adapters:
■Fast EtherLink PCI 10/100BASE-T (3C595)
■EtherLink III PCI 10 Mbps (3C590)
■Fast EtherLink EISA 10/100 (3C597)
■EtherLink III EISA 10 Mbps (3C592)
The 3C59X drivers are not backward-compatible with the 3C5X9 family of EtherLink III adapters (ISA, EISA, or MCA).
Accessing DOS
The 3Com program for loading drivers is a DOS-based program that loads network drivers, modifies some adapter parameters, and runs diagnostic tests on the adapter. If you are using an operating interface other than DOS, such as OS/2â or Windows 3.x, and you want to use the EtherDisk diskette to load the drivers, you must exit from that interface before
Loading...